
Mastering Metadata
Learn how to wield the descriptive data embedded in your files to work more efficiently.

This article appears in Issue 5 of CreativePro Magazine.
Metadata. Data about data. It’s useful, and it’s everywhere.
In files created with the Adobe Creative Cloud applications, metadata can be the dimensions of your Photoshop image, the copyright status of your Illustrator artwork, and the keywords of your InDesign document—all kept within those files themselves.
Much of the metadata in your file describes the technical underpinnings of your file and is automatically generated and updated behind the scenes—your apps take care of that for you. But you can and should add other descriptive info yourself, as it makes finding, sorting, and working with files easier.
So, let’s look at a couple different ways to view, add, and edit metadata.
File Info and XMP
The easiest way to view, add, and edit metadata in a Photoshop, Illustrator, or InDesign file is through the File Info dialog box (File > File Info), which is nearly identical for each program (Figure 1). That’s because Adobe developed the Extensible Metadata Platform (XMP) as a universal standard for creating, using, and storing metadata in popular image, video, and document file formats.
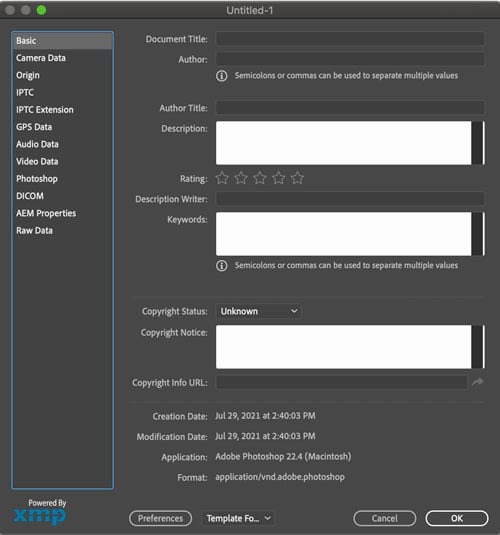
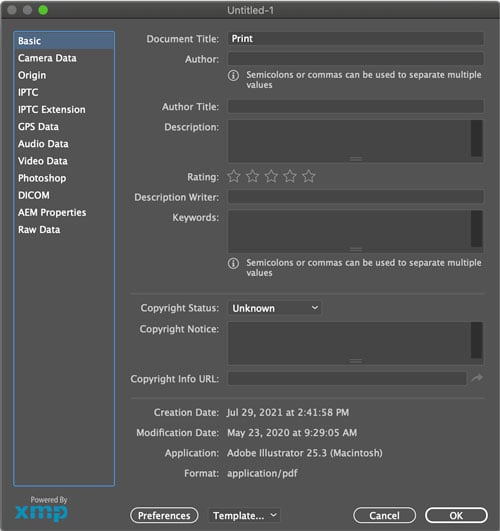
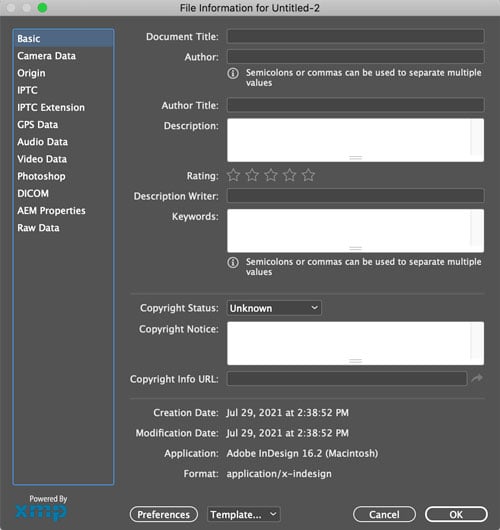
Figure 1. The File Info dialog boxes of Photoshop, Illustrator, and InDesign
When you can scroll through 12 categories on the left side of the dialog box, the corresponding metadata fields and the data for your file appears on the right. In some cases, you can edit this data as well, depending on the program and the document file format you’re working with. For instance, in Photoshop, if you open any image taken with a smartphone, the file will already contain both camera information and shot information in the Camera Data fields. You can’t edit those.
Because the XMP standard applies to so many different kinds of files, you’ll encounter some fields that won’t make a lot of sense for a given file format, as well as some idiosyncratic behavior depending on the program. For example, in InDesign, the Camera Data category will remain blank; you’re working on an InDesign document, after all, not an image document taken with a camera. Nor does linking or embedding images or other media in InDesign affect the metadata information in the INDD document itself.
On the other hand, be warned: Illustrator automatically, and wrongly, inserts the profile of the document (Mobile, Web, Print, Film & Video, or Art & Illustration) into the Document Title field (under Basic, the top metadata category in the list) when the file is created. Not only is this behavior wrong, but when you save the new untitled document with a name, the Document Title field is not updated until after you close and reopen the file.
Keywords that are part of the XMP fields grouped under Basic in an InDesign or an Illustrator file are preserved when a PDF is exported from either of those programs. For those documents that will end up as PDFs on the web (such as this magazine), keywords are crucial for search and discoverability.
What Is XMP, Anyway?
The Extensible Metadata Platform (XMP), developed by Adobe and introduced in the 2005 release of Creative Suite 2, is an international standard for creating, storing, and exchanging information about a file. The data can be stored in a separate, associated file (a sidecar file), but it is far more common and convenient for it to be embedded within the very file it is describing.
If you work at all with database software, you will recognize this data in your file as a single record with a collection of fields. Your Photoshop, InDesign, and Illustrator files will have those common XMP Metadata fields, opening up a world of possibilities for finding information, storing information, and even leveraging that information through automation. For example, this is how InDesign can grab the caption embedded in a placed Photoshop file.
In the File Info dialog box, the fields are presented in 12 groups. Many of the fields allow you to enter metadata information; some will be blank depending on the type of file you’re working with, and some record under-the-hood information about the file and can’t be edited.
- The Basic category is for, as the name implies, basic information about your document, including its title, author, a description, keywords, and copyright information. This information is embedded into PDFs when they are created and can be viewed in Acrobat in the Document Properties dialog box by choosing File > Properties. Search engines will register this information in documents shared online, so it’s a good idea to assign keywords to any document you might want found through a web search.
- Camera Data lists read-only camera information (make, model, owner, and lens information) and shot information (focal length, exposure, pixel dimensions, whether the image is horizontal or vertical, resolution, and whether and how a flash was used). You’ve likely seen the term Exif if you’ve worked with digital photos. That metadata, embedded into your image files by your camera, can be viewed and, where relevant, edited in this panel.
- The Origin category lets you enter data about the file that is useful for news outlets, including when and where the file was created, credit information, transmission information, special instructions, headline information, and a degree of urgency.
- XMP Metadata Fields in the IPTC and IPTC Extension categories come from the International Press Telecommunications Council, an entity formed in the mid-1960s to create industry standards for the interchange of news—in other words, its own metadata. Now largely extinct, these categories live on in XMP and describe photographer contact information, photo caption information, and other image content data.
- GPS Data displays read-only location information received from the Global Positioning System, if the camera capturing the data has that capability.
- Audio Data displays metadata for audio files, including title, artist, album, track number, genre, composer, and engineer, as well as read-only technical data like sample rate, sample type, channel, and duration.
- Metadata for Video Data includes technical data like aspect ratio, frame rate, and dimensions, as well as editable information about the content of the video file.
- The Photoshop XMP category keeps a log of changes made to images with Photoshop. Turn on the History Log preference in Photoshop’s Preferences for the log to be saved with the file’s metadata.
- DICOM (Digital Imaging and Communications in Medicine) is a worldwide standard developed by the American College of Radiology and the National Electrical Manufacturers Association for the communication and management of medical imaging information and related data—think ultrasounds, CT scans, and MRIs, their data, and the medical information associated with the file.
- Data within AEM Properties comes from the Adobe Experience Manager, a content management solution that helps organizations keep track of their content when building web applications, responsive websites, mobile applications, forms, and so on.
- The Raw Data category displays XMP text information about the file.
Adobe Bridge: More Data, More Control
You can also work with metadata in Bridge, Adobe’s free digital asset management program that works hand-in-hand with the other Creative Cloud applications. As in the other apps, you’ll find the now-very-familiar File Info dialog box in Bridge, too. (For an extensive overview of Bridge, see Alan Gilbertson’s article in InDesign Magazine, Issue #139.)
But Bridge also has another feature: the Metadata panel. Not only can you view, add, and edit metadata in your files using the Metadata panel (Figure 2), you can also edit metadata that you can’t access using File Info. For instance, only in Bridge could I edit the GPS metadata settings for latitude and longitude of Lake Pleasant, New York, where I took the shot in Figure 3. In the Metadata panel, you can edit the data of any field that shows a pencil icon.

Figure 2. The Metadata panel in Bridge
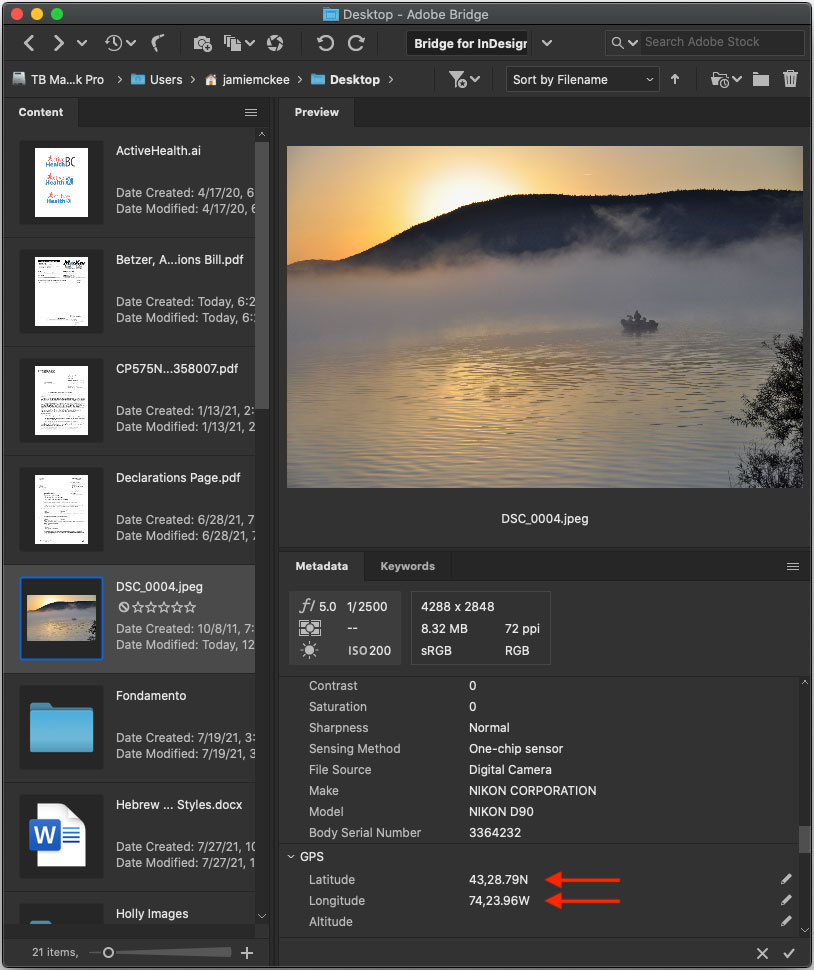
Figure 3. Bridge allows you to edit some metadata that can’t be accessed in the File Info dialog box, such as GPS data.
Bridge offers a dedicated Keywords panel to make working with keywords easier and more robust (Figure 4). Bridge’s keywords support hierarchy and can be imported or exported.

Figure 4. Bridge has its own Keywords panel that can import and export keywords and supports hierarchy.
Finally, another useful aspect of Bridge’s Metadata panel is that for Illustrator and InDesign files, it shows additional properties like Fonts, Linked Files, Document Swatches, and Plates.
Much More Meta

If you want to go really deep with metadata and how it can be used to make print and ebooks more discoverable to potential readers, check out The Metadata Handbook by Thad McIlroy. It gives you a 360-degree view of how metadata is used in book publishing by everyone from publishers, aggregators, and wholesalers to bookstores and libraries. Then it lays out standards and best practices for optimizing your book’s metadata to make it discoverable to all.
Put Metadata to Work
Metadata is ubiquitous—you should make it work for you. Here are a few ways you can use it to create more accurate designs, give your clients work that is more discoverable online, spend less time searching for your digital assets, and even see if your work is being swiped by digital thieves!
Power searching
Bridge—and, for that matter, other digital asset management programs—can make powerful use of metadata in helping you find that one file in your archives. In Bridge, you can even perform a search on various XMP fields or on all metadata.
Metadata templates
You can save yourself the hassle of having to retype the same information for multiple files with a metadata template, which saves the metadata as an XMP file. Once you create a metadata template, you can use it in any of the Adobe programs with an XMP File Info dialog box to import, append to, or replace the metadata of files. You can share this file with others.
You can create a metadata template in multiple ways:
In Bridge, select Tools > Create Metadata Template (Figure 5). Here you can populate the various fields with your own default information, such as your company name, other contact information, and the copyright language. You can append or replace metadata with commands from the Tools menu.
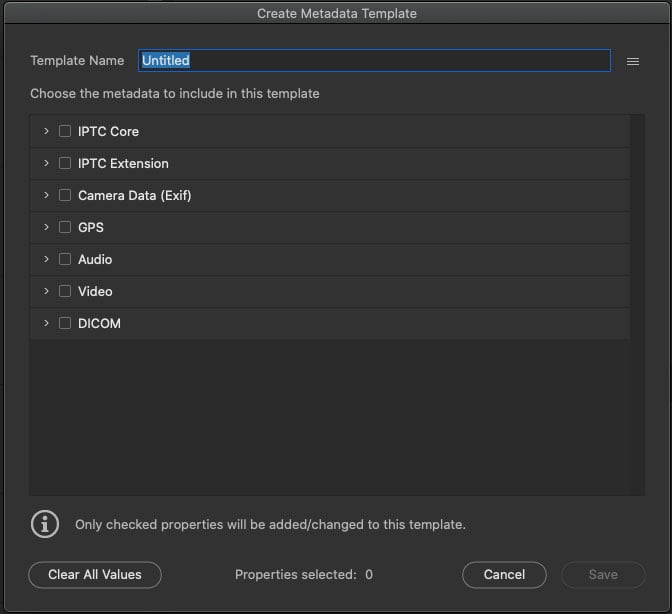
Figure 5. Use Bridge to create metadata templates that other Adobe applications can access.
If you’re already in an XMP File Info dialog box in one of the Adobe applications, you can fill in the pertinent information and choose Export from the Template menu.
You can save metadata template files out of Acrobat from the Properties dialog box (File > Properties). Under the Description tab, click the Additional Metadata button to open a stripped-down version of the XMP File Info dialog box (Figure 6). From the menu in the upper right, you can save the current metadata as a metadata template, delete any of the available templates, or assign an already-saved template.
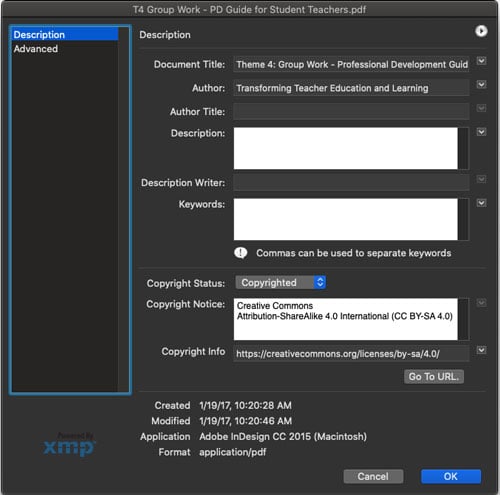
Figure 6. Metadata templates can be assigned to or created from PDFs in Acrobat.
Live captions
Introduced in CS5, InDesign’s Live Captions feature uses the metadata from an imported image file in an automatically generated text frame. These captions are live in the sense that if the metadata changes or if you replace one image with another, the caption text automatically updates.
Strictly speaking, the caption text should be placed into an appropriately designated field in the metadata of the image, such as in the Description field of the IPTC Content category (Figure 7). But InDesign can use any of the dozens of metadata fields to generate captions, which you can then use in creative ways.

Figure 7. InDesign’s live captioning feature is a great use of the power of metadata.
For example, you can create contact sheets that display shutter speed, ISO, or even the brand of camera the image was taken with. (For such an example of live captions, see Pariah Burke’s “Live Captions as Label Makers” in InDesign Magazine, Issue #42.)
Maintaining Metadata in InDesign Exports
InDesign lets you export content to image formats like JPG, PNG, and EPS. Unfortunately, there’s no way to preserve metadata when you export to those formats. But there is a workaround. First, export to PDF from InDesign. Then, open the PDF with Photoshop and export to the image format of your choice, using File > Export > Save for Web. In the Save for Web dialog box, just be sure to select All from the metadata menu.

Keywords applied to the InDesign file

Choose All Metadata in Photoshop’s Save for Web dialog box.

Keywords applied to the JPG file as they appear in Adobe Bridge
Following the digital breadcrumbs
Because of metadata, a few years ago I discovered a company in India was producing books using templates I had created without my permission. I found a PDF with my metadata that proved conclusively a former client was using my work without permission.
Similarly, metadata can protect your digital assets, whether you are a photographer, an illustrator, or a graphic designer delivering work electronically. You can find metadata in vector images, raster art, and InDesign files—and all the source material linked to or embedded in those various documents.
You, too, should be using metadata to protect your work!
Scripts Make Metadata More Convenient
Unsurprisingly, you can find scripts to do even more with metadata. For the following scripts, download the file and place it in your Adobe InDesign > Scripts > Scripts Panel folder. In InDesign, open your Scripts panel (Window > Utilities > Scripts).
The first field in all the XMP File Info boxes is Document Title. Wouldn’t it be great if that information could automatically be added when you name and save your file? The Document Name to Metadata script, posted by super-scripter Kasyan Servetsky in Adobe’s InDesign Support Community, does just that for InDesign. You can download the script here. Double-click the script name in your Scripts panel to populate the Document Title field with the document’s filename.
As a book, journal, and long-document layout specialist, I often set documents that will be kept behind a paywall but with excerpts available for public consumption as PDFs posted on the web. How do you make those files findable when the entire article isn’t visible? Keywords!
I use the Keywords script written by Peter Kahrel to automatically enter these keywords into the Keywords metadata field of the document. Those keywords will come through in a PDF—even an excerpted PDF without all the text. With the list of keywords selected, run the script to populate the Keywords field with the selected text. Keep in mind that semicolons or commas must be used in the selection to separate multiple values.
Things Go Better with Meta
Metadata can seem like a boring topic, until you realize how important it is. Investing a little time to make sure the metadata in your files are complete, accurate, and optimized can help you in numerous ways, so I encourage you to always set aside some time in your workflow for “getting meta.”
Commenting is easier and faster when you're logged in!

Recommended for you

Photoshop Automation
A basic introduction using actions, scripts, and data driven graphics to make yo...

CreativePro Speaker Spotlight: Deke McClelland, the Photoshop Nerd
Well, this is our last post of the 2016 series of posts called Speaker Spotlight...

10 Photoshop Efficiency Tips from CreativePro Week
Use these quick tips to increase your efficiency and enjoyment in Photoshop.