
Mastering Find/Change
The more you understand this unsung hero, the more productive you’ll be!


This article appears in Issue 97 of InDesign Magazine.
Most of us take for granted the ability to search for text in a document—to locate an instance of a word or phrase each time it appears, and then change each found instance to a new word or phrase. This Find/Change feature alone is a lifesaver when you need to quickly and accurately locate and change content in a document. But InDesign, as you might suspect, boasts find/change capabilities far and above a mere exchange of text characters.
You’ve probably used InDesign’s Find/Change floating dialog box, but have you really understood it? Do you know all its ins and outs, so that you can make the most of it? Let’s dive in and explore this powerful, albeit underutilized, feature!
The Find/Change Dialog Box
Let’s start with the basics. The Find/Change dialog box in InDesign can be accessed by choosing Edit > Find/Change or by pressing Command+F (Mac) or Ctrl+F (Windows) on your keyboard. This same shortcut also closes the dialog box. You can use any of four categories of find/change by clicking the tabs located across the top of the dialog box (Figure 1).
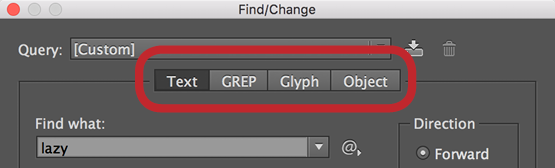
Figure 1: The four tabs of the Find/Change dialog box.
To save time, you can also use the keyboard shortcuts Command+1 through 4 (Mac) or Ctrl+1 through 4 (Windows) to toggle between the four different find/change categories:
Text For finding and changing static text such as literal words and phrases in a document as well as the formatting applied to that text.
GREP For finding and changing text using search patterns with code known as Regular Expressions.
Glyph For finding and changing text based on a particular glyph (character in a font) or Unicode
ID.
Object For finding and changing objects in a document, based on the appearance or formatting of that object.
Now let’s go deeper, focusing on each of these four find/change types.
Text Find/Change
For the most basic find/change operation, make sure that the Text category at the top of the Find/Change dialog box is enabled, and enter the desired text into the Find What and Change To fields.
Tip: To save time, before opening the Find/Change dialog box, you can highlight a word or phrase in the document and press Cmd/Ctrl + F1 to populate the Find What field or Cmd/Ctrl + F2 to populate the Change To field. Keep in mind that if you’re on a laptop, you may need to add the fn key to those key combinations depending on your system settings. You can use copy paste to move text into these fields as well.
During searches, it’s often necessary to find special characters within text. This might include tabs, symbols, and line breaks, among others. If you click on the @ symbol to the right of the Find What or Change To fields, you’ll gain access to many of these elements via a drop-down menu. Simply choose one of these items, and a code representing that special character will be added to the appropriate field (Figure 2).
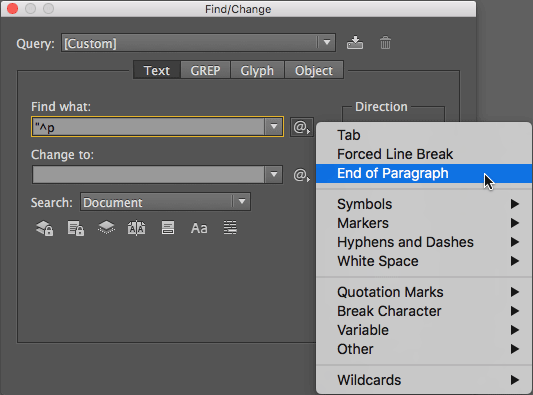
Figure 2: Use the @ symbol to locate unique symbols and characters to use in your find/change query.
Locating and Changing Content
So after you’ve defined what you want to find in the Find What field, press the Find Next button to jump to the first instance of the found content. Press Command+ Option+F (Mac) or Ctrl+Alt+F (Windows) to invoke Find Next even faster.
A recent addition to the Find/Change dialog box in InDesign is the ability to change the direction of your search by clicking the Forward and Backward radio buttons in the Direction section of the dialog box.
Tip: Pressing Command+Option+Return (Mac) or Ctrl+Alt+Enter (Windows) toggles the search direction.
Once you have found the content that you’re searching for, you can click the Change button to change the current found instance, the Change/Find button to change the found instance and move on to the next instance, or the Change All button to change every found instance at once.
It’s important to pay attention to the scope of your search when performing any find/change operations. You can define the scope via the Search drop-down menu—you’ll see up to five options, depending on which tool is active and what you have selected (Figure 3).
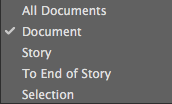
Figure 3: The scope of your search is important.
For example, if the Selection tool is selected in the Tools panel, you have only two available options; but with the Type tool selected and the text cursor in a story, you have a total of five. The available options are as follows:
All Documents Probably the most misunderstood option of the five: All Documents means all currently open documents.
Document Searches all the text stories in the current document.
Story Searches the contents of the story in which your cursor resides.
To End of Story Searches from your current text cursor location to the end of the current story.
Selection Searches only within the currently selected text.
Sharpening Your Search
To fine-tune your searches in InDesign, you can take advantage of 7 icons found in the Find/Change dialog box that provide options for what is searched within a document. These buttons can reduce or expand the limits of your search to find and change exactly what you want.
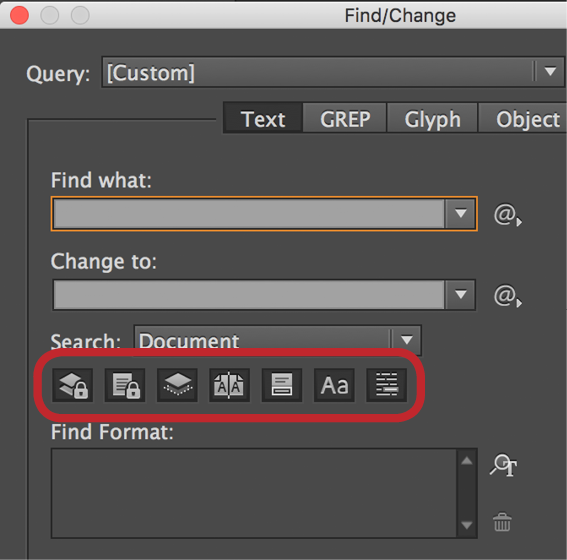
Include Locked Layers and Locked Objects (Find Only) Expands the search to include any layers in the document that are locked. Of course, because the text is in a locked object or layer, InDesign can tell you it found it, but it can’t actually select or change it.
Include Locked Stories (Find Only) This will include any locked text frames or locked stories in the specified search. This is particularly useful in InDesign/InCopy workflows where the stories themselves can be locked (Checked In). Check out this article on InCopySecrets.com for more info. In the case of locked objects, InDesign can’t actually show you where it found the content.
Include Hidden Layers and Hidden Objects This will include any hidden layers or text frames in the search and will show you the location of what’s found via a gray highlighted area. (Hidden objects aren’t locked, so you can both find and change text in them.)
Include Master Pages By default, InDesign will not search content on a master page, but you can include masters in your search with this option.
Include Footnotes If you need to find/change content contained in a footnote, enable this option.
Case Sensitive If you want to find/change only content that matches the search terms exactly, enable this option.
Whole Word To avoid stemming and only find entire words that match your search criteria, enable this option. For example, if you search for and, it will not find the last three letters in the word Greenland.
Finding and Changing Formats
Many folks overlook the ability to find or change the appearance of text using the Find/Change dialog box. In fact, you may find that this has the potential to be one of the most useful features for your day-to-day work. To define format properties for both find and change, click the More Options button in the Find/Change dialog box. A new section appears at the bottom of the dialog box containing two areas: Find Format and Change Format.
As their names imply, these options allow you to find formatting applied to text, and also change that formatting. You can define exactly which text formatting attributes you’d like to find by either clicking the tiny Specify Attributes to Find button or just clicking anywhere inside the Find Format field. Every character and paragraph attribute available can be defined in this dialog box. Similarly, you can define the formatting attributes you’d like to apply to the found text by clicking the same button to the right of the Change Format section (or just click in the field itself).
This is important: You don’t have to enter any text in the Find What and Change To fields! You can perform a find/change based solely on the formatting attributes of the text. In Figure 4, you’ll see that we’re searching for any text in the Body paragraph style with italic manually applied to it.
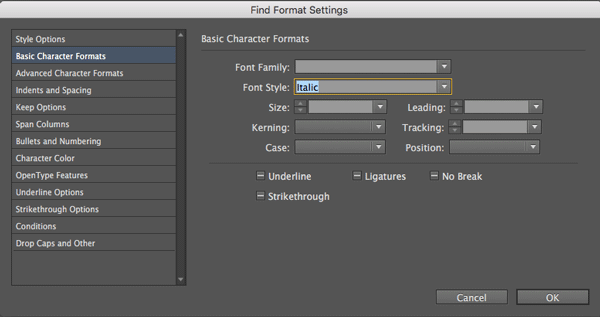
Figure 4: A search to replace manually applied italics with a character style

When that text is found, a character style called Italic is applied to the found text. This is a common solution for properly styling text imported from Microsoft Word. Performing this find/change operation ensures that the italic formatting in the character style will be retained. This is outlined in more detail in this article on InDesignSecrets.
There’s really no limit, though. Any attribute can be found and changed via the Find/Change dialog box—even text language, as Anne-Marie Concepción pointed out in this article.
GREP Find/Change
The second tab along the top of the Find/Change dialog box is GREP. You can think of GREP as “Find/Change on steroids.” GREP uses character combinations called Regular Expressions to find patterns within text. For example, where the Text tab can find the word “apple,” the GREP tab can find a pattern such as “all words that begin with a and end with e” or “all words that are 5 letters long.” GREP is not new to InDesign, it’s been around since the CS3 days, and it allows you to perform amazing searches that are impossible any other way!
At first glance, the GREP find/change looks exactly like the text find/change—so much so that you may find yourself accidentally performing a search in the wrong category on a regular basis! What sets GREP apart from the standard text find/change is the terms used in the Find What and Change To fields. Instead of searching for static text, GREP allows you to search for patterns of text using special codes called expressions. Don’t worry, you don’t have to memorize these expressions; InDesign can often insert them for you!
GREP Templates
For some examples of GREP find/change that you can try out in a hands-on manner, check out the March 2017 Template Essentials, GREP Queries.
Here’s a situation that you may encounter, that illustrates the power of GREP. Someone has created a numbered list where the text (including the number, period, and space) have been typed out manually instead of using the numbered list feature in InDesign. To fix this, you need to remove the number, period, and space, and then apply a style that adds the numbering automatically. In Figure 5, I’ve enabled my hidden characters so you can see what we’re dealing with.

Figure 5: A list with manual numbering
To find this information, we’ll open the GREP tab in the Find/Change dialog box. Click in the Find What field to insert your cursor. Now click the @ symbol to the right of the Find What field; you’ll see a plethora of options to search for. For this example, I’ll go to the Wildcards submenu and choose Any Digit… and InDesign inserts d in the Find What field for me. (d is the GREP code for a digit.)
Click the Find Next button to test your search; you’ll notice that it finds every digit, including any digits that might appear in other locations in your text. So let’s fine-tune our search a bit. With your cursor placed after the d that you just inserted, click the @ symbol again, and choose Repeat > One or More Times. This adds a + sign after the d, indicating that there could be more than one digit in a row. This will account for double digits, triple digits, and so on. See how smart GREP is?
To fix the numbered list problem, you need to look for digits followed by a period. But you can’t just type a period in the Find What field, because that is a “reserved” character; it’s the GREP symbol for “any character”! To find a literal character like a period using GREP, you need to precede the character with a backslash (), also known as “escaping.” So after the + sign, type . to set your search to find a literal period.
Finally, in our numbered text example, each period is followed by a space. So after the . that you typed, click the @ symbol, and choose Wildcards > Any White Space. This adds s to your GREP search to include a white space after the period. So your complete search will now be d+.s, which is GREP code for “find a string of one or more digits followed by a period, followed by a single whitespace character.”
Click the Find Next button a few times; you should see that each time you do, the next number instance in your list is highlighted. No other digits in your text will be highlighted, because InDesign is using GREP to look for a very specific sequence of characters. However, if you do encounter a situation where the search matches numbers elsewhere in your text, you can get more creative, and specify only numbers that appear at the beginning of a paragraph. To do this, put your cursor at the beginning of your GREP search, click the @ symbol, and choose Location > Beginning of Paragraph, which adds the ^ symbol to your search, so it’s now ^d.s Now, only numbers at the beginning of a paragraph will be found (Figure 6).
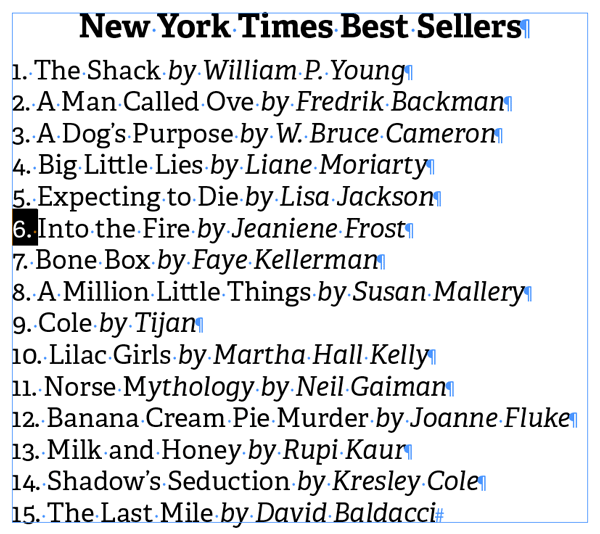
Figure 6: With GREP, you can match only numbers occurring at the beginning of a paragraph.
Leave the Change To field blank. Then click the Change Format button to open a dialog box where you can specify a paragraph style that includes automatic numbering (Figure 7).

Figure 7: A GREP query to remove manual numbering and apply a paragraph style that includes automatic numbering
Click the Change All button to remove the digits, period, and space at the beginning of every numbered list item and apply a paragraph style that uses the numbered list feature to number the items. This makes it incredibly easy if you need to insert a new item anywhere in the list, as the auto numbering will renumber the items, well, automatically (Figure 8).

Figure 8: A properly styled numbered list
Alignment Assistance
Struggling to get list numbers to decimal align as shown in Figure 8? Check out this post for a foolproof method.
Glyph Search
The third tab across the top of the Find/Change dialog box is the Glyph search. It’s also one of the less-understood and less-used options in the Find/Change dialog box. The Glyph search provides a way to search for specific glyphs (characters) within a given font. Not only can you search visually for a glyph, but you can also search for a glyph based on its glyph ID (GID), character ID (CID), or Unicode value. Not sure what these things are? Check out this post by David Blatner at InDesignSecrets.
Here’s a practical example of how you can use a Glyph search to make your life a bit easier. In Figure 9, you’ll see that in the text, there are typographer’s quotes as well as straight quotes.

Figure 9: Text with typographer’s quotes and straight quotes
In a standard text search, if you enter a quote character in the Find What field, you’ll notice that the search finds both the typographer’s quotes and the straight quotes. In this case, you want to change the double straight quotes to single, straight prime marks (“foot” marks).
This is where the Glyph search really shines. The first step is to find the glyph that you want to search for. This is easily done by opening the Glyphs panel (Type > Glyphs) and then selecting one of the double straight quote characters in the text. This highlights the character in the Glyphs panel automatically. Right-click on the selected glyph in the Glyphs panel, and choose Load Glyph in Find (Figure 10).

Figure 10: Using the Load Glyph in Find command to populate the Find Glyph field
This automatically populates the Find Glyph property in the Find/Change dialog box (opening the Find/Change dialog box if it isn’t already open).
Now find the single prime glyph in the Glyphs panel, right-click on that glyph, and choose Load Glyph in Change. Again, InDesign automatically populates the Change Glyph section with the appropriate glyph (Figure 11).

Figure 11: Double straight quotes defined in the Find Glyph field and single prime marks defined in the Change Glyph field.
Define the scope of your search, and then click Change (or Change All) to change the double straight quotes to the appropriate single prime marks (Figure 12), and you’re done!

Figure 12: Double straight quotes are changed to single prime marks.
Glyph searches are uniquely powerful for finding certain characters in your text. Steve Werner wrote up a great article here on how to take advantage of the Glyph search when dealing with foreign language text.
Object Search
All of the options that we’ve discussed so far deal with searching for text and text formatting. The fourth tab across the top of the Find/Change dialog box is different: it lets you search your document based on the type and visual appearance of an object. Take the layout in Figure 13.
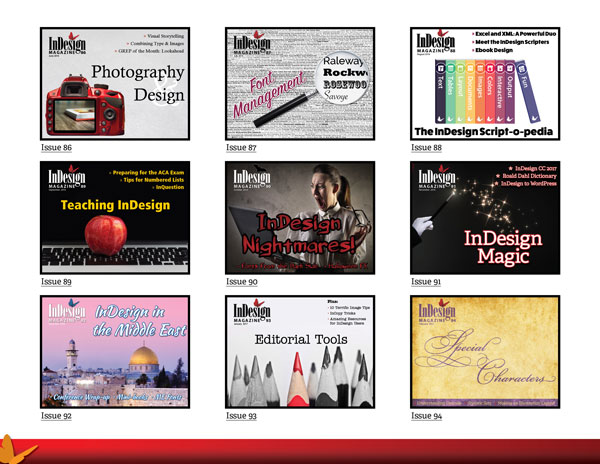
Figure 13: A layout showing objects on a page with a 3 pt stroke applied to each of them
This is a page from a layout showcasing the covers of all the issues of InDesign Magazine. When this document was built, a 3 pt stroke was applied to the frame for each cover image. Now, as you look at the document, you decide that the stroke is too wide, and you’d like to reduce it.
You’re probably thinking, “Why didn’t they just use an object style?” That’s a valid point, but in reality, this situation happens all the time. It’s the difference between best practice and common practice. So you could go through page by page, selecting all of the frames and adjusting the stroke accordingly, and if you enjoy repetitive tasks and get paid by the hour, you should probably do it that way. But if you want to make this change quickly and accurately, the Object find/change is the way to go!
Click the Object tab at the top of the Find/Change dialog box, and make sure that all options are visible (if you see the More Options button, click it). Then click anywhere inside the Find Object Format field (or click the tiny Specify Attributes to Find button) to display the Find Object Format Options dialog box (Figure 14).
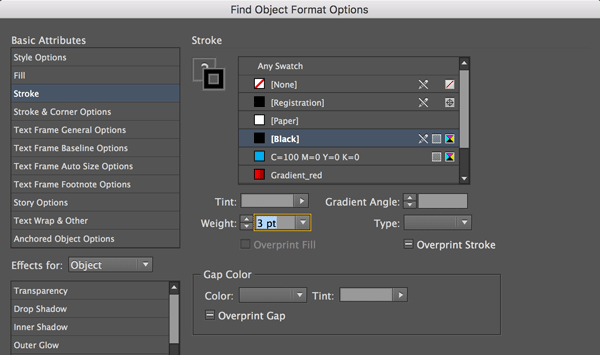
Figure 14: Find Object Format Options set to find any object with a 3 pt black stroke
To follow this example, click the Stroke option in the Basic Attributes section, and then click the Black swatch. Next, in the Weight field, enter a value of 3 to instruct InDesign to find every object with a 3 pt black stroke applied to it. Click OK. Now click the Specify Attributes to Change button (or just click anywhere in the Change Object Format area) and define the new properties of the found object(s).
Actually, if you want to be smart about it, first create an object style that defines how you want the frames to look, and then choose the object style by clicking Style Options option under Basic Attributes, and choosing the object style that you’d like to apply.
To limit your search to a specific type of frame, you can choose the appropriate option from the Type drop-down menu in the Find/Change dialog box. In this example, you could choose Graphic Frames to find only graphic frames with a 3-pt black stroke applied, and make sure that the scope was set to Document. Click Change All, and watch as InDesign changes all of the frames in the document to the appearance that you specified (Figure 15).

Figure 15: Options defined in the Find/Change dialog box (top). The layout after changing the properties, with a thinner red stroke applied to the objects (bottom).
As you can see, using the Object tab can save you a huge amount of time, so be sure to try it out a few times on your own. That way you’ll be ready the next time you need to adjust the formatting throughout your document (or even across multiple open documents).
Saving Your Searches
For searches that you perform on a regular basis, it’s helpful to save them so you can reuse them later on. This is especially important for GREP searches, which can easily get quite complex. Each of the four search types can be saved by simply defining your Find and Change terms inside the Find/Change dialog box, and then clicking the Save Query button. In the Save Query dialog box, give your search a descriptive name, and then click OK.
Your saved query (search) will now appear in the Query drop-down menu at the top of the Find/Change dialog box. This drop-down menu is divided into four sections, each one correlating to a type of search. From top to bottom, you’ll see Text, GREP, Glyph, and Object searches (Figure 16).
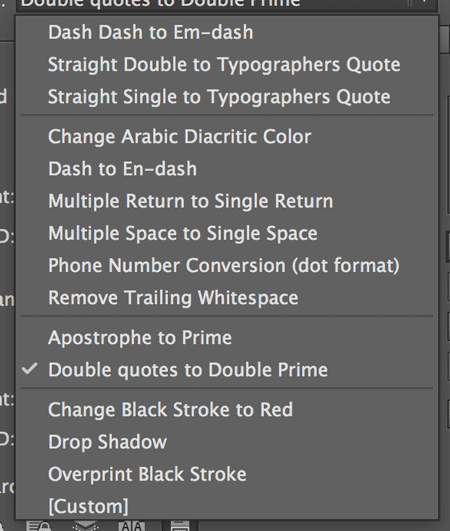
Figure 16: Saved queries (including some that come with InDesign) appear in the Query drop-down menu.
Simply choose the option you want to perform from the Query drop-down menu, and then proceed as usual.
Performing Multiple Find/Change Operations
In many workflows, it’s necessary to run multiple find/change operations on a regular basis. This could be due to the fact that text is supplied in a less-than-stellar format, or the style of the supplied text doesn’t match your company’s style. Regardless of the reason, it’s annoying to have to run the same find/change queries repeatedly, one at a time. Fortunately, there are solutions that let you run more than one query in a row. Following are several helpful examples.
Find/ChangeByList
Every copy of InDesign comes with a script called FindChangeByList. This script allows you to define multiple find/change queries that are performed when the script is executed. To see the script, choose Window > Utilities > Scripts. Within the Scripts panel, click on the disclosure triangle to open Applications > Samples > Javascript. Within that folder you’ll see the FindChangeByList.jsx file as well as a folder called FindChangeSupport that contains a file called FindChangeList.txt (Figure 17).
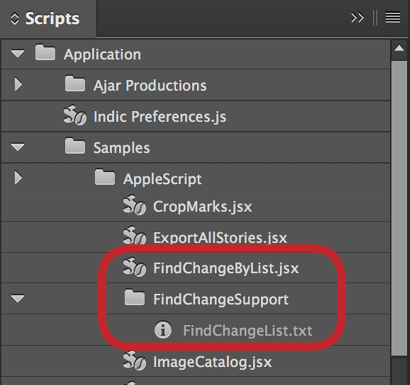
Figure 17: The FindChangeByList script and its supporting text file in the Scripts panel
When you execute the FindChangeByList.jsx script, it executes the instructions found in the FindChangeList.txt file.
To define the find/change routines that the script will perform, right-click on the FindChangeList.txt file and choose Reveal in Finder (Mac) or Reveal in Explorer (Windows) to display the location of the file on your computer. Open the .txt file in a text editor to edit the contents of the file. This text file provides instructions at the top of the file for how to set up your searches, but there are also nine defined searches at the very bottom of the file that already work when the script is run (Figure 18).

Figure 18: The contents of the FindChangeList.txt file
Essentially, you define the type of search, what you want to find, what you want to change to, and the various properties for each search. You can add and/or remove the prebuilt searches that are provided and, more importantly, create your own searches for your particular requirements. Note: You can define all search types in this text file except for object searches. Once you’ve edited the file to your liking, save the file, and then run the script from within the Scripts panel; all of the find/change queries defined in the FindChangeList.txt file will be executed in the open InDesign file.
Multi-Find/Change
If editing text files isn’t your cup of tea, but you still need the ability to run multiple find/change routines at a time, then you’ve got to check out Multi-Find/Change by Automatication. Multi-Find/Change is an extension for Adobe InDesign that provides an intuitive interface to run multiple find/change queries at a time (Figure 19).

Figure 19: Multi-Find/Change
At $49.95, Multi-Find/Change is worth its weight in gold! For a full description of using Multi-Find/Change, see “Cleaning Up White Space Problems” in issue 84.
ChainGREP
If all you need is the ability to run multiple GREP queries at once, check out ChainGREP. This free script allows you to select multiple GREP queries and save them in a Javascript that you or someone else can run with just a double-click. You don’t need to know anything about scripting to use ChainGREP, and the scripts you save are entirely self-contained, so you can share them with your co-workers and not have to worry about distributing your queries or any other resources. To read all about ChainGREP, check out this post.
A Change for the Better
We live in a world of imperfect documents. Despite our best efforts, we still find two spaces after a period, multiple returns between paragraphs, multiple tabs in a row, and a slew of other text anomalies that need to be fixed. Fortunately, InDesign provides us with powerful tools that help us to fix these problems with the click of a button (or two).
Tons More Find/Change Tips
Commenting is easier and faster when you're logged in!

Recommended for you

Limiting Matches with GREP in InDesign
Peter Kahrel shares a technique for targeting a specific instance in a repeating...

How to Find and Fix Partially Italic Words with GREP
You can banish incomplete italics fast with Find/Change and the clever use of a...

GREP of the Month: Email Addresses
Learn how to automatically format email addresses when applying a paragraph styl...