Masking Artwork in Illustrator
Create clipping and opacity masks to fill your artwork with anything

Masks are an essential tool in Illustrator because they enable you to conceal parts of your artwork, which opens up all kinds of creative possibilities. Applying a mask is like placing a frame with a matte over your artwork. You’ll be able to see what’s inside the mask’s boundary, while everything outside its edges is hidden. I use masks in Illustrator anytime I need to fill a shape with something other than a color, pattern, or gradient. Here are some basics to get you started masking art in Illustrator with clipping masks and opacity masks.
Making a Clipping Mask
You will need some artwork and a shape to use as a mask. Any shape will work – including live text – and you can set the fill to none to see the artwork underneath as you create and position the mask. You can mask anything that’s visible on an artboard including paths, text, and raster images. When drawing your mask with the Pen or Pencil tools, be sure to close the path. Next, make the mask shape the topmost object by choosing Object > Arrange > Bring to Front from the menu or use Cmd/Ctrl+Shift+] keyboard shortcut. Finally, select everything and choose Object > Clipping Mask > Make or press Command/Ctrl+7. Magic! Your artwork is now showing through the top shape. Notice that any fills or strokes applied to the mask are reset to none. Read on to learn how to change this.
Masking while you draw
Another way to create a mask is by changing Illustrator’s Drawing Mode to Inside. To do this, select a closed shape, then press Shift+D twice. You can also click the Draw Inside icon near the bottom of the toolbar:
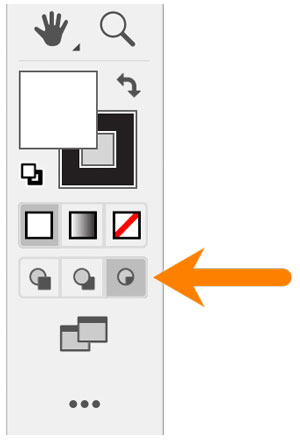
Figure 1: The Drawing Mode
icons in the toolbar, with Draw Inside selected.

Figure 2: The selected outer star is a clipping mask with a fill and stroke. The dotted corner frames show that the Drawing mode is set to Inside.
Formatting a Clipping Mask
Once you create a clipping mask, it is combined with the artwork into a Clip Group. View it in the Layers panel and note that the mask itself is the top object in the group. You can drag artwork from other layers underneath a clipping mask in the Layers panel to add it to the clip group. To format your mask, first select it in the Layers panel or with the Direct Selection tool. Now, you can modify its fill and stroke. The stroke will appear above the masked artwork, and fill will appear below, as a background color for everything within the mask.
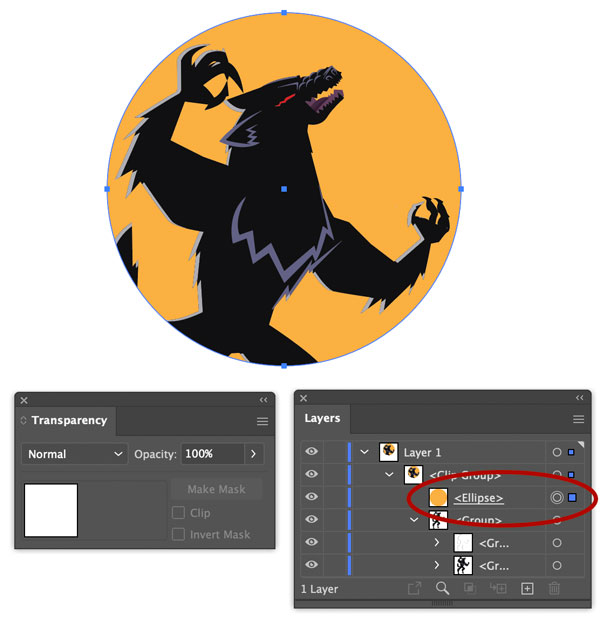
Figure 3: With the clipping mask selected in the Layers panel, you can modify its fill and stroke.
Making an Opacity Mask
Opacity masks offer a more sophisticated an alternative to the all-or-nothing approach of a clipping mask. They enable you to selectively hide and show artwork inside their boundaries using shades of gray, from black to white. In this way, you can create smooth transitions from opaque to transparent. To make an opacity mask, first create a shape and fill it with the default black-to-white gradient. You can do this in one step by typing the period (.) on your keyboard with the object selected. Next, place the gradient-filled shape on top of your artwork and select both items. Open the Transparency panel by choosing Window > Transparency, then click the Make Mask button in the panel. The Clip option in the panel is turned on by default so the shape also acts as a clipping mask. You can turn this off, while retaining the opacity effects.
More Masking Tips
- Before you attempt to modify the mask or the artwork it’s linked with, be sure you have the right thing selected by clicking the appropriate thumbnail in the Transparency panel.
- Option/Alt-click the mask thumbnail to edit its fill without seeing the art underneath.
- Click Invert Mask to make lighter shades more opaque and darker ones more transparent.

Figure 4: The Transparency Panel with the mask selected for editing and inverted.
- Use the Gradient tool and panel to change the effect of an opacity mask.

Figure 5: You can modify the shape, position, and angle of an opacity mask with the Gradient tool and panel.
- In the Layers panel, opacity mask groups have an underline.

Figure 6: You can tell a group is acting as an opacity mask by an underline in the Layers panel.
- Unlike a clipping mask, the opacity mask itself can only be selected from the Transparency panel, and when active for further editing it will be displayed by itself in the Layers panel, which can be confusing if you don’t understand what’s going on.

Figure 7: When a mask is targeted in the Transparency panel, it’s the only thing visible in the Layers panel.
Commenting is easier and faster when you're logged in!
Recommended for you

Illustrator Downloadable: Tropical Shadow Overlay Kit
Downloadables are an exclusive benefit for CreativePro members! (Not a member ye...
Illustrator Downloadable: Summer Citrus Pattern Set
Downloadables are an exclusive benefit for CreativePro members! (Not a member ye...
InDesign Downloadable: Tables SuperGuide
Downloadables are an exclusive benefit for CreativePro members! (Not a member ye...


