
Making the Trip Easy with the Location Manager


Most iBook and PowerBook users have two, maybe three, primary locations where they use their laptop-at home, at the office and on an occasional road trip. Each of these locations undoubtedly has different specifications. For example, unless you’re a major gearhead, you probably don’t have a network in your home. Therefore, while you’re at home you wouldn’t need to load network or file-sharing software. And while your coworkers have decided that it’s best for your health to not have sound at work, there’s no reason why you can’t pump up the volume at home. While you can quickly go in and make most of the changes within a few moments, you can save those moments (and they add up) by setting up the Location Manager utility. With this software, you can set specific system settings for each location. The application allows you to go from place to place without spending undue time reconfiguring your laptop’s settings, such as networking, printers, file sharing, sound volume, extension sets and even applications to launch. In this article, we’ll explain how the Location Manager software can make your mobile computing more productive.
Tip: When working with the Location Manager, it’s important to understand that it doesn’t store much of the information you use to define locations. Instead, it relies on the individual configuration setting for that item. So for instance, the utility doesn’t store your IP address. Instead it just refers to the TCP/IP configuration that contains these numbers.
Scouting Out a Location
When you choose the Location Manager from the Control Panels folder, the dialog box shown in Figure A appears. By default the utility has two locations already created-a Home location and an Office location. We’ll start off working with the Home location to add something simple like our default printer. To do so, select the item in the Settings list box and note the information listed in the Values area, as shown in Figure B. If the wrong printer is listed for your Home location, open the Chooser and select the correct printer. Then, after you close the window, click the Apply button to make the change. When you’ve finished, the Default Printer option is activated.
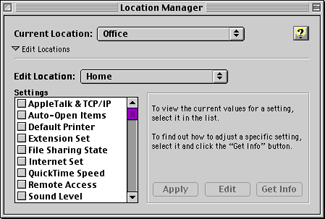
Figure A: The Location Manager resides in the Control Panels folder.
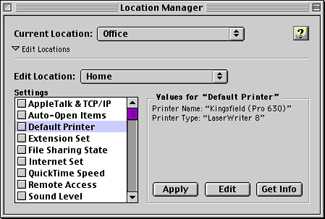
Figure B: Your printer settings appear in the Values information area.
As you can see, setting the Default Printer setting is relatively easy. Now, let’s go to the next step and create networking settings for both the Home and Office locations (the system settings can be created independently of the location configurations). To do so, select the AppleTalk & TCP/IP setting and then click the Edit button. When you do, the message box shown in Figure C appears. From here you can open both the AppleTalk and TCP/IP control panels. (Also make particular note about the Apply warning. It isn’t fun to go through the process only to find out you have to start over.) Now, click the Open AppleTalk button and then when the dialog box appears, select the appropriate means to connect to your network from the pop-up menu.
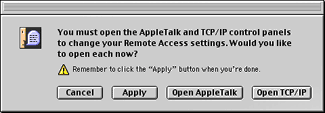
Figure C: You can open the control panels without a trip to the Apple menu.
Then choose File > Configurations. Unless you’ve previously created configurations for your network, the Active Configuration will be set at Default, as shown in Figure D. Strangely, you’ll notice that there’s no New or Create button-to create a configuration, you need to click the Duplicate button and rename the configuration At Home Networking. Click Done to return to the AppleTalk dialog box and configure the control panel for your office network setting. Again, choose the Configuration command, saving the setting in the process, and then click the Duplicate button. Name this setting At The Office Networking. Finally, choose the At Home Networking configuration and click the Make Active button. Dismiss the Configurations dialog box by clicking the Done button and then quit the AppleTalk control panel.
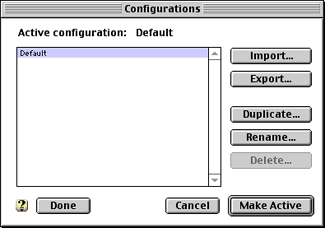
Figure D: To create an AppleTalk configuration, you’ll need to duplicate and then rename the Default.
Since AppleTalk is only part of your PowerBook’s networking options, you should follow these same steps to create similar configurations in the TCP/IP control panel. Now, when you return to the Location Manager and select the AppleTalk & TCP/IP option in the Settings list box, you’ll see the two home configurations in the Values area, as shown in Figure E. (Be sure to click the Apply button!)
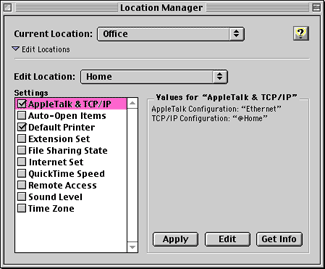
Figure E: Your new AppleTalk & TCP/IP settings appear in the Values information area.
Configuring the Extensions Manager
The only other system setting that you may find a bit bewildering to configure is the Extensions Manager. This is, however, by far the most important system setting you can make with the Location Manager. That’s because selectively deactivating extensions that you don’t need at a particular location frees up valuable RAM. To create a set of extensions for your home and office settings, launch the Extensions Manager and then choose New Set from the File menu. Name the new set At Home Extensions and then scroll down the list of extensions and control panels deactivating any of the items you don’t need at home.
Once you’re satisfied with the extension set, simply create another set and name this one At The Office Extensions (don’t worry, the Extensions Manager saves the At Home Extensions set automatically). Then deactivate the items you don’t need at the office. (If you notice that you turned off an item in both the home and office settings, you might consider tossing that extension out altogether.) Now, from the Selected Set pop-up menu, choose At Home Extensions, then return to the Location Manager and click the Apply button to add it to the setting for the location.
Now the Easy Stuff
The other location settings are more intuitive to configure. For instance, if you double-click on the Auto-Open Items option in the Settings list box, the Location Manager displays the standard Open dialog box, as shown in Figure F. You then simply navigate to the file or application you wish to open upon startup and then click the Open button. You can have numerous Auto-Open Items in any particular setting.

Figure F: Select the file or program you wish to have the Location Manager automatically open upon startup.
To set the File Sharing portion of the Location Manager for your home setting, click the Edit button and then open the File Sharing control panel and turn off file sharing (unless of course you’re on a network at home). Then, close the control panel, return to the Location Manager, and click the Apply button to add it to the settings. Similarly, set the Sound Level, Internet Set, QuickTime Speed, Remote Access and Time Zone items in the same manner.
It’s important to note that you don’t need to add an item to a location setting unless you need to change the settings between different locations. For example, if you live and work within the same time zone, there’s really no need to add a Time Zone setting to either the At Home or At The Office location settings. Furthermore, if you want to auto-open the same files or applications at both locations, it’s easier just to add aliases of those items to the Startup Items folder (in your System Folder).
To the Office and Beyond
Now that you’ve created your first location setting, choose File > Save Location and then create a location set that matches your needs at the office. You can also include an additional location setting for traveling. While you’re creating a location, you might find some options that aren’t available. For instance, if you’re creating the locations at home, you won’t be able to access the Ethernet network at your office. As long as you’ve set the options as one of the item’s configuration settings, there’s no problem. Just set as you normally would.
Launching a Location
The Location Manager includes three different ways to switch locations. Before you close the application, you can choose the Preferences command from the Edit menu. The Preferences dialog box, shown in Figure G, lets you display a dialog box at startup that prompts you to choose a location.
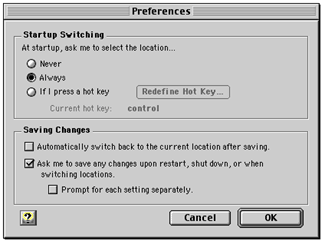
Figure G: You can have the Location Manager prompt you for the proper location setting.
We’ve found the Always option the most beneficial since it reminds us to switch the location settings. Choosing this setting, however, doesn’t mean that you always have to be there during the startup process. If you turn on your laptop and then leave it unattended, the Location Manager displays a dialog box asking you which setting you wish to use for a few moments. If you don’t make a choice, it assumes you don’t want to change the location and sets the location using the last location you chose.
You can also switch locations either by choosing the Location Manager module from the control strip or by choosing the setting from the Current Location pop-up menu in the Location Manager application itself, as shown in Figure H. When you switch a location, a dialog box pops up and displays the status of each of the system changes, as shown in Figure I. This same dialog box informs you of any problems that occurred during the switch.
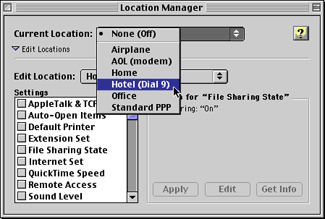
Figure H: You can launch a location setting from the Location Manager application.
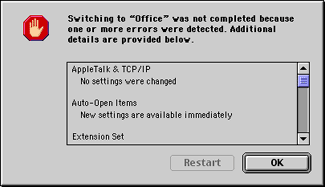
Figure I: The Location Manager updates you through the switch of locations.
No Module for You?
If you’re unable to find a specific module that does what you need, don’t fret-use AppleScript and the Auto-Open Item module. Simply create a script that performs the function you need and save it as an application. Then use the Auto-Open Item module to open the script at startup. You can also use AppleScript to launch a location with the following script. Simply replace theLocation with the name of the location you want the AppleScript to launch.
tell application “Location Manager”
set current location to location “theLocation”
end tell
Making Things Easy on Yourself
Separately none of the items that the Location Manager controls would take much time to change manually. But together, it can amount to several hours a year. By using the Location Manager you can save this time for other, more interesting diversions.

Copyright © 2000, Element K Content LLC. All rights reserved. Reproduction in whole or in part in any form or medium without express written permission of Element K Content LLC is prohibited. Element K is a service mark of Element K LLC.
This article was last modified on January 6, 2023
This article was first published on November 27, 2000
Commenting is easier and faster when you're logged in!

Recommended for you

New Autoprice Software For InDesign CS4
Meadows Publishing Solutions (MPS) announced the release of their AutoPrice plug...

InDesign GREP Essentials: How to Add, Delete, and Re-Arrange Text
This article is part of a series of posts on using GREP in InDesign for beginner...

Is Mac or PC Better for Graphic Designers?
The reason many designers gravitate to Macs is mostly a matter of tradition, not...