


Here’s a little holiday project for you: take a break from your usual work to design and make a paper ornament to decorate your tree, cubicle, rearview mirror, etc. It easy, kinda fun, and you get to play with shapes and transform them.
If you just want to print out the ornament or customize it with your own images, you can download this snippet file and open it with any version of InDesign or later. If you’d like to learn how to make it from scratch, read on!
First, a little math.
What? Math? You just said this was going to be fun.
It is fun to fold shapes, but it’s more fun if you know why they fit together.
There is a branch of geometry called solid geometry that deals with 3-dimensional shapes. You might remember it from your school days if you ever had to use formulas to calculate the surface area or volume of a sphere, cone, cube, prism, etc. One topic in solid geometry is “nets”, or 2-dimensional shapes that when folded become solid 3-dimensional shapes. Two InDesign features are great for this: Step and Repeat and Flip.
To illustrate what a net is, here’s a nifty little app that lets you fold and unfold nets with a slider. You can also click and drag to rotate the shapes and view them from any angle.
So for our ornament project, we’ll make an octahedron (like two pyramids stuck together at their bases).
To begin, create a triangle. It doesn’t need to be any specific size, but it does need to be an equilateral triangle.

A whaa….?
Sure, you remember David’s post on how to create equilateral triangles, right?
When you’re sizing the triangle, just make sure that you can fit at least 4 copies across your page and 3 copies from top to bottom.
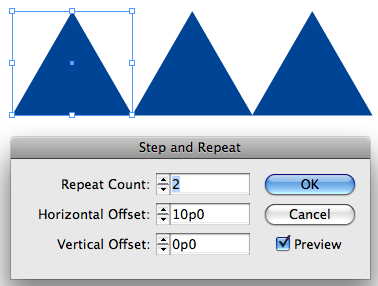
Now to make the net. With the triangle selected, choose Edit > Step and Repeat. Make the horizontal offset the width of the triangle, the vertical offset zero, and the count 2.
Select all three triangles and choose Step and Repeat again. This time make the horizontal offset half the width of one triangle, vertical offset zero, and count 1.

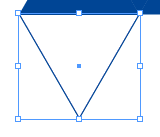
Now in the Control panel, make the proxy any of the middle points ![]() and then press the Flip Vertical button
and then press the Flip Vertical button![]() . You now should have six perfectly interlocking equilateral triangles. Nearly a net.
. You now should have six perfectly interlocking equilateral triangles. Nearly a net.

Select the original triangle. In the Control panel, make the proxy any bottom point ![]() , hold Option/ALT (to copy the triangle) and press the Flip Vertical button.
, hold Option/ALT (to copy the triangle) and press the Flip Vertical button.

Select the last triangle on the right, and again hold Option/ALT and press Flip Vertical.

Wait a minute, why did that work? I thought the proxy was at the bottom…
Yep. It was, but when we flipped the three triangles, they stayed flipped. That is, InDesign remembered what the bottom used to be and flipped the triangle around that axis. Make sense? You can tell by looking at the Flip State and proxy icons in the Control panel.
![]()
![]()
Bonus tip: You can right-click on the Flip State icon to clear transformations. Don’t do that now, just save that trick for future reference.
![]()
OK, now we need to make InDesign “forget” some triangles were flipped to make it easier to orient the photos we’ll place in them. To do that, draw any shape so it fits within a flipped triangle (the ones that point to the bottom of the page).

Then select both shapes and choose Object > Pathfinder > Add. Since the smaller shape was on top, its orientation (and its stroke/fill) is used for the merged shape.
![]()
Repeat for the other three flipped triangles. OK, now we have the eight sides of our octahedron/ornament.

The next thing to do is fill them with colors or photos. If you place photos, you will have to rotate them so the tops and bottoms all match up when you fold the ornament together. Here’s a little cheat sheet for the rotation angles.

Make yourself an InDesign Secrets ornament.

Or a Creative Suite ornament.
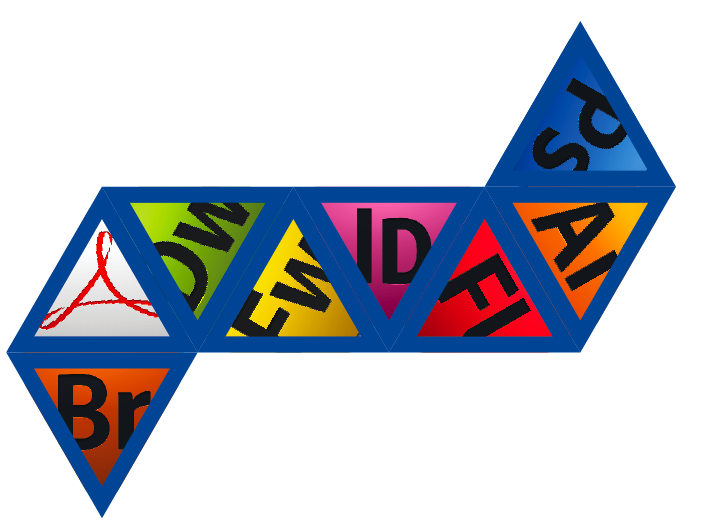
The last thing to do is make tabs that you can use to tape or glue the shape together. You could just leave some extra paper all around the net when you cut it out. Or you could try something like this: Select the whole net, group it, and apply a drop shadow. Give it a Distance of 0, a spread of 100, and make it big enough to glue or tape.


Now the crafty part: print the net, and cut it out. Fold along the edges of the triangles and tabs, then glue or tape it together. It also helps to snip off the pointy ends of the tabs. If you need help figuring out how to close up the net, play with the octahedron animation here. Last, thread a hook or some string through the top and voila, eight sides of geek holiday fun.

Try some other shapes too. Just don’t attempt the dodecahedron after too many eggnogs.
Happy Holidays!
This article was last modified on December 23, 2024
This article was first published on December 7, 2009
Commenting is easier and faster when you're logged in!

Recommended for you

InDesign Magazine Issue 74: Flipbooks
We’re happy to announce that InDesign Magazine Issue 74 (June, 2015) is now avai...

Changing Layer Visibility in an Interactive PDF
Here's a tutorial on how to change layer visibility in an interactive PDF file.
Highlighting an Entire Paragraph with Color
With the right combination of paragraph rules and an underline, you can create a...