
Making Catalogs that Work (with Less Work)
Transform your catalog designs from ho-hum to high performing with these tips.


This article appears in Issue 40 of CreativePro Magazine.
Done well, catalogs can be an incredibly valuable and rewarding addition to an organization’s product marketing—whether the customers are retail (B2C) or wholesale (B2B). Done badly, catalogs can put organizations under extreme stress and provide documents that don’t engage with customers and don’t provide a return on investment. With a little knowledge of catalog types and the content each needs, as well as some new features from InDesign and Photoshop, you can give your organization the best chance of success with your next catalog project.
What Makes a Good Catalog?
While catalog content has been serving a similar purpose for centuries (Figure 1), the production methods have improved dramatically—as have marketing options for businesses. Despite the growth in alternative means of communicating product information, printed catalogs remain very popular in many industries worldwide. Catalogs are tactile, and they have a physical presence that a website or email newsletter does not. Once catalogs are in the hands of a customer (or potential customer), they often hang around—on desks, in bookcases, in drawers. The bigger the catalog, the less likely it is to be simply thrown in the bin!

Figure 1. You can see a lot of similarities between these department store catalogs from Sears (USA, 1908) and Harris Scarfe (Australia, 2024).
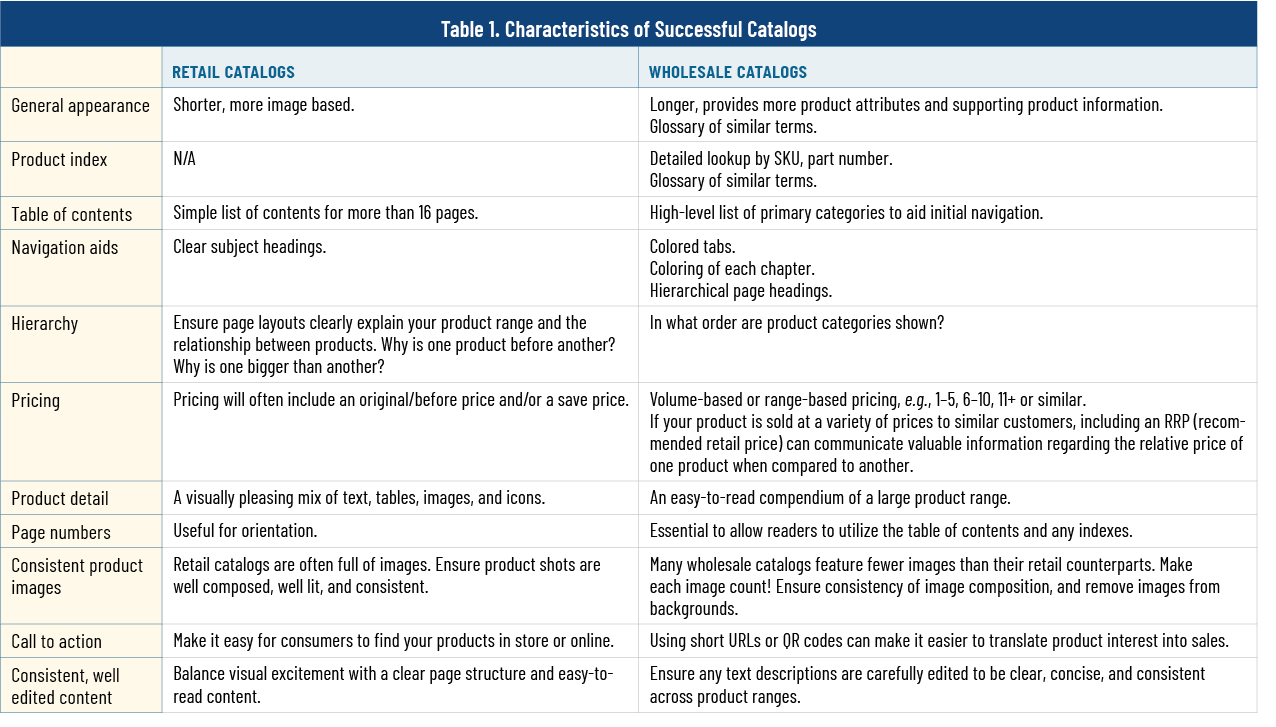
High-performing catalogs, whether for retail or wholesale audiences, have some characteristics in common. Table 1 outlines some key characteristics of successful catalogs for retail and wholesale. For more advice on the basics of catalog design, see my article “Make Better Catalogs” in InDesign Magazine, Issue 124.
Use a Layout Grid for Easy Flexibility
If your catalog needs to feature multiple products of different sizes, I recommend using a 12 × 12 grid to lay out the pages, allowing you to separate a page into halves, thirds, quarters, or sixths, and to include both smaller and larger elements on the same page with no wasted space. In my experience, a 12 × 12 grid strikes a good balance between flexibility to support interesting page layouts and consistency to allow users to understand and for easier production (Figure 2).
Figure 2. Both of these catalog pages use an underlying 12 × 12 page grid.
Harness AI
The release of Adobe Firefly and the addition of its AI functionality within InDesign and Photoshop has had a positive impact on the design and production of catalogs. Outside the Adobe suite, generative AI tools such as ChatGPT are worth exploring. For a deep dive into what Adobe Firefly can do, see Bart Van de Wiele’s article in Issue 38. For some tips on what these capabilities offer catalog designers, read on.
Placeholder images: For larger, range-based catalogs, generating AI placeholder/positional images affords you massive time savings as you’re designing catalog templates. Even if you’re going to be photographing actual products, AI can be a good way of helping with photograph composition, and allowing you to road-test page designs and more. For instance, I used AI (mostly Adobe Firefly) to generate more than 80% of the images in the example supermarket content for this article.
Expanding image content: Using Generative Expand on an image can be an easy way of adding bleed to an image that was supplied sans bleed or to refine areas of an image that aren’t quite right. Just be sure to use the feature in Photoshop, not InDesign.
Text creation: Ask your text-based AI generator to write descriptive text outlining product features and attributes based on a template you’ve developed.
Writing documentation: Documenting your catalog processes is an important part of each catalog project, especially larger ones. AI is great at helping to fill the gaps, so why not ask it to help to create documentation for your team members to use in your next catalog cycle? (Your future self and team members will thank you!)
Maximize Your Images
A good product picture adds so much to a catalog and can be more compelling than a text description to some consumers. Product images are notoriously hard to source and keep updated—whether you’re using a commercial image library for FMCG (fast-moving consumer goods) products, or you have a lightbox and wish to photograph your own images. The sidebar “Image Management Tips” offers some insight on how to wrangle the multitude of images you’ll likely use. No matter the source of your images, however, be sure they have a consistent look. InDesign offers automatic frame fitting and background removal controls to help you with this.
Frame fitting options
The Auto-Fit option eliminates the need to manually select each image frame, choose an anchor point, and choose a consistent fitting option. In the Frame Fitting Options dialog box, simply turn on the Auto-Fit option, then specify how InDesign should fit images in your image frame (Figure 3). Even better, you can save these fitting options as part of an object style, enabling you to quickly and consistently align and fit an image to a selected image frame (or to multiple frames simultaneously).

Figure 3. Set up your fit and alignment options once, then apply them consistently as an object style.
Remove backgrounds
Similarly, with InDesign—and a little help from Select Subject in Photoshop—you can quickly remove image backgrounds for design flexibility and a consistent catalog look (Figure 4).

Figure 4. The image to the left shows the broccoli created using Firefly, while the image on the right shows the image with the background removed.
Removing images from their backgrounds is one of the biggest returns on a time investment I know, and the easiest way is to use the Select Subject option from the new Contextual Task Bar in Photoshop to create a path around the image. You can then add or remove anchor points from the automatically generated path to fine-tune the result. The steps are simple:
- Open the image in Photoshop, and choose Select Subject from the Contextual Task Bar.
- Notice the image is now highlighted, hopefully without any shadows or other background elements. (Note: Sometimes you may need to remove unwanted content from the image using a rectangular marquee selection or the Polygonal Lasso tool.)
- In the Paths panel, choose Make Work Path from the panel menu. Accept the default value of 1.0 pixels, and choose OK.
- Choose Save Path from the Paths panel menu. Accept the default value of Path 1, and choose OK.
- Choose Clipping Path from the Paths panel menu. Accept the default value of Path 1, and choose OK.
- Save your image, complete with its clipping path as a JPG, TIF, or PSD. It’s now ready to place in your InDesign document.
- In InDesign, choose File > Place, select the image, and turn on the Show Import Options, because you need to tell InDesign to observe the path.
- Ensure Apply Photoshop Clipping Path is selected, and click OK. Your image will now appear with only the pathed area visible on the InDesign document.
For an even more efficient workflow, you can save these steps into a simple action that you can reuse on multiple images. I don’t tend to run as a batch, though, as I like to check what has been suggested via Select Subject and alter as necessary.
Image sizes and styles within a catalog
Catalogs often contain products of different sizes on the same page. What’s the best way to present these images to aid customers in their purchase decisions? Over my many years of helping clients to create their catalogs, I’ve heard that question many times.
Think of a typical homewares catalog: Parts of a dinner setting may be shown together on the same page with a smaller entrée plate next to a larger dinner plate, a dessert bowl next to a soup bowl, or, in the extreme, an egg cup next to a salad bowl. How can the design offer context clues to which dinnerware the reader is looking at (Figure 5)?

Figure 5. Salad bowl or egg cup?
At one extreme, you could place both the egg cup and the salad bowl at the same size in the catalog. The reader is left to use the heading and supporting text to discern the size of each product (Figure 6).
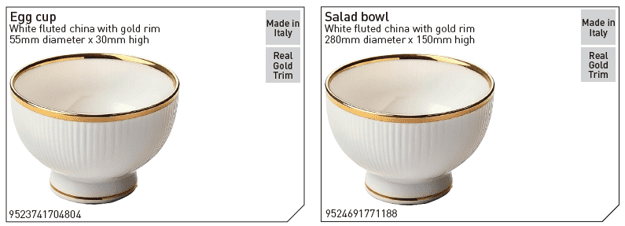
Figure 6. Supporting text can help, but the catalog entry requires more detective work from the reader.
At the other extreme, you could place the egg cup and the salad bowl at the same approximate scale compared to full size. This assists the reader in understanding the scale but has the distinct disadvantage of not showing much detail in the smaller image (Figure 7).
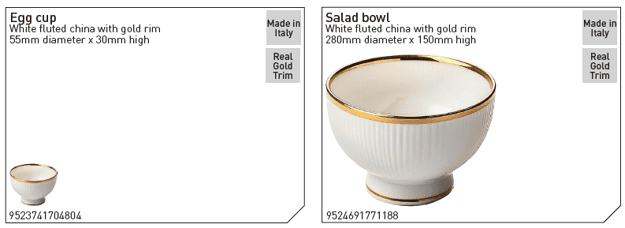
Figure 7. Now the size difference is clear, but detail is hard to discern in the smaller product.
A better option, made all the simpler by the inclusion of Generative Fill within InDesign, is to show the item in use to assist the reader. In Figure 8, you can much more easily understand which product is bigger, as well as how the products may be used.
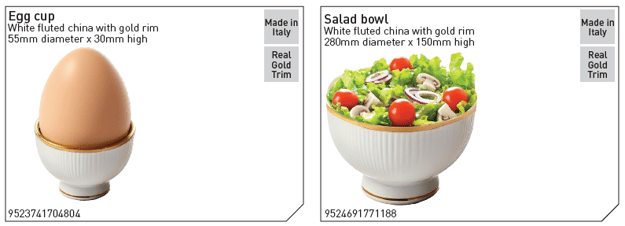
Figure 8. Adding context to the images simultaneously gives clues to the products’ respective uses and sizes.
An alternative is to show the products slightly smaller individually (possibly with or without application info) and then use some of the freed-up space to add a supplemental photo to show the products together (Figure 9).
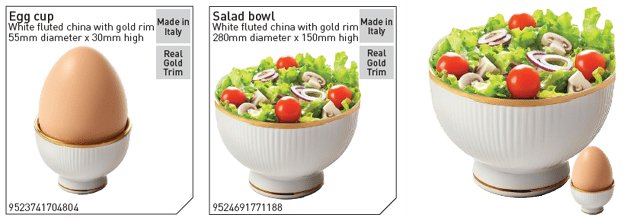
Figure 9. A supplementary image that combines the products eases comparison even more.
To add the application and product context information, turn to Photoshop’s Generative Fill feature:
Draw a marquee where the new content is to appear. It can take a few tries to get this right—too small and the egg is too small for the egg cup, too big and the egg can make the cup disappear.
Type a descriptive text prompt in the Contextual Task Bar, such as whole egg with shell, and click Generate. Photoshop will now generate options (Figure 10).
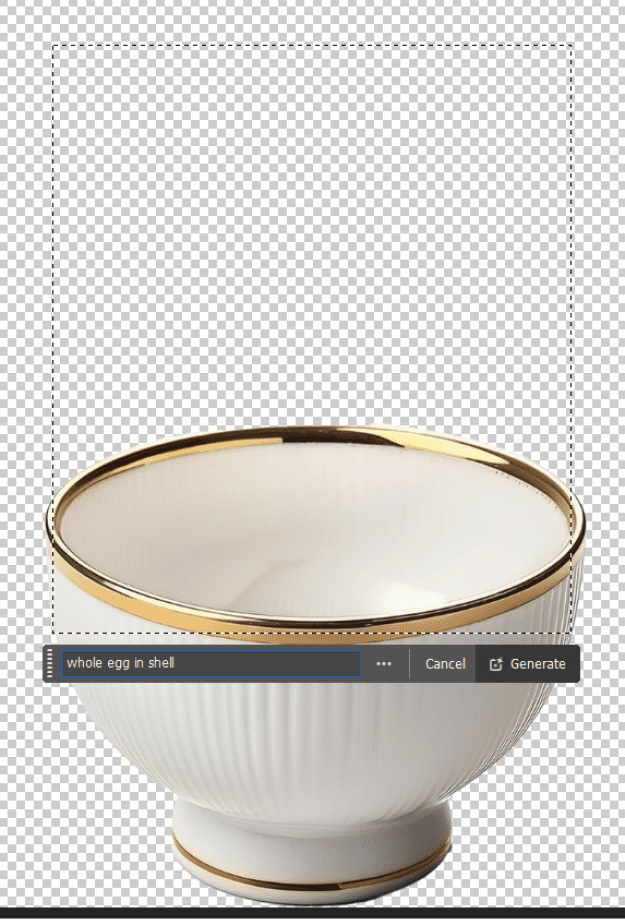
Figure 10
Consider the images Photoshop provides in the Variations area of the Properties panel (Figure 11).
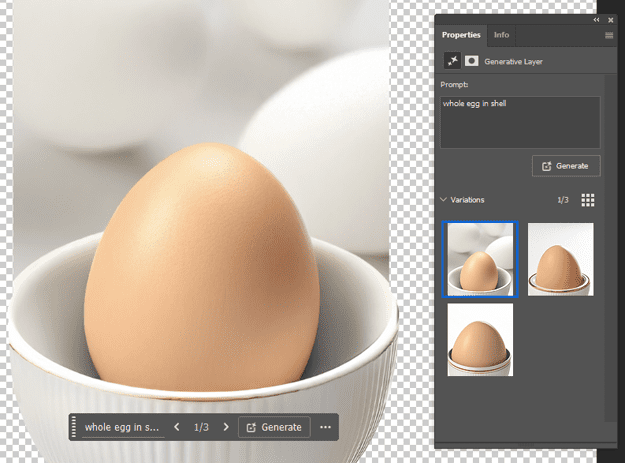
Figure 11
Select the image that best matches the content you’re looking for, and Photoshop will place this image as a separate layer in your original image. Note that you can also choose smaller areas to touch up, leaving the text prompt empty (Figure 12).
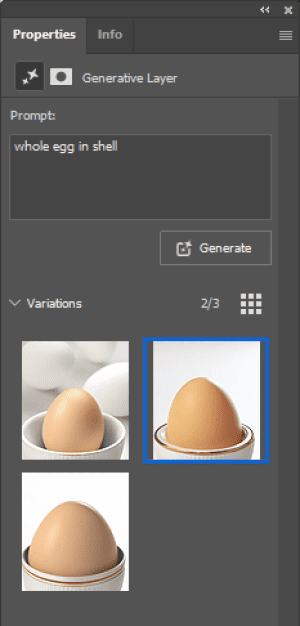
Figure 12
Work Smarter, Not Harder with InDesign
For many InDesign users working in industry, an annual catalog is orders of magnitude bigger than other projects completed during a typical year. The good news is that InDesign offers several tools to help you work more efficiently. The payoff for becoming competent across these subject areas (listed in Table 2) can be huge for your productivity. And it could be the difference between your catalog project meeting your deadline or not. If you haven’t had experience with one of these areas, I urge you to search for more information—watch a video, consult CreativePro’s many resources, ask a colleague, or even ask me.

In conjunction with Book files and nested parent pages, you can use InDesign libraries, snippets, and templates allow you to quickly reuse content across multiple pages and multiple documents:
Libraries and Creative Cloud Libraries: A library is a separate file which contains one or more text or image objects (or groups of objects). You can preview libraries inside InDesign, then drag the element you need from the library onto the page. If a library contains paragraph (and other) styles that already exist in the target document, those styles will be applied to content as it is inserted onto the page. If a library contains styles that don’t exist in the target document, those styles will be added to the target document.
Snippets: A snippet is similar to a library, but it typically contains a single combination of text and image frames. Snippets are saved separately (as IDMS files) on your local computer or network drive. As for libraries, snippets will utilize styles in the target document if they exist, or import new styles if required. To add a snippet in your current document you can either choose File > Place from the menu, or drag a snippet file from Finder/Explorer into your document.
Templates: InDesign templates are typically empty or skeleton documents that may contain multiple parent pages, multiple styles, and predefined page layouts and content. When creating a catalog, I start with a template document that gives me the page backgrounds and high-level navigation, and then reuse product content from either libraries or snippets.
Return on Investment
The need for well-designed catalogs will never go away as long as businesses are selling goods to other businesses and retail customers. Making great catalogs that help sell products is no small task. But new tools such as generative AI can help you solve design problems and increase workflow efficiency. Spending time now to learn some new or new-to-you InDesign and Photoshop features will reap dividends for your workflow and your clients’ catalogs later.
Commenting is easier and faster when you're logged in!

Recommended for you

Building Catalogs
Learn how to create high-performing catalogs by following these best-practice ti...
Creating Mixed Page Orientations in the Same Layout
There are two ways to create mixed page sizes in InDesign CS5, but only one lets...

Turn Off Spell Check for Certain Words in InDesign (like catalog part numbers)
How you can make InDesign skip certain pieces of text when checking spelling