
Making Calculations in InDesign
Scripts and other solutions to take the pain out of dealing with math in InDesign

This article appears in Issue 30 of CreativePro Magazine.
For some designers, using InDesign means being able to start with a blank page and noodle their way to a beautiful interplay between text and artwork. For other designers, InDesign lets them see order and precision on the printed pages, with controls that bring logic, consistency, and structure to visuals.
The best production designers are adept at doing the math and typing in numbers to position objects and guides with pinpoint precision. They measure design elements and position page objects by the numbers rather than by drawing dozens of guides and eyeballing it. At least, that’s how it was in the early days of electronic publishing. But as InDesign matured as a product over the past couple of decades, something fantastic happened.
Thanks to the efforts of Adobe’s engineers, of technically inclined designers, and of graphically inclined software developers over these many years, we can use InDesign’s native capabilities, as well as readily available scripts and plug-ins, to avoid doing calculations in the first place! Even better, when you let InDesign do the calculations for you, you can spend more of your time being your best creative self.
To help you do production design with efficiency and precision, I’ve corralled a roundup of tips and tricks that InDesign can do on its own, as well as scripts and plug-ins that will do all the math for you.
Avoid Counting
Put away that ruler! Following are some tips and resources to make InDesign do the measuring for you.
First things first: The Control panel
Did you know that you can mix measurement units? If your Control panel shows that your text frame is 245 points, you can subtract half an inch by adding –0.5 in. to the Width field. You can use
any units of measure, not just the default.
Want to resize an image? Let InDesign figure out by how much. Type the new width in the Scale X Percentage field or the new height in the Scale Y Percentage field. InDesign will scale your image perfectly (Figure 1).

Figure 1. To resize an image to a new width, replace the Scale X Percentage field’s value with a measurement. (You must type in the unit of measure, even if you’re using the default unit; otherwise, InDesign reads the new value as a percentage.) Do the same with the Scale Y Percentage field to scale to a new height.
Count text more flexibly
The Info panel (Window > Info) offers a number of measurements (Figure 2), including veritable GPS coordinates about where your cursor is on your page and the width and height of your selection.
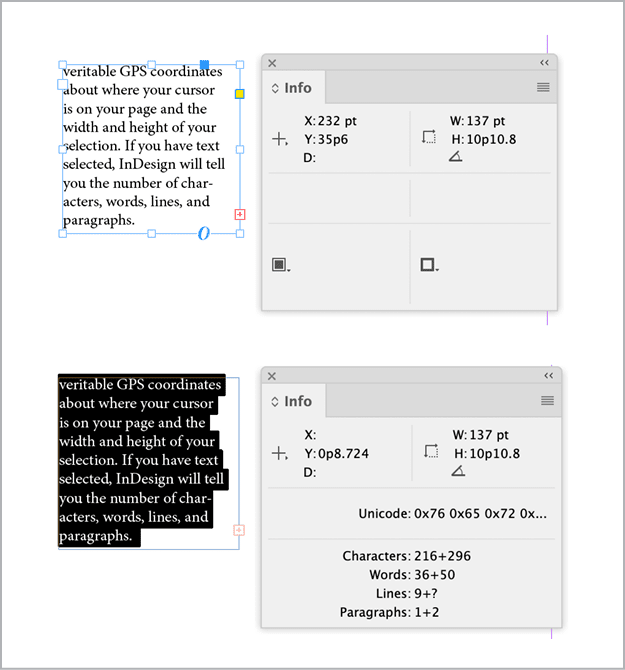
Figure 2. Don’t forget the venerable Info panel, which will communicate different measurements depending on your selection: A) When your text frame is selected, you see the width, height, and coordinates of the frame on the page. B) When you’ve selected text, you get a count of characters, words, and paragraphs, both visible and in overset. The X coordinate shows the horizontal location of the first word selected, measured from the left edge of the frame, and the Y coordinate measures the vertical location of the cursor on the baseline of the first line selected.
InDesign will tell you the number of characters, words, lines, and paragraphs in a selection of text, or the entire story where you have your cursor parked—including threaded frames and overset text.
Text Count for Adobe InDesign/InCopy (DTP Tools, part of DTP Tools Cloud, $12.90 monthly, $119 annually) adds a Text Count panel (Figure 3) that gives you finely grained control over the scope of text you’re measuring and lots that you can do with the information.

Figure 3. DTPTools’ Text Count panel
John Pobojewski’s Count Text script (part of InDesign Toolbox, free/open source) lets you see the heft of your text more clearly without needing to select any. You can select the text frame to count the contents.
Marijan Tompa, a.k.a. Tomaxxi, was once an active and prolific scripter whose contributions to the InDesign community remain incalculable. You can still download his Count All Text Scripts, and it will still count words in tables and footnotes, which InDesign would otherwise ignore (Figure 4).

Figure 4. Tomaxxi’s Count All Text script does just that—counts all the text, including footnotes.
Count other things
InDesign Toolbox also includes a Count Selected Items script that reports how many items you have selected. You want to know how many PDFs you placed en masse to check against the number your editor said there were? Select them all, run the script, and find out (Figure 5).
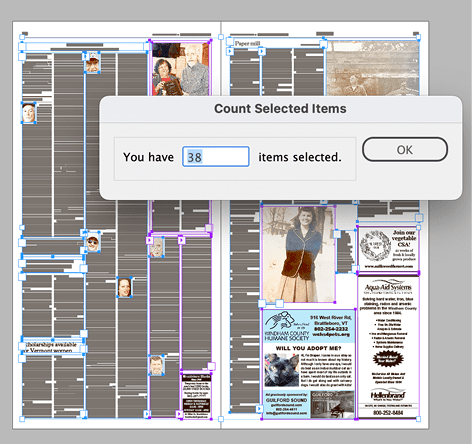
Figure 5. Count objects on a spread with the Count Selected Items script.
You can count the number of paragraphs that have a selected paragraph style applied by using the Count Paragraph Style Usage script (LFCorullón Scripts; free, donations appreciated).
Measure by Measure
Are you still getting measurements by drawing frames and copying the width? You can go even further with these tools.
No more eyeballing guides
Tucked into the Layout menu is, of course, the Create Guides command that can add rows and vertical gutters to create a grid based on your full page or your parent page’s margin settings (Figure 6).

Figure 6. The Create Guides command is so useful but unassuming. (You can admit that you forgot it was there.)
Among InDesign’s sample scripts, you’ll find Add Guides (provided in multiple languages depending on your platform, but everyone can use the JavaScript: Windows > Utilities > Scripts, then in the Scripts panel, navigate to Samples > JavaScript > AddGuides.jsx). Select an object, click the script, and check which guides you want: top, bottom, left, right, horizontal center, vertical center—and that’s just the start (Figure 7). You already have this script installed by default. Start using it now!

Figure 7. The AddGuides scripts let you build guides around and through the centers of objects on your page. And they’re already installed!
Chad Chelius recently reviewed GuideGuide (GuideGuide LLC; subscription, $9–$39 per year), a plug-in for InDesign, Illustrator, Photoshop, and Sketch that offers even more flexibility and control. Check out the website to get a sense of the scope of the product and the refreshing candor of its developer, Cameron McEfee.
If you build templates and documents that need to label your objects with measurements (Figure 8), you will want Dimensions InDesign (Mars Premedia, $29), a script from the prolific prepress guru William Campbell, who has a version for Illustrator as well. We were impressed.

Figure 8. Measure and label your selected object(s) with a click of a button with Dimensions InDesign.
Measure type exactly
Measure the exact x-height of your selected text (Figure 9) with the logically named Get x-Height from Selected Text script from Roland Dreger (free and open-source).

Figure 9. You can measure the exact x-height of a font without breaking a sweat.
Design tables cleanly
If you want to equalize the width of a number of table columns, select all of them, then select Table > Distribute Columns Equally. You can do the same for rows.
By default, when you create a table, InDesign sizes it to the width of the frame in which you insert it and distributes columns across the space equally. While you could distribute the columns equally, resizing them can be a mess. And what if you have multiple tables inline in a text thread? It’s time for Peter Kahrel’s Tables Sized to Frames script (available to CreativePro members). It could save you some measuring and fiddling (Figure 10).

Figure 10. If you need to redistribute table columns evenly into a narrower column width, you’ll really want the Tables Sized to Frames script.
Id-Extras’ Table Tools offers ample automation of fitting to bypass fiddling and calculating. See Keith Gilbert’s review from CreativePro Magazine Issue 20.
Let InDesign worry about resolution
With operating systems and monitors offering dozens of resolutions, viewing your work at 100% is meaningless when you need to see it at exactly the size it will be published. Marc Autret’s PhysicalSize (Indiscripts, free) adds a Physical Size item to your View menu. Set up the scripted plug-in once by physically measuring the diagonal of a gray box that the script renders on your screen, and you’re good to go (Figure 11).
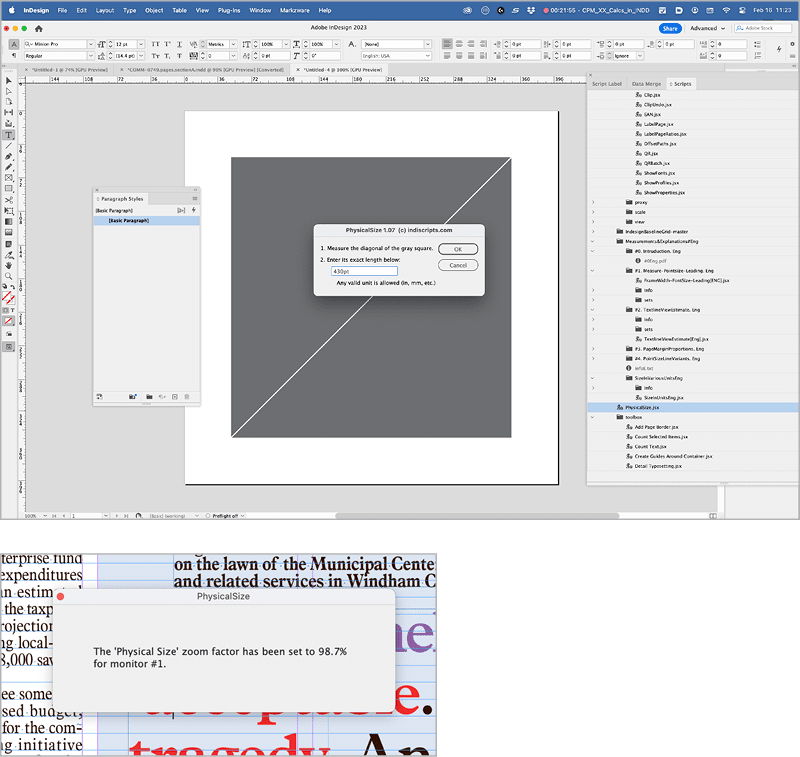
Figure 11. In this era of super-high-resolution displays that divorce view percentages from reality, let the PhysicalSize script calculate how to really see your document at the exact size with your monitor.
Space Out
Let InDesign do all the work in distributing white space horizontally or vertically.
Avoid tweaking tabs and tables
Set your first tab in the Tabs panel, then right-click that tab to access some hidden functions, including Repeat Tab. Choose it to repeat the first tab interval along the rest of your line’s length (Figure 12).
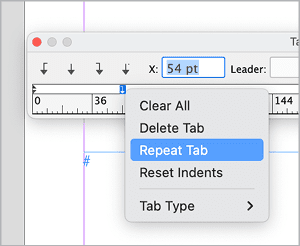
Figure 12. You can have InDesign set up your tab stops without eyeballing or calculating by finding the Repeat Tab command. (It’s in the context menu if you Command/Ctrl-click the first tab stop.)
Do you want to position your tabs evenly along the whole line? You can determine that first tab stop by adding a tab and setting its position as the width of your frame. Then, with your tab highlighted, divide the measurement in the Tab Position field by the number of tabs you want. Select Repeat Tab, and you have tabs exactly where they should be, without your having to do the least bit of math (Figure 13).

Figure 13. If you know how wide your text frame is, set your first tab to the full width. Then divide that value in the Tab Position field by the number of columns you want to get your first tab stop, and use the Repeat Tab command to create the rest.
Let InDesign figure out vertical space
InDesign’s native vertical justification is handy for quick design of single blocks of display text or newspaper columns—but precious little else. In particular, book and long document designers might love V-Justify (Bookraft Ltd./Id-Extras, $99) or Proper VJ (In-Tools, $59), which let you force more space above specific styles (Figure 14) and not distribute it over every line in your text frame. (For more about V-Justify, see Keith Gilbert’s review in InDesign Magazine Issue 144.)

Figure 14. V-Justify lets a designer apply exacting parameters to specify which styles can accommodate extra spacing, the limit of that spacing, and where and how that spacing is applied.
Need to add a half-line space, whatever that might be, to a particular heading (Figure 15)? Peter Kahrel’s Fine Tune Paragraph Spacing scripts (free, but donations appreciated) give you finely grained control over your composition without forcing you to break out the calculator. Other scripts can create shortcuts to add or remove by 1-point increments. Assign keyboard shortcuts to them and save some real time.
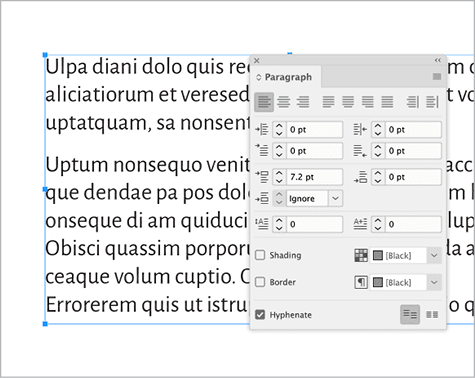
Figure 15. I added a half line space above the current paragraph—7.2 points—automatically, without even thinking about what the actual line space is, much less doing the math. Peter Kahrel’s script is part of a series that can add or subtract space above or below in half-line or 1-point increments. You can assign these scripts to keyboard shortcuts to whip through your document and refine the spacing.
Convert and Calculate with a Click
When you find yourself reaching for that calculator, stop right there and see if these tools can help.
Convert currency, time, and more
Got a document to update with new prices because the exchange rate has changed? Do you need to add a fixed amount to every price on a menu? Peter Kahrel’s Price Adjuster script (free, but donations appreciated) gives you fine control over converting currency in your selection, story, or document (Figure 16).

Figure 16. PriceAdjuster converts all the prices in your document. Just specify the exchange rate.
Kahrel has a similar script: TimeChange (free, but donations appreciated) can change times by the hour in your document with one click.
Get one-click AI translation of your document with Translate (Id-Extras, $5 plus credits to access Google Translate or DeepL.com API), and add it to your document as conditional text.
Do calculations in tables
What if you have a document with data that changes often? Although InDesign can’t do the job by itself, it can with the help of the Active Tables plug-in from DTP Tools, which fires up the ability to turn your table into a mini-spreadsheet (Figure 17).

Figure 17. ActiveTables turns your InDesign tables into a surprisingly powerful spreadsheet.
Calculs Raynaux (Labdal; free, but donations appreciated) enables you to perform simple calculations (addition, subtraction, multiplication, division) on table cells on the fly. Its interface is not beautiful, and you will need to run the script each time you want to update the calculations, but it might be all you’ll ever need (Figure 18).

Figure 18. Calculs Raynaux provides the basics for table calculations.
Colors and Images
Let InDesign offer you some color suggestions based on your current palette.
Generate variants for a given swatch
The late, great prolific scripter Theunis De Jong, a.k.a. Jongware, offered Variations to CreativePro forum members in 2014. It generates swatches and applies them to a series of six frames (Figure 19) stopping at regular intervals along a continuum of your choosing (hue, saturation, brightness, red, yellow, green, cyan, blue, magenta).

Figure 19. Variations can automatically generate a continuum of colors.
Koen Jonguh’s InDesign Color Palette Generator script generates five swatches (some lighter, some darker) and applies them to a series of frames (Figure 20).
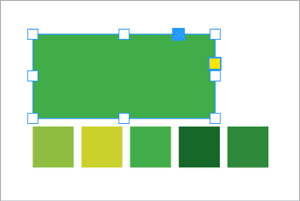
Figure 20. Color Palette Generator can drop some new colors into your document based on the fill of a selected frame.
Select an image, get all the color breakdowns
Wouldn’t it be great to let InDesign give you color values on demand from the use of a color in your document? Run the Color Convert Label script, and you’ll get a RGB, CMYK, and hex color breakdowns generated in a text frame (Figure 21). (This script, available here to CreativePro members, is based on code contributed in a discussion on Stack Overflow.)

Figure 21. Let InDesign figure out the basic breakdowns of your color swatches in other color models.
Tween your colors
GradientTable (free and open source), a script by Tucker Harris, “calculates intervals between two RGB colors, creates swatches for those colors, and builds a table gradient.” The script builds frames on your page with your new colors and names your swatches with the color break (Figure 22).

Figure 22. Create a palette on the gradient ramp between two RGB colors with the GradientTable script.
Automatically resize images to their maximum resolution
There’s no sinking feeling quite like the one when you have a beautiful layout and realize that the image you imported is half the resolution it needs to be. Scale to PPI (Id-Extras, $49) automatically scales your images to their largest size at the resolution you need (Figure 23). Click once, and design with confidence.

Figure 23. Scale to PPI automatically sizes your placed images to the largest they can be reproduced at the resolution you specify. Just don’t make them bigger, and you’ll be good to go.
Why Use This Stuff?
I’ll freely admit that trying new add-ons and techniques requires an investment of time, energy, and sometimes money. (Please tip your InDesign developers if you use their free software. They deserve it.)
But if you make good use of the solutions presented in this article, you’ll have more time to focus on the creative, fulfilling, and joyful aspects of your job. And isn’t that why you became a designer in the first place? So give these add-ons and techniques a try, and may your creativity soar.
Commenting is easier and faster when you're logged in!

Recommended for you

Create High Quality Upscaled Image with AI in Photoshop
Generative Upscaling When you need to enlarge images beyond their original resol...

Including InDesign Files in PDF Assembly
When you want to combine together different kinds of files for distribution, PDF...

Crowdfunding Focus: Playing Cards Designers Will Love
Crowdfunding—raising money for a project or cause from diverse sources via the i...