Making a Splash with Flash: An Animation Primer
As a Web designer, you’ve undoubtedly figured out by now that you can never stop learning. Because of the very nature of the Web, you have to stay up to date on all of the up-and-coming technologies in order to create pages that will knock the eyeballs out of the viewer’s sockets. So when Flash came out you probably thought to yourself (’cause that’s the only person you can actually think to), “Great, another program that I’ll need to learn someday.” Problem is, if you didn’t have any pressing need for Flash, you probably never took the time to learn how to use it. So, out of the kindness of our collective hearts, we’re going to take you, kicking and screaming, into the world of vector graphics by providing you with a series of articles that won’t only teach you how to use Flash, but will show you why the popularity of the software will continue to grow in the coming years.
This month, we’ll begin by reviewing the program’s interface and then use it to build a very basic Flash animation, similar to the one shown in Figure A, that would be suitable for an intro movie for your Web site. In the following months, we’ll show you how to use the application to build interactive interfaces, incorporate QuickTime and 3-D graphics, and even create broadcast-quality animations. By winter you should be a Flash expert. But let’s not get ahead of ourselves here. After all, you have to crawl before you can dance like the maniac that you really are.
Figure A: Think of Flash as the best way to add motion to your Web pages.

The Basics in a Flash
Flash is an extremely versatile application, filling three of the major categories of computer software. First, it’s a multimedia authoring program that allows the user to quickly create interactive movies. It’s also a powerful animation tool that you can use to create frame-by-frame animation, or tweened animation, where the computer generates the animation frames. Finally, it’s a drawing program, much like FreeHand or Illustrator. The reason that Flash can create mind-blowing animations, movies, and graphics is because it’s a vector-based application, and vectors, as you know, are much smaller than bitmaps. In fact, a vector is really a mathematical equation that tells that old computer on your desk how to render the image on your screen. Due to the small size of the information needed to render the image, the vector graphic is ideally suited for the Web.
Another great thing about working in Flash is that in addition to creating movies and animations, it imports almost any graphic or sound format you throw at it, including Photoshop, Microsoft WMF, and even AutoCAD DXF files. Many of the images, including those created in FreeHand and Illustrator, are fully editable within the application. And once you’ve completed your work, you have a wide variety of export formats, vector or bitmap, to choose from. You can even save them as a QuickTime file.
They Say They Built the Interface on Broadway
Like many animation applications, Flash bases its interface on the theater. The interactive multimedia files it creates are called movies. These movies are made up of different scenes, which take place on a stage and in a timeline. Figure B provides an overview of the various elements of the Flash interface that you should be familiar with before starting a project.
Figure B: Once you get used to the Flash interface, it’s pretty easy to get around.

Most of the objects in the Toolbar palette should look relatively familiar–they’re a hybrid of your basic drawing and Photoshop tools. There aren’t a lot of surprises here. The biggest difference is that the bottom of the palette includes a contextual area for modifiers for the individual items.
The timeline, situated at the top of the window, is broken down into individual cells, each representing one moment of the animation. In the timeline, you can add or delete cells and keyframes (which are used to define the changes to your animation). You can place the elements of your movies on their own layers, allowing you to control content, create masks, lock and/or hide content, and tween the groups and symbols on each layer. You can also divide your movies into scenes and change the order of the scenes in the timeline–just as you would non-linear video. To move throughout the animation you can click in the individual cell or drag the Cell Pointer to any point along the timeline. The size of the sections is also editable, should you be creating a long animation.
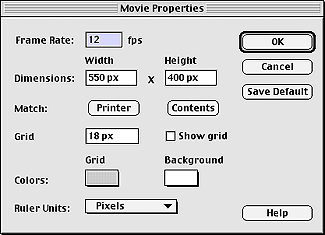
When you first open a new Flash document, the program creates the stage where you’ll draw or import your images. By default the color is white, but you can change it easily by choosing Modify > Movie. This displays the Movie Properties dialog box, as shown in Figure C. Notice that you can also change the frame rate, the size, and the unit of measurement used as you make the movie.
To facilitate learning, each of the tools also has a ToolTip that tells you what each one does. All you have to do is rest the pointer over the item for a moment.
Figure C: Your Flash movie can be as small as a button or as large as a digital video screen.
The Flash Components
Shapes, groups, and symbols are the components of a Flash movie. Shapes are created when you draw something on the stage. Then, after you’ve made several shapes, you can assemble them as a single object, called a group. Once you’ve created something you’re going to use in your movie, you turn it into a symbol. A symbol is a reusable element for your movie. The beautiful thing about symbols is that they only get stored in Flash once, therefore reducing the download time, and decreasing the file size.
Act One, Scene One
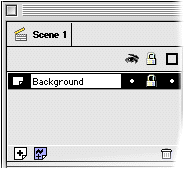
At this point we’ll start building our first animation. As you’ll notice in the example shown in Figure A, there are four elements to the movie–the words Digital and Tropics, a circle, and the background. Since the background changes color throughout the animation, we’ll have to use a graphic instead of just changing the color in the Movie Properties dialog box. Also for the example, we chose to create each of these images in TypeStyler rather than Flash. Typically, TypeStyler is quicker at creating interesting graphics. You can download the Digital and Tropics graphics by going to our Examples section at www.elementkjournals.com/iwd/examples. The first step is to fill the stage with a background. To do so, simply select the Square tool, then choose the fill color from the Color palette in the Modifiers region. Next, draw a rectangle over the entire stage area. Now, with the item selected, choose Insert > Convert To Symbol. Name the symbol Background and accept the behavior as a graphic, then dismiss the dialog box. Finally, double-click on the Layer 1 label and change it to Background, as shown in Figure D.
Figure D: It’s a good idea to label each of the layers as you go along.
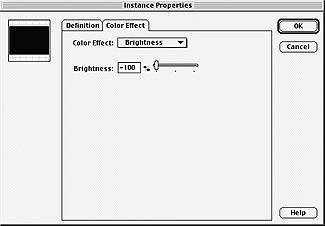
You’re now ready to add the first portion of animation to the stage–that of the background changing from blue to black. To do so, click in the cell marked 40 and then choose Insert > Frame. When you do, Flash adds a box that covers frames 1 through 40. Next, choose Insert > Create Motion Tween. The box now contains a dotted line, indicating that there’s some form of motion or change in the frame. Next, choose the Selection Pointer (icon) from the Toolbar palette and double-click on the blue rectangle. When you do, Flash adds a keyframe to cell 40 and then displays the Instance Properties dialog box. In the dialog box, click on the Color Effect tab and then choose Brightness from the pop-up menu. Then slide the control to change the value to -100%, as shown in Figure E. When you click the OK button, the rectangle on the stage changes to black. Now, use the Cell Pointer to drag back and forth between cell 1 and cell 40. As you do the rectangle’s color changes from blue to black. Problem is, the black comes a bit too soon.
Figure E: Change the Brightness setting of the rectangle to -100%.
To change this, click in cell 25 and then choose Insert > Keyframe. Then, double-click on the rectangle once again. This time, keep the Brightness value at 0%. Next, when you close the dialog box, Flash changes the rectangle back to its original color. Now from cell 1 to cell 25 the color remains the same–it only begins to fade to black after cell 25. The frame for the Background layer should now contain three key frames, at cells 1, 25, and 40, as shown in Figure F. Finally, lock the rectangle by clicking on the dot directly below the Lock icon. When you do, the dot changes to the Lock icon, telling you that the background is locked. Now you’re ready for a little sunshine, but first, be sure to save the file just in case something goes awry and you decide to start over with the background.
Figure F: The Background layer now contains three keyframes.

Here Comes the Sun
Adding the sun to the stage is easy. First, add a layer by clicking the Add Layer button or choosing Insert > Layer. Next, move the Cell Pointer back to cell 1. Then, select the Circle tool from the Toolbar palette, choose a nice “sun” color from the Fill Color palette, and draw a large circle in the upper-right corner of the stage. When you’re satisfied with the size and location, click on the label for Layer 2 and change it to Sun. Now, with the image selected, chose Insert > Convert To Symbol, name the symbol, and accept the Graphic Item as the behavior. Then, click the OK button to dismiss the dialog box. To make the sun move from the upper-right to the lower-left portion of the stage, move the Cell Pointer to cell 40 and then choose Insert > Frame. Now, once again choose Insert > Create Motion Tween and then move the sun just outside of the lower-left portion of the stage. Now as you move the Cell Pointer back and forth along the timeline, you’ll notice that the background begins to darken about the same time the sun nears the bottom of the stage. When working with Flash you don’t have to rely on such simple tweening movement. However, for our simplistic example, linear motion is fine. Now lock the layer and let’s move on to adding text to the stage. We’re almost finished so don’t give up.
It’s Digital
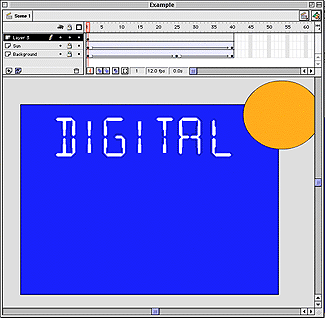
Since the word Digital appears on the stage throughout the entire animation, it’s easy to add this image to the stage. Create a new layer and then move the Cell Pointer back to the first cell, choose File > Import and locate the graphic in the import dialog box. Once you’ve brought it into Flash, simply position it near the top of the stage, as shown in Figure G. The graphic never moves, so just change it to a symbol, and rename and lock the layer. You’re then ready for the last element of the animation.
Figure G: Your animation now contains three layers and six keyframes.
Welcome to the Tropics
To add the Tropics graphic, move the Cell Pointer back to the first cell and create a new layer. Import the image and then position it just below the word Digital and flush to the right side of the image. Now move the Cell Pointer back and forth along the timeline–to get the full effect of the animation, the sun should glide behind the word Tropics. Once you’ve lined the graphic up, move the Cell Pointer to cell 40 and choose Insert > Frame and then Insert > Create Motion Tween. Now, click on the graphic to display the Instance Properties dialog box once again. This time, choose Alpha from the Color Effect pop-up menu and make sure it’s set to 100. For our animation, we’d like the word Tropics to fade in just as the sun glides over it. Therefore, click in cell 8 and then choose Insert > Keyframe. Then, move the Cell Pointer to cell 1 and double-click on the cell to display the Instance Properties dialog box. Again, choose Alpha from the Color Effect pop-up menu and make sure it’s set at 100.
Now return to cell 1 and double-click on the cell to display the Instance Properties dialog box for the last time. This time set the Alpha setting to 0. This makes it quickly fade from invisible in cell 1 to totally visible in cell 8. Finally, click the OK button, convert the graphic to a symbol, and then rename and lock the layer. Your timeline should now look exactly like the one shown in Figure H.
Figure H: Your animation is complete.

Testing Your Handiwork
After all this toil you’re ready to put the animation to the test. To do so, choose Control > Loop Playback and then Control > Play. Flash then plays the animation repeatedly. Or, if you want to see what it will look like on the big screen choose Control > Test Movie. Flash then enlarges the animation to fit your monitor. Notice though that the graphics are still nice and sharp, even along the edges. That’s the vector graphics at work. Once you’re satisfied with the animation, it’s time to save it in a format for the Web. Here you have two main options–export it or publish it. To export it, choose File > Export Movie and then choose the format from the pop-up menu at the bottom of the Save dialog box, as shown in Figure I. However, to save time and get better control over the results, we prefer to use the Publish option.
Figure I: Flash allows you to export the animation in various formats.

To use the feature, first choose File > Publish Settings. Flash then displays a list of the possible export settings, along with a Filename text field for each. Select the formats you want and then choose each of the tabs to customize the settings for that format, as shown in Figure J. After tweaking the settings, click the Publish button and Flash exports the animation in several different formats at once.
Figure J: You can create several different formats of the same file with a single click of a button.

Conclusion
In this article, we’ve walked you through a very rudimentary example of how to use Flash to create a basic animation. Next month, we’ll show you how to make a similar animation interactive by adding buttons to control the motion of the elements on the page.

Copyright © 2000, Element K Content LLC. All rights reserved. Reproduction in whole or in part in any form or medium without express written permission of Element K Content LLC is prohibited. Element K is a service mark of Element K LLC.
This article was last modified on January 8, 2023
This article was first published on August 8, 2000
Commenting is easier and faster when you're logged in!
Recommended for you
Creative Blöks: The Ponderous Complexicator
Editor’s Note: You run into them everyday, but don’t yet know their names. They...

PageProof Introduces Automated Link Checking for Creative Approvals
PageProof’s link scanner surfaces URLs, internal jumps, and email links automati...

Beware The Double Effect with Object Styles
As you may have heard in Episode 69, when we interviewed Deke McClelland, he des...


