
Making a DVD Video Portfolio: Putting It All Together
Author! Author!
By now, you’ve spent a lot of time in other applications – creating graphics, preparing video clips, and encoding video and audio. Now for the easiest part – putting it all together.
The first step in authoring a DVD is to select the project settings. In general, these settings will be very similar to the graphics and video settings you’re already familiar with – NTSC, 4:3, 29.97 fps – as shown in the Apple DVD Studio Pro Property Inspector, below.
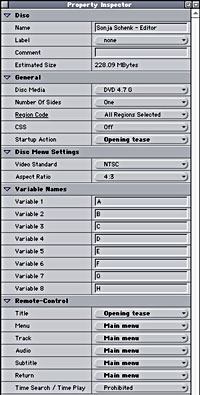
The DVD Studio Pro Property Inspector lets you select the settings for your DVD project.
Next, import the assets you created: Photoshop menus, still graphics for slide shows, video clips, audio clips, etc.
There are two basic elements in a DVD project: menus, and tracks or movies. For each menu you created in Photoshop, you’ll create a menu tile in your DVD-authoring application and tell it which menu background to associate with it. For each video clip, you’ll create a track or movie tile and tell it which video and audio clip to associate with it. Since your source video is now broken into two components – video and audio – you’ll have to add both to each track or movie. Most DVD authoring applications have a graphical interface that displays all of your menu and track tiles, as shown below.
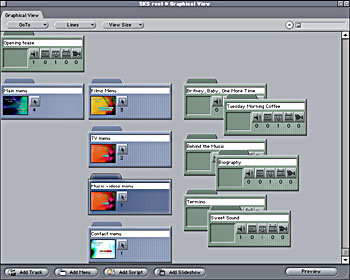
The DVD Studio Pro interface, with an arrangement of menus and tracks.
Linking Assets
Next, link the various menus and tracks together. The methods for programming buttons vary greatly between one DVD authoring application and another but in general these applications have made programming the DVD easy to do. Start by programming the startup action or first play event. If you haven’t created a special splash screen or introductory montage, your startup action will simply be the main menu. If your startup action is a still image, you’ll need to set a duration for it. For both stills and video, you also need tell it where to go when the startup action finishes playing – usually your main menu.
Now, work your way through the buttons on each menu, starting with the main menu. When activated, each button should lead to either a movie or another menu. For each movie, you also need to tell it what to do when the movie finishes playing. Usually, you’ll want it to return to the previous menu or the main menu.
Finally, don’t forget that your DVD demo reel may get played on a console-type DVD player, and that a prospective employer may navigate through your DVD using a handheld remote control. Good DVD authoring applications make it easy for you to program the remote control device, like the Sonic DVDit! interface shown below.
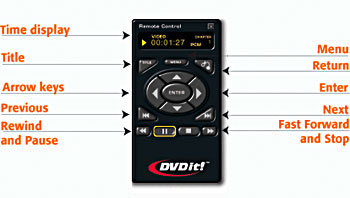
Sonic DVDit! has a special remote control interface to help you program the remote.
The Next Level
The DVD programming language allows for a lot of flexibility and interactivity, but most of these capabilities aren’t necessary for a demo reel or video portfolio. However, if you want to have slide shows, video buttons, or show multiple camera angles and multiple sound tracks, you may need to do a little extra programming. (You may also need one of the more advanced DVD authoring applications.)
Slideshows are relatively simple to create. Use the specifications for still graphics listed earlier and add a number to the name of each file in the slide show to make it easier to put them in order. Apple DVD Studio Pro offers a special slideshow interface or you can create a movie for each still, set a duration — say five seconds — and program the movie to jump to the next still in the sequence when it’s done playing the first one.
The kind of video buttons that you can create depends on your authoring application. Sonic DVDit! lets you create a video button by simply dragging a video clip onto a menu page. For Apple DVD Studio Pro, you’ll have to use an editing application to create a QuickTime movie that looks like a still frame with moving buttons placed on it. Once you’ve encoded it and imported it, you can program each moving area as if it were a button.
DVDs are capable of playing up to three streams of video at once, allowing the viewer to choose from one camera angle to another at their will. This feature may be useful for 3D animators who want to create different renderings or fly-throughs of their animations. Follow the instructions above for exporting animations to a video format, but make sure the length of each video clip containing a different camera angle is exactly the same. Then follow instructions in your DVD authoring software manual for adding multiple camera angles to a movie tile. Similarly, sound editors can use the multiple audio track capability (usually used for director commentaries and foreign language versions) to give viewers an opportunity to listen to different mixes.
Finishing Touches
All DVD authoring applications offer a preview mode that lets you play your work-in-progress as if it were an actual DVD and test all the links. Once you’re satisfied that your DVD project is working properly, render it to your hard drive and burn it to an actual DVD disk. Test it on as many different DVD players as possible – at minimum a Windows computer, a Mac computer, and a console-style DVD player with a TV monitor.
For most DVD demo reels and video portfolios, burning disks one at a time, as needed, will suffice. But if you plan to send out hundreds of disks, you should consider a mass duplication service – the price per disk will be cheaper, not to mention the time you’ll save. You’ll need to save your rendered DVD files on either a DVD disk or a DLT tape to deliver it to the duplication facility.
Finally, don’t forget the packaging. There are lots of options available, from the standard jewel case to cardboard sleeves to transparent colored plastic cases. Mass-produced CDs and DVDs have labels that are silk-screened directly onto the disk, but you can buy special inkjet paper to help you create custom stickers for labeling.
Updating your DVD
Congratulations! You now have a DVD demo reel that’s easily revised and updated. The ideal backup medium for your DVD project and related assets is, of course, DVD. Data DVD, that is. Save all the files associated with your DVD demo reel – video source files, MPEG2 files, audio files, original and compressed graphics, your DVD project file, and final rendered DVD output folder. Adding samples from your next job should be a breeze.
Read more by Sonja Schenk.
This article was last modified on January 6, 2023
This article was first published on April 29, 2002
Commenting is easier and faster when you're logged in!

Recommended for you

The Importance of Paragraph Composition
Gary Cosimini (who used to be a senior art director at The New York Times and is...
How to Make an Abstract Mosaic From a Photo in Illustrator
Learn how to create an abstract mosaic image from a photo in Illustrator with a...

TypeTalk: Glyph Substitution
TypeTalk is a regular blog on typography. Post your questions and comments by cl...