
Making a DVD Video Portfolio: Onscreen Menus
Color Guard
You also need to make sure the colors in your artwork are acceptable on all the different monitors that may display your DVD: a Macintosh computer, an IBM-compatible computer, or a TV monitor. Of the three, TV monitors have the most limited palette of acceptable colors, known as NTSC-legal colors (see figure 6). NTSC is the type of video that’s broadcast in North America and Japan, as opposed to PAL, which is broadcast in most of the rest of the world, and HDTV, the digital broadcast standard that will become the norm in 2006.
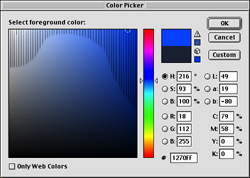
Figure 6: In the Apple Color Picker, the colors that fall in the regions under the striped overlay usually aren’t NTSC safe.
NTSC video is notorious for its poor ability to handle bright, saturated colors. The rich reds and magentas that look great on a computer screen will bleed, flicker, and generally look awful on a TV monitor. With Photoshop 6.0, you can choose from different proof setups in the View menu to see how your artwork looks on different types of monitors, but nothing can take the place of looking at the image on real monitors.
White Out
Yep, you guessed it. Video white isn’t the same as computer white – in other words, it’s not 100 percent white. In video gamma, 100 percent white is considered the ultimate maximum that the video signal can handle in terms of brightness. This is overkill for most monitors, so standard video white is usually 75-80% white.
In Photoshop you can use the NTSC colors filter to make sure your artwork meets the limitations of NTSC video. The NTSC colors filter will reduce the brightness and saturation of any color that isn’t NTSC legal. Usually, the changes are not noticeable unless you have an image that has lots of oversaturated color, like the background artwork on the right below (see figure 7). Unfortunately, using the NTSC colors filter on this image resulted in some strange posterizing, as you can see in the image in the middle below. I was able to create a better-looking NTSC-legal image by slightly desaturating the image first, and then applying the NTSC colors filter just to be safe, as seen in the image on the left.
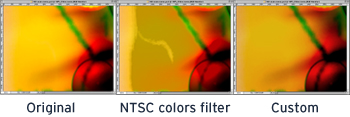
Figure 7: With an oversaturated image (right) applying the NTSC filter alone isn’t enough. Desturating the image first (left) gave better results.
Before you move on, make sure your background artwork and text are NTSC legal – you might want to duplicate the original layers as backups before you apply the NTSC colors filter or make any brightness and saturation adjustments.
Button It Up
The next step to completing your menu in Photoshop is to create layers containing the button graphics. For my main menu, I decided to use four simple text-based buttons: Films, T.V., Music Videos and Contact. Your buttons can be text-based like mine, graphics-based, or even video-based, which is a little more complicated. (We’ll talk about video-based buttons and other video elements in part three of this series).
On a DVD, each button has three states: normal; selected, for when the user chooses it; and activated, for when the viewer clicks Enter or OK (see figure 8). In Photoshop create a separate layer for each state of each button and name it appropriately: Films button normal, Films button selected, etc. You can turn layers on and off in Photoshop to get an idea of how your final DVD interface will look.

Figure 8: The Films button in three different states: normal (top), selected (center), and activated (bottom).
Once you’re done with the main menu and all the buttons, save the Photoshop document. You’ll need to create a new Photoshop document and repeat the process for each sub-menu. Don’t forget to add a button that lets the user return to the main menu in the sub-menus.
Final Prep
The final step is to get your Photoshop documents ready to import into a DVD authoring application. Save a copy called Main menu clean.psd and get rid of unnecessary layers, such as the TV safe guides layer and other work-in-progress layers. All effects layers need to be flattened but be sure not to flatten the whole file. Rasterizing any text layers onto a transparent background is also a good idea.
Finally, resize the document to 720 x 480 pixels. Be sure to deselect Constrain Proportions in the dialogue box (see figure 9). If your DVD authoring software doesn’t support Photoshop layers, you’ll have to save each layer as a separate document before importing.
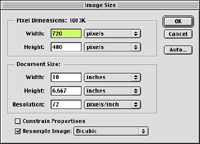
Figure 9: Be sure to uncheck Constrain Proportions when resizing the document.
Up Next
In the next article in this series, you’ll learn how to prepare digital artwork, video and audio media, build an interactive DVD project, create a slide show and put the final polishes on your DVD.
Read more by Sonja Schenk.
This article was last modified on January 6, 2023
This article was first published on April 15, 2002
Commenting is easier and faster when you're logged in!

Recommended for you
Working with Small Caps, Subscript, and Superscript
Explore the secret life of fonts with Nigel French in his series about the hidde...

Interview with Echo Swinford, PowerPoint Author and Consultant
Q&A with Echo Swinford, who is presenting at the 2025 Presentation Design Confer...

WordsFlow Offers a Revolution in Word-InDesign Workflows
When it comes to the editorial component of InDesign workflows, there’s no...