Make One (or more) Round Corners on an InDesign Frame
James wrote: Is it possible to create a box (with a rule) and only round one of the corners? This would be cool for my ad designs, but I can't...

James wrote:
Is it possible to create a box (with a rule) and only round one of the corners? This would be cool for my ad designs, but I can’t solve it!
James, you’re in luck. While InDesign’s Corner Effects feature cannot round a single corner, InDesign ships with a script that can do it for you. The script — called CornerEffects.jsx — works on both Mac OS and Windows, but isn’t installed by itself, so you need to grab it from the install discs, or download it as part of the sample scripts at Adobe’s XML and Scripting web page. Put the script in the InDesign > Presets > Scripts folder and then open the Scripts palette (from the Automation submenu, under the Windows menu in InDesign). The script should be listed there.
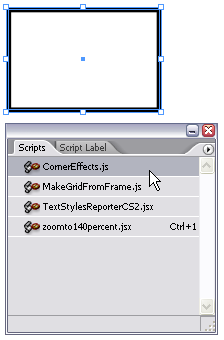
Select a frame and double-click on the script in the Scripts palette to run it and open the Corner Effects dialog box.
Here you can choose which points on the path you want to control.
The only problem is that it’s not always obvious which is the “second point” on the path, or the “fourth point,” or whatever. My suggestion is to save your document or make a duplicate of the frame before you run the script. That way, if you don’t like the effect, you can choose Revert or delete the result and start over. (You can use Undo, too, but trying to undo after a script is tedious because it may have performed many — even dozens — of steps without you seeing.)
This article was last modified on December 18, 2021
This article was first published on March 7, 2007
@Rory: InDesign CS5 and later have live editing of corners! Jump in and upgrade, the water’s fine!
I hate to say this… but why can it not be like freehand MX where it gives you the option to edit corners “live”. This seems like a little bit of a hack. Nevertheless, I learnt something new today.
Thanks for all the indesign help :)
Incredible! Many thanks! I always aspired to create in my website the like.
Is there a script which keeps the value of the corner? Cause when you scale this, the corners become distorted. That?s not what i need. I need to scale my object, but the corner needs to stay at (example) 2 mm.
Thank you! I have CS4 and the script was already installed. It made it very easy to get the images in my brochure to look the way I wanted.
You can duplicate the box you want to be rounded, CTRL+C – ALT+SHIFT+CTRL+V, so that the copy you made is on top of the source.
For one round corner you have to duplicate again. When you have 3 objects one on top of the other, you must drag, with the selection tool, V key, the margins of the object until the back object has the corner you want to be rounded visible. On that object you apply the round corner effect at your specifications. After that, just select all 3 objects and from pathfinder just click ADD. Regardless of the content, you will have one round corner and the same content, fill, stroke and any other properties you can think of.
For 2 corners its easier. Just duplicate and leave the bottom object with the corners you want to be rounded visible. Round the bottom object then ADD.
If you want 2 opposite corners to be rounded then you use the same technique as in the first part, with 3 objects. :)
Worked like a charm. Saved me an hour!!!!
THANK YOU!!!!
Don’t forget with CS5 you can get all the rounded corners you want, immediately on the screen. No more script work-around needed!
Fantastic, I have been looking for a simple way to do these boxes and the script suggested works like a dream
gracias ;))))
Thanks David, This will save me hours of work on a new project wher I have to rebuild uneven rounded corner boxes.
so one more silly question when you have a rounded rectangle with all 4 corners rounded it keeps the radius intact when resizing when using the script it’s kind of like illustrator. I am using this in a catalog design what a pain in the butt… I am inserting shapes into a square box to cut off the corners but when adding or deleting lines I am constantly resizing the rounded corner box inside my square corner outsie box…
I thought this would solve my problem but without the constant corner radius it doesn’t work… any ideas?
Cheerios M
PS: all great ideas btw!!!
I’ve got even one more method to add to the pile! It’s limited in it’s usefulness (you have to have a solid background color) but I used it at a newspaper all the time.
Draw your rectangle that you want to round off on one or more corners.
Make a square that’s the background color (I’m usually using white). Align the center to the corner you want to round. Make a note of the dimensions ?ย it’s easiest to pick an even size, but you can copy/paste for the next part.
Use Corner Effects… on the square. Take the width of the square and divide by two (paste in the value and trail a /2 for extra fun!) then select Inverse Rounded.
Your shape will be a cute little four-pointed star that you can then place on other corners as well. You can scale that shape to change the radius of the rounding. I kept one in my library and used it for quick/dirty rounding.
Happy (inverse) rounding!
This is a great script! (just used it for first time with CS4 on Windows).
The only problem with this script is that if you forget and just use the default unit (points) in it’s dialogue box, it converts the units preference for the document to points. This is somewhat inconvenient when working in mm (fairly common in Australia). I’ve just tested it again, and if you manually type mm into the dialogue box (eg. “5mm”) then even though it converts this measurement to points, it leaves the document preference as is.
Marcus: What do you mean? Add an ancor point to square it off and then it won’t be distorted? I am working on CS3 and I’m having the distortion problem and can’t figure it out!
The problem with the scripted solution is that when you resize the box, the corners become distorted.
In CS3 you could apply rounded corners using corner effects then use the ‘add anchor point’ tool to add a second point directly above a corner to square it off. You could then resize the box without distorting the corners.
A technique which sadly no longer works in CS4.
We usually need help when were doing a job so were usually on the clock. When we look for help we don?t need the kind of help that takes us to a link that takes us to a page that we have to search for the file as in the first paragraph.
https://www.adobe.com/products/indesign/xml_scripting.html
I see this more and more these days. People trying to sell rather than help. All I thought when I read this help column, was it would be faster to download the script than find my DVD?s and try to find the file on them.
I guessed wrong
Thanks for the great article shame on you and everyone else that takes you in a link Joy Ride.
OK, so I used to use this script in CS3 A LOT but in CS4 it just isnt working properly. I go through all the steps and nothing happens. Is there a problem in CS4?
One of my favorite sites about InDesign and other Adobe goods. Thanks for the info. Thought I’d contribute a link I found for when things don’t work at all!
https://jsid.blogspot.com/2006/07/sample-scripts-wont-work.html
Thanks heaps for the wonderful tip!!! Now I can sleep at night. =)
[…] PostsRounded Corner Tables and Brackets on Frames by David Blatner Make One (or more) Round Corners on an InDesign Frame by David Blatner Making Custom Arrowheads by David Blatner Force a Closed Path with the Pencil Tool […]
Just came across this and wanted to express my thanks – you have saved me quite a bit of time and for that I’m grateful :)
I love this script. Use it all the time. One step rather than using pathfinder etc.
Just what I was looking for. Thank you very much.
Hi David, this was really useful, thanks for sharing.
There’s yet one more way. All of the previous methods are fast and work great – unless you want to quickly resize the frame. To do so, you would have to use the Direct Selection tool and grab only the points you want to move. However, if you have other items stacked on top of each other, it can be frustrating to try to grab only the points you want.
A method I prefer, although it takes a little more time but gives you incredible flexibility in resizing, is to first make an octagon (eight sides, like a stop sign) using the polygon tool. Then add guides to each side – the “AddGuide” script that ships with InDesign works great for this step.
Then use the Direct Selection tool and move each point to the nearest corner so that you have two overlapping points on each corner. Then apply your rounded corner effect.
It appears nothing is happening, but you just need to use the Pen tool, hover over the corner or corners you want rounded until you see the minus (-) sign next to the Pen cursor, and click to remove the point. Voila!
Do the same for any other corner you want rounded. Using the Selection tool, grab a side as you would to resize a regular rectangle and stretch or reduce the height or width, and the corner proportions stay the same.
Why not make a compound path? That’s what i did today before coming across this article?
this was sooo helpful! thank you a ton!
Kati, yes that is great! Virendra #10 wrote about that above, too.
I have CS2 and i found this: draw a rectangle, then open path (object/path), choose one of the points with the direct selection tool, now round corner (object/corner effects) now you have a 3 rounded rectangle :) but only works with one corner.
I find it easier to make the rectangle in Illustrator and copy+paste into InDesign.
Thank for the post!
Very helpful
Thanks.. been looking for this!
by the way, where it really shines is when you already have an image in a sqaure box and you don’t want to play with pathfinder and reload an image.
In CS3, the corner effects javascript is already installed and it works like a charm. It’s as fast to use as any other palette command.
I have nothing against the scripts. At some work places you are not allowed to install anything for obvious reasons. So here is another simple solution. Draw 2 rectangles – one with sharp corners and other rounded – sided by side. Select both and go > Pathfinder & Add. Done.
For those of you who don’t know what Jim is referring to, see this cartoon at Yabbadobedoo and also this blog entry.
Mr. Blatner,
He probably gets paid by the hour and is milking it. Or he’s aiming Russell Viers’ prize for Watching the clock.
Virendra, now you are pushing it too far! With that much work, it’s time to just go use the script. ;)
With a little bit of imagination I did manage to do two rounded and two sharp corners. Once you got 1 sharp and three rounded corners recangle(see #10 above), select it and go Paths> close paths. Shift, option click and drag to make a copy. Flip the copy horizontally, select both and go to Pathfinder> Add. Bingo! You have 2 rounded corners and 2 sharp in a rectangle.
Virendra, that’s a great trick! As you point out, it only works when you want one sharp corner and three rounded corners, but it’s very clever. Thanks.
There is another faster way without any script. Simply draw a rectangle, select it and go to Path> click open paths and then convert shape to rounded. It gives you 3 rounded corners and one square.
Awesome. I so needed this having grappled with this recently. I find the script is so fast and exacting that it really beats any of the other methods mentioned here.
Here’s another way. Draw a simple right angle with the pen tool, then apply your corner effect from the object menu. Use the direct selection tool and pen tool to complete the other sides… you can hold shift to constrain to 90ยบ so your sides are square. No bezier curves required for the pen tool impaired :)
Bear in mind that this script is a javascript, so you can edit it yourself — you may want to if you’re producing a book or a line of books that only use one of the effects, or if you want to use a different default offset size, or if you’re only ever going to cut a specific corner, etc.
Just make a copy of the script, rename it as necessary, edit it as you like, and you’re golden.
I was working on a project that involved — if I remember correctly — about 6 clicks and a bit of typing per corner effect, and 5 minutes of javascript hacking changed that to only 2 clicks.
James, the person who wrote these scripts — Olav Martin Kvern, who is also my co-author on Real World InDesign — has been working on perfecting the “MakeCoffee.jsx” script for years. I believe he’s waiting for CS4, when InDesign will have a built-in coffee roaster feature.
david, thank you for pointing me in the right direction – those scripts are cool! is there one that’ll make me coffee and create pages while i take a lunch-break!?
and thanks for your quick response too.
james.
london, uk.
Oops. I left out an important step. Two anchor points need to be added to the rectangle’s path, and the corner point needs to be pulled into the ellipse with the direct selection tool. If the corner point isn’t pulled in, pathfinder will not use the ellipse’s path.
It’s a fact !
I find it much easier and faster, to draw this kind of box with the Pen tool, manually than to open palettes and play with features !
Really, try it ! It’s like rediscovering a real pen and paper after 15 years of computing…
Pathfinder can also serve this function. Draw and place an ellipse in the corner and use Add in the pathfinder to join the objects. Then apply a stroke.
You can also use a polygon shape to help illustrate those “savings blowout” kinds of boxes.
I’ve found this problem with some of my designs. Im a beginner but solve the problem very easily combining basic frames with sthe same swatch. I first make my rounded frame, then I make square frames for those corners that I dont want to be rounded and put them in front, so I just show the rounded corner…