
Learning the Ins and Outs of Mac OS X

 Brought to you by Element K Journals
Mac OS X has been around for over six months now and many folks are just beginning to consider it an option. But once you load it and take a few days to play around with it, you’ll quickly discover that it’s a surprisingly elegant replacement for your old OS. But are you really using the new features to their fullest? We’ve found that many people simply treat Mac OS X as an updated version of the old OS instead of the revolutionary new operating system that it is. In this article, we’ll examine the unique aspects of Mac OS X and show you how to capitalize, and in some cases improve, on the new features.
It’s All in the Perspective
The most important thing to remember when working with Mac OS X for the first few times is that it’s not just an upgraded version of the Mac OS. It’s a totally different sort of operating system that just happens to be able to run Mac OS 9.1 applications. In fact, if you continue to think that Mac OS X is little more than the next step for Mac OS 9.1, you might confuse yourself. Keep telling yourself that this is a brand new operating system, not an evolution.
First you have your choice of views for mounted volumes: Column, Icon or List. To change views you can either choose the one you want from the View menu, or click the corresponding button in the Finder window, as illustrated in Figure A. And while the Icon and List views will make you feel more at home, you should really begin getting accustomed to the Column view, the holdover from NeXTSTEP. This is not so much because it’s a new feature of Mac OS X, but rather because it’s much more powerful than the older views. For instance, only the Column view gives you a quick file preview of a selected item, as shown in Figure B. As you’ll notice from our example, you can even preview audio files via a QuickTime-like player in the window.
Figure A: You can change the view of a window by choosing another view button.
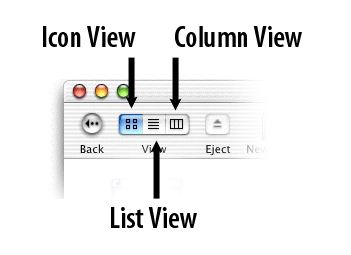
Figure B: The Column view gives you a live preview of several file types.

Another feature that makes the Column view so powerful is that it allows you to easily navigate through several levels of directories with a single click of the mouse. For example, if you’re browsing through the Preferences folder in your user directory, you can quickly return to the main user level by just clicking on the appropriate user folder, as illustrated in Figure C. Furthermore, you could copy any number of items to other levels by simply dragging them to the left and dropping them in the appropriate folder. And since you’ll be able to copy between folders from one window view, you’ll end up with fewer open windows on your desktop. In fact, there’s never a need for more than two or three windows to be open on your desktop at any given time. That in and of itself is reason enough to get used to the Column view. Once you get used to the view options, you’ll quickly discover their power.
Figure C: You can easily copy files up several levels in the Column view.

Avoid Double-Clicking on Your Volumes
When you’re in an application and you click on the background to return to the Finder, you’ll find that it doesn’t display your windows. And you’ll therefore double-click on the respective volume to display the contents. The problem is, when you choose the Finder’s Window menu, you’ll discover that you actually have a number of windows, as shown in Figure D. Activating the Finder by clicking doesn’t display the windows–but they’re there. To avoid propagating a number of extraneous windows on your desktop, get out of the habit of double-clicking on the volumes on the left of your desktop. And to help you out, you can remove the volume icons from the desktop completely. Just choose Finder > Preferences and deactivate the Show Disks On The Desktop option, as shown in Figure E. Also get into the habit of switching to the Finder by clicking on the happy Mac face item in the Dock. Doing so quickly takes you to the Finder and displays all the open windows.
Figure D: You can quickly end up with a multitude of duplicate windows in Mac OS X.

Figure E: It’s best to remove all temptation to double-click on the icons of mounted volumes.

Use the Tools Available to You
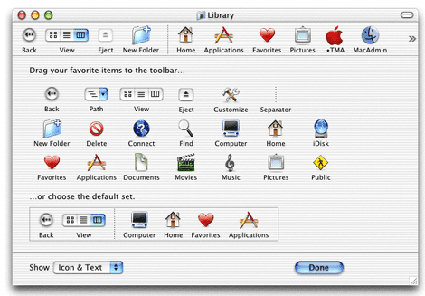
No matter which view option you’ve used in the past, you’ve undoubtedly noticed the icons atop each of the windows. Chances are you even learned you could customize these icons by going to the Finder and choosing View > Customize Toolbar (or by [shift]-clicking on the pill button on the right of each toolbar). Yet the window that appears, shown in Figure F, deceptively implies you can do little else than add a few icons to the toolbar. You can, however, use this area for many other things.
Figure F: The options for customizing the toolbar seem pretty basic.
For instance, let’s say you have three primary folders you use throughout the day. There’s no reason to navigate through various folders, though–just drag them onto the toolbar. When you do, the operating system creates an alias of the item and stores it on the toolbar. That way it’s always just a click away. You can use the same trick for frequently used files, system preferences, and volumes (even your iDisk).
We’ve also found that drag-and-drop applications like StuffIt Expander and Disk Copy are good to put on the toolbars, as shown in Figure G. That way you can easily open or copy a file without scouring through your folders. While you’re adding and deleting items from the toolbar, don’t forget the very useful separator bar. That way you can visually categorize each of the items.
Figure G: You can even include drag-and-drop applications on your toolbars.

What’s Good for the Finder
While we’re on the subject of toolbars, don’t forget to take a look at the System Preferences dialog box. Though it’s not as flexible as the Finder window’s toolbars, it does allow you to store up to six system preference options on the toolbar. That way, you don’t have to click the Show All button after you’ve made a change to another setting. Just click the preference’s button on the toolbar.
While you’re in the neighborhood, be sure to familiarize yourself with all the features available in the System Preferences dialog box. That way you won’t have to hunt around when you need to make a quick change to a setting.
New Way to Launch
Though Apple made a big deal of the Dock when they rolled out Mac OS X, it’s been somewhat maligned by users, who find it a bit obtrusive. However, with a little understanding you’ll learn to love it.
First off, don’t consider the Dock the tool to launch applications. While it’s possible to use it for this, there are too many other applications that handle this function better. (For more on these applications, see the sidebar “Drag the thing or drop the drawers” in this issue.) Rather, think of the Dock as a place to hold applications that you’ve hidden, running programs or docklings like Airport or Battery Monitor. These items, shown in Figure H, are convenient here without taking up too much space, akin to the Control Strips of the previous OS.
Figure H: There are a number of good docklings that add function with a small footprint.

Another good use for the Dock is alternative storage of a volume’s icon. That way, you have instant access to all the items through a hierarchical menu with a simple [control]-click.
Should you decide that you want to keep an application in the Dock even after you’ve quit it (so you can quickly launch it later), [control]-click on the item and choose Keep In Dock from the pop-up menu. You can also resize the Dock quickly by [control]-clicking on the separator bar and moving the selection pointer up or down the screen. As you’ll notice from the example shown in Figure I, this also gives you access to the Magnification, Hiding and Preferences options.
Figure I: You can resize the Dock on the fly by [control]-clicking.

Now comes the sad part. Even though Magnification and Bounce are cool features to show your friends, they don’t do much good in a practical setting, especially if you’re using the Hiding feature. To save yourself a bit of time and make things easier, choose the appropriate magnification, activate auto-hiding, and then turn off Magnification and Bounce (you can always turn them back on if you need to impress your friends).
It’s Multitasking–Use it
When you launched an application in previous versions of the Mac OS, chances are you patiently waited while the program opened. Don’t waste your time doing so with Mac OS X. Instead, launch an application and then switch to your browser and check a few Web sites, or start another program. Since Mac OS X is multitasking, there’s no reason to wait for one task to finish before you proceed to another. The OS can easily handle a number of functions without hiccupping due to lack of memory or processor time.
When in Doubt, Reinstall
If you get curious and make a lot of changes to the system, it’s possible you could cause major problems (that’s why most of the important stuff is hidden from view!). But should you mess things up, you can get things back to normal without much fuss. Because Mac OS X separates user areas from the system, you can reinstall the system without affecting the applications you’ve already installed. Furthermore, the installer that comes with Mac OS X is smart enough to know what parts of the system need to be reinstalled and what parts are okay left as is. That way you save time should you encounter any problems.
Setting Up For Multiple Users
While much has been touted about the stability and multitasking capabilities of Mac OS X, one of the most powerful yet unheralded features has to be its multi-user environment. And while you might think this feature is only functional for computer labs, you’ll actually find it helpful in the office and even at home.
Mac OS X includes both local and remote support for multiple users. Local and remote users can access a shared set of applications while protecting the system from tinkering. Furthermore, each user can have a separate experience, customizing every feature of the operating system to suit her–down to the alert sounds and desktop pattern.
Remote users are a bit different in that you can have multiple users accessing your computer simultaneously. They can still access the same information they would as local users, but they just don’t have to come in to the office!
To accommodate multiple users, Mac OS X stores all the system files in an area only accessible to the administrator. (The system administrator has access to all the system files, both locally and remotely.) To set up a user account, you just create the username and password. The OS then automatically creates a Home directory complete with a set of folders for the user to store her files, as shown in Figure J. Applications are then stored in either the Applications folder or, if they’re only needed by a single user, in the Home directory.
Figure J: Mac OS X automatically creates directories for your users.

Make Use of Key Commands
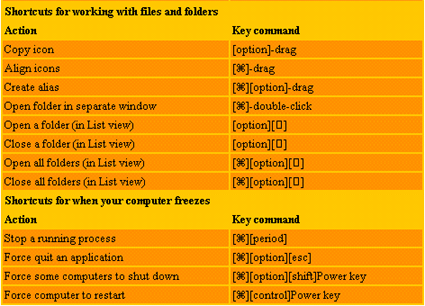
Finally, once you’ve grown accustomed to Mac OS X you’ll want to begin using shortcut key commands whenever possible. That way you won’t have to move your hands from the keyboard as often. Table A lists the basic shortcuts available in a standard keyboard setting. And don’t forget that the Finder includes shortcuts for nearly every menu command.
Table A: Mac OS X keyboard shortcuts


Copyright © 2000, Element K Content LLC. All rights reserved. Reproduction in whole or in part in any form or medium without express written permission of Element K Content LLC is prohibited. Element K is a service mark of Element K LLC.
This article was last modified on January 6, 2023
This article was first published on August 24, 2001
Commenting is easier and faster when you're logged in!

Recommended for you

On the Move to InDesign: Adding Dingbats
I usually write these tips to show you something terrific that InDesign can do....

TypeTalk: A Bodoni Is a Bodoni Is a Bodoni?
TypeTalk is a regular blog on typography. Post your questions and comments by cl...
FontAgent Pro Provides Font Management and Repair for QuarkXPress 7 Users
Insider Software today announced the immediate availability of the industry...