
Laying Out Basic (non-PDF) Forms Using Tabs
Three ways to get great-looking tab leaders for your forms, a Super Bonus Tip, and funny cartoons ? check this out!

Everyone, at one point or another in his or her career, ends up having to lay out a form something along the lines of this:
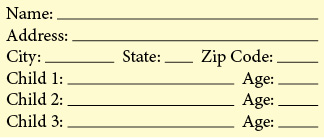
A plain vanilla form
Nothing fancy, just some labels followed by lines on which to write the information. But what is the best way to go about actually setting up those lines?
Note: If you want to learn about how to turn InDesign forms into nifty PDF forms there are numerous articles on this topic.
Everybody seems to make them a little differently, but here are a few different ways to set up those form lines that should fit into anyone’s work styles.
Method 1: Tabs and Character Styles
The first method to lay out your form is to use tab stops to set the spacing between the labels and then use a Character Style to apply an underline to the Tab characters.
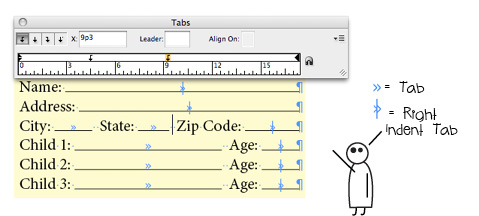
Note: If you want the underline to extend all the way to the right edge of the text column press Shift+Tab to insert a Right Indent Tab character.
By using a Character Style, if you ever want to change the appearance of the form lines- make them dotted, for example, or move them up or down a point or two- all you have to do is edit the Character Style and all your form lines will update automatically. Nice!
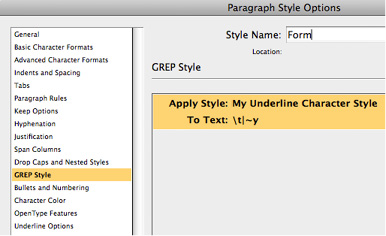
Super Bonus Tip!
If you want to be super cool- I mean knock-your-boss’s-socks-off cool- use a GREP style as part of the Paragraph Style to automatically apply the Character Style to the Tab and Right Indent Tab characters as soon as you type them.

Never underestimate the power of GREP Styles
It sounds scary and complicated but it really isn’t. Just go to your Paragraph Style>GREP Style panel and edit it so that it looks like the screenshot, below: (the ?|~y? is the way you tell InDesign to look for any Tab character or Right Indent Tab character).
Method 2: Tabs and Underline
The next method is identical to the first but, rather than using a Character Style to apply the underline, you just select the Tab characters and apply the underline manually (or by using the keyboard shortcut Command+Shift+U (Mac) or Control+Shift+U (Windows)).
While this method is all fine and good, by not using a Character Style to apply the underline it makes changing the appearance of all the form lines a bit of a hassle should you ever want to do so. And, of course, you can’t use the GREP Style trick unless you use a Character Style. If you’re even halfway comfortable using styles I’d go with Method 1.
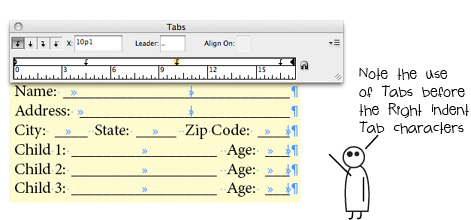
Method 3: Tabs with Underscore Tab Leaders
Another method to lay out your form is to use tab stops to set the spacing between the labels but, rather than applying an underline to the Tab characters, you actually edit the tab stops themselves so that that they use the underscore character as a tab leader. You do this by selecting the tab stop in the Tabs panel and then typing an underscore character ( _ ) into the Leader field.
Note: While this works well when using normal Tab characters it does not work so well when using the Right Indent Tab- since the Right Indent Tab character does not have a corresponding tab stop in the Tabs panel so you cannot apply a tab leader directly to it. If a normal Tab character appears on the same line before the Right Indent Tab then the Right Indent Tab will inherit the previous Tab character’s leader setting, but if there is no preceding Tab character you are out of luck. The way to work around this is to type a normal Tab character before you type the Right Indent Tab.
Setting tab leaders is fun and easy!
While this lets you off the hook for using underlines or Character Styles, by using an underscore as the tab leader you lose a lot of the control over the appearance and vertical position of the underline that you would get if you used the underline attribute.
Method Oh Dear God Please Don’t Do This: Inline Lines
One really bad way to create form lines is to draw them using the Line Tool and then pasting them into the text as inline graphics. There are many, many drawbacks to creating a form this way: if the text or column width changes updating the width of all of the lines can be a nightmare, it is very easy to accidentally move a line so it is no longer vertically aligned with the others, etc. Do not do this, only sadness lies down this road.

Making forms using inline lines… just don’t do it
Note: There are some very good reasons to do something like this using inline frames if you do want to create a PDF form and you are using InDesign CS6, but this topic is covered in other posts on this web site, such as this.
So the next time you need to create a simple form in InDesign use one of these methods above (but not that last one) and you should be whipping out attractive and flexible forms in no time.
This article was last modified on December 21, 2021
This article was first published on August 2, 2012
Commenting is easier and faster when you're logged in!

Recommended for you
Tab Stops Snap to Points
Dragging a tab stop should be a smooth and easy affair. But those darn tab stops...

20 Obscure Features
David Blatner shares his favorite 20 obscure features that every InDesign users...
Importing a list of items for CS6 forms
A fast-paced scripter writes a script to let you import a list of items for list...