


![]()

Version: 4
Operating systems: Macintosh, Windows
Shapes and lines are important design elements in any layout. Prior to version 4, QuarkXPress was primarily just a layout program. Using it to create any kind of design element wasn’t really possible, so everything had to be imported. The most you could do within the program was fill a picture or text box with color to liven up the color scheme of your page, and even that could end up flawed. Given that, you may be in the habit of doing all your design work in Illustrator or some other drawing program. Since QuarkXPress has added new tools, you don’t have to leave the application anymore to create graphic elements. QuarkXPress 4 has all kinds of path and shape tools that can be used to create graphics, like the one shown in Figure A.
Figure A: This graphic was created within QuarkXPress 4.

In this article, we’ll encourage you to break with the past and try out some of QuarkXPress’ design tools.
Multiple boxes
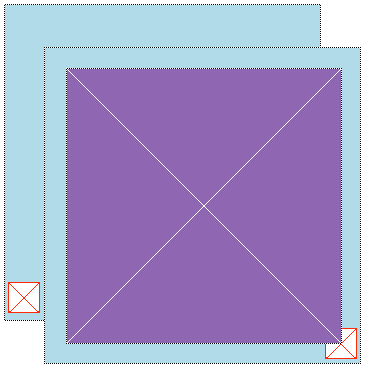
In the past, using QuarkXPress to add areas of color to your document was restricted by two things: the square shape and the box type. Depending on which box type you selected, there would be either a big X on the screen indicating a picture box or overset marks if you overlapped text boxes. If your layout became very complex, all of the X’s could get really distracting. Figure B shows the effect of overlapping just a few text and picture boxes.
Figure B: You can fill picture and text boxes with color, but it doesn’t look very nice on the screen.
Fortunately, there’s a solution to this visual problem. Quark Inc. finally incorporated empty or contentless boxes for specific use as graphic elements into version 4. Now, if you just need to create shapes or place large areas of color, you can use these empty boxes rather than picture boxes.
There are several advantages to using this new feature. First, the boxes look better on the screen. Second, they redraw more quickly because QuarkXPress doesn’t have to associate content with them. Lastly, they take up slightly less room on disk. But this is only a noticeable advantage if you’re using lots and lots of them.
Mutable boxes
Things don’t have to stay the way they are in any layout. QuarkXPress is very flexible. Any of its box types can be changed quickly from one to another. For example, if you have a picture box, you can change it to a text box by choosing Item>Content>Text. However, take care with this method, as switching the content of a box will cause it to lose its original content. So, the placed image will be deleted if you change it into a text box. If you’re just using the box as a graphic element, it’s best to empty it of content by choosing None instead of Text.
Adding boxes to the Tool palette
If you frequently create filled shapes with QuarkXPress, you may just want to add the contentless boxes directly to the Tool palette. This way you don’t have to keep setting the content of your picture and text boxes to None. To do this, choose Edit>Preferences>Document. In the Document Preferences dialog box, click on the Tool tab to change your tool setup. Once there, [?]-click the Default Tool Palette button at the bottom ([Ctrl]-click in Windows). When you click OK, the empty, contentless box tools will appear in your Tool palette, as shown in Figure C. They look just the same as your text and picture box tools, only empty.
Figure C: You can add contentless box tools directly to your Tool palette.

The empty box
The contentless boxes are a definite benefit to those that do a lot of drawing in QuarkXPress. In this article, we’ve shown you a better and more visually appealing way to create graphics. Even though the box is empty, it’s full of colorful possibilities.

Copyright © 2000, Element K Content LLC. All rights reserved. Reproduction in whole or in part in any form or medium without express written permission of Element K Content LLC is prohibited. Element K is a service mark of Element K LLC
This article was last modified on March 12, 2022
This article was first published on August 4, 2000
Commenting is easier and faster when you're logged in!

Recommended for you

This Week in InDesign Articles, Number 109
I should be getting work done, especially as Anne-Marie is out teaching epub stu...

The Design + AI Summit Agenda Released
We’re thrilled to share the agenda for our brand-new event, The Design + AI Summ...