

If you’ve been having trouble fitting your digital camera into your new digital lifestyle, then have no fear, because Apple’s new iPhoto is here. Apple’s latest iApp completes the company’s strategy of providing consumer software for video production (iMovie), video playback (iDVD), music playback (iTunes), and now digital photography with iPhoto.
iPhoto aims to streamline your digital photography workflow by providing automatic transfer of images from your camera to your Mac, as well as providing cataloging, online photo sharing, and online printing. While iPhoto offers nothing that can’t be found in third-party cataloging applications, like most Apple products, its engineering is so thoughtful that it surpasses most of its competitors in usability.
For the creative professional, though, iPhoto may not cut it for hard-core image asset management. If your needs are simple, though, it bears a closer look.
Import and Organize
As one would expect, iPhoto is built around many of the same interface elements as Apple’s other iApps. Pretty much all of the program’s functions can be accessed from the main window. If you’ve spent any time using iTunes, you should feel right at home navigating iPhoto.
iPhoto is only available for OS X, and the program makes great use of OS X’s built-in digital camera integration. Just as you can set iTunes to automatically launch when you plug an iPod into your Mac, you can configure iPhoto to open any time you plug in a digital camera.
Tabs near the bottom of the screen switch between iPhoto’s five different modes: Import, Organize, Edit, Book, and Share. When you plug in a camera, iPhoto automatically switches to Import mode, tells you how many pictures are on the camera, and offers an Import button for transferring the images. The program also provides a handy option to automatically erase the images from the camera after importing (see figure 1).
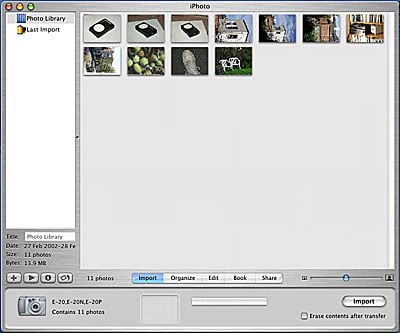
Figure 1: iPhoto includes a simple import facility that automatically detects your camera, downloads all of the images into a virtual “roll” and then, optionally, deletes the originals from your camera.
Once you’ve finished importing your images, you can switch to Organize mode where you can see thumbnails of all the photos in your image library. Just as iTunes displays a list that lets you navigate between viewing your entire music library and any Playlists (collections of songs in your library) that you may have created, iPhoto displays a list that lets you navigate between viewing your entire image library, and any albums (collections of images in your library) that you may have created (see figure 2). Buttons at the bottom of the list let you create new photo albums, and you can quickly add pictures by dragging thumbnails from the main display onto the appropriate name in the album list. Then, you can simply click on an album name to view the contents of that album. iPhoto also includes a “Last Import” item in the album list that automatically shows you the last batch of photos that were imported.

Figure 2: iPhoto lets you view your images as batches of imported images while the left-hand pane displays a list of all of your current albums.
In addition to importing from a camera, you can drag pictures into the iPhoto window from the Finder, or use the Import menu command to select a photo. Each time you import a batch of images, whether from a camera or from the Finder, iPhoto tags all of those images as belonging to the same “roll.” When you turn on Roll display in the browser window, you can see all of your images organized by roll. This may seem a simple thing, but if you’re like me, you tend to think of your images in batches, and often think of them in terms of when you added them to your library. iPhoto’s roll scheme gives you another way to organize and search your photos.
Each image in your library is given a name based on its roll number and position in the roll — 1-1, 1-2, 1-3, etc. Once you’ve imported a group of images, you can name each image by clicking on its thumbnail and entering a name in the title field beneath the album list.
The browser mode also lets you rotate single thumbnails, or a group of thumbnails, by selecting it and then clicking the rotate button. This rotation does not affect any of your original image data, only the thumbnail is rotated.
iPhoto also lets you assign keywords to images. Up to 14 keywords can be defined, and you can add any keywords to an image by selecting the image (or group of images) and clicking on the desired keywords. By switching from Assign to Search mode, you can quickly search by keyword by simply clicking on the keywords you want to search for.
Though iPhoto’s importing and organizational features are first-rate, it’s important to understand one very important facet of the program’s operation: When you import pictures, iPhoto copies all of the image data into its library on your hard drive. Because all of your pictures are stored locally, iPhoto can do such cool things as generate thumbnail images on-the-fly at any size, perform simple editing tasks, and export your images in lots of different ways.
Unfortunately, because iPhoto insists on storing all of your image data locally, this means it’s not really usable for cataloging an image collection that you want to keep off-line. For example, if you have a large library of images that you keep on CD-R, you would have to copy all of those images to your drive to catalog them with iPhoto. For cataloging off-line images, you’ll have to stick with programs such as Canto Cumulus, iView Multimedia MediaPro, or Extensis Portfolio. Hopefully, future versions of iPhoto will include an option for cataloging off-line media.
When you want to copy an image that you’ve found in your library, you can either drag its thumbnail to the desired destination, or use the program’s export command to create a copy of the image.
Also frustrating is iPhoto’s limited Information display. Though your camera probably stores complete EXIF information in the header of each file, (shutter speed, aperture, white balance setting, exposure compensation, and so on) iPhoto ignores this information and tells you nothing more than the date and time that the image was shot, along with resolution and file size. If you used any of your camera’s exposure controls to bracket a series of shots, you won’t be able to tell which shot was which with iPhoto. For even hobbyist photographers, this can be an essential feature.
Editing and Booking
Select an image and click the Edit tab and you’ll arrive in iPhoto’s simple editing environment (you can also enter Edit mode by double-clicking on an image in the browser window). Here you can crop an image, rotate it in 90-degree increments, use the program’s automatic red-eye removal feature, or convert an image to grayscale (see figure 3).

Figure 3: For editing your images, iPhoto provides only the bare essentials.
Obviously, iPhoto is not intended to be a full-fledged editing environment, nevertheless we’d at least like to see some additional tools that can be necessary to get an image ready for printing. Dust and scratch removal, sharpening, simple brightness and contrast controls, and possibly a text tool would all be great additions. (In the meantime, Caffeine Software’s excellent, free, OS X-compatible image editor PixelNhance makes a great complement to iPhoto and you can configure iPhoto to automatically launch PixelNhance when you want to edit an image.)
Once you’ve finished editing, you can use iPhoto’s sharing tools to output your photos in a number of different ways. The Book tab takes you to iPhoto’s Book editor where you can organize an album full of images into a book format. iPhoto includes a number of book format “themes” such as year book, portfolio, and story book, in addition to the basic Picture book. Images appear in the same order in which they are arranged in your album, so if you want to re-arrange the order of the book’s pictures, you’ll need to go back to Arrange mode and re-arrange the image order there.
iPhoto’s Book feature is simple but very effective and is a really cool way to create a presentation for your images. Ideally, we’d like to see lots more themes, as well as the ability to create your own themes. Given Apple’s continued development of Themes for their iTools Web Page engine, it’s a safe bet that they’ll beef up the Book themes in iPhoto. You can also order hard-copy editions of the books you make (more on that later).
Sharing
iPhoto’s Share mode provides a number of powerful options for publishing your images. The Print button allows you to print your images as a collection of thumbnails, or as a set of prints, one per page. If you’ve assembled a book using Book mode, then the print button will print your book’s pages. Printing controls are good and are certainly suitable for most users. If you’re hoping for ColorSync control and on-screen proofing, you’ll have to use a more savvy application than iPhoto.
The Slide Show button creates a simple on-screen slide show. You can define the duration for how long the slides should stay visible, as well as pick an MP3 file that will play during the show. iPhoto uses the full screen with a black background for playback, and cross-fades between each slide. For a simple presentation, it’s really all the control you need.
Apple has contracted with Kodak to provide online photo finishing, which you access by simply clicking the Order Prints button. Your computer will need to connect to the Internet to establish contact with Kodak’s site, but once it does, you’ll be presented with a simple dialog box for building an order (see figure 4).

Figure 4: When you finish editing your images, you can order photographic prints directly from Kodak.
Kodak’s Web photo-printing service, like similar services, uses a true photographic process to print your images. iPhoto’s interface to Kodak’s service is simple and efficient and, except for the fact that the service is not available to users outside of the United States and Canada, complete. Kodak offers a variety of print sizes from wallet-size to 20 x 30 inches.
iPhoto’s most unique output option is its Order Book facility. After designing a book using iPhoto’s book-making feature, you can order a linen-bound, hardcover professionally printed copy of your photo album. For $30 you can create a 10-page book. After the first 10 pages, each additional page is $3. The books themselves are very attractive, though they’re not printed using the same high-quality process as the individual prints that you can order. The printing in the Book is closer to magazine quality and is not as good as what you could get from an inkjet photo printer. Despite the lower image quality, the presentation is hard to beat. Whether it’s for making your own coffee table books, portfolios, or gifts, iPhoto’s books are very cool.
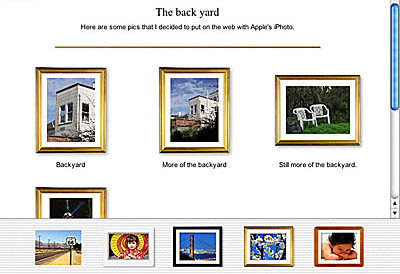
The HomePage button works in conjunction with your iTools account, iDisk, and Apple’s iTools HomePage features to automatically create a web site of the photos in the currently selected album. iPhoto provides a simple interface for adding text to a page full of thumbnails. When you’ve got everything the way you want it, iPhoto automatically uploads the photos to the Pictures folder of your iDisk and creates a web page (see figure 5). The resulting page not only displays the thumbnails, but also lets the user click on each thumbnail to see a larger version.
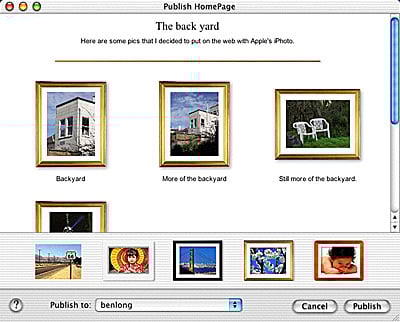
Figure 5: iPhoto’s HomePage button lets you quickly create and post a Web-based photo album of your images.
iPhoto’s integration with iTools is very clever and is a great way to implement photo sharing, as users can always manipulate the resulting images and files that are stored on their iDisk. The only downside to HomePage photo sharing is that visitors can’t order their own prints from your page as they can with other photo sharing sites.
iPhoto’s Export control lets you export your still images as JPEG or TIFF files but, unfortunately, doesn’t provide any control of JPEG compression parameters, a frustrating omission. The Export command can also export a QuickTime movie of a slide show but, for some reason, does not include dissolves. Finally, you can export a simple web page but, again, with no control over compression.
iPhoto, uPhoto
iPhoto has a lot of room for improvement, but for a first version it’s very impressive, very usable, and a great tool for its target audience. Graphics professionals, though, will probably find it underpowered. Until iPhoto is capable of cataloging offline images, and displaying EXIF information, it will be of little use in serious production environments. However, iPhoto’s interface, HomePage integration, and printing features are so compelling that we can only hope that Apple will make the few tweaks necessary to turn it into a more serious cataloging tool.
Read more by Ben Long.
This article was last modified on January 3, 2023
This article was first published on January 16, 2002
Commenting is easier and faster when you're logged in!

Recommended for you

Creating "Hobbit" Type in Photoshop and Illustrator
Unless you’ve been living under a rock the size of a cave troll, you...

Creative Cloud Storage: Where Does It Go?
When you create using Adobe Creative Cloud applications, where is your work save...

Make a Realistic Wood Texture in Photoshop
Step 1 Create a new document. The dimensions don’t really matter, but I st...