Inside Web Design: Using Layers in Dreamweaver
Application: Adobe Dreamweaver 3/4
One of the most frustrating things to deal with when working on the Web is that great storyboard thoughts just don’t make their way to fruition. It’s a phenomenon that happens all too often. What was a great idea in a storyboarding session often mutates into an absolute nightmare in the development phase of the project. While some of these issues have to do with poor planning on the front end, much of the problem is due to the fact that tables, although widely used as tools for page layout, sometimes leave much to be desired. Fortunately, the solution is right there in front of you–layers!
Introduction to Layers
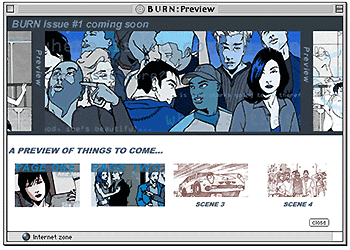
A layer is a container that can hold text, images, tables, other layers and various types of multimedia. For example, the Web site shown in Figure A uses layers to display and actually move a GIF file to give the illusion of a Flash file (you can check out the entire site at www.epicprops.com).
Despite the fact that layers can be a bit tricky to hand-code, and that some older browsers may not be “layer-savvy,” a great advantage is that they allow us Web designers a bit more versatility when positioning elements on a page. What’s more, Dreamweaver greatly simplifies the layer creation and editing processes. It kindly inserts the <span> or <div> tags, codes the layers according to how you arrange them in the WYSIWYG-style document window, and even supplies each layer with its own generic name.

Figure A
Layers can contain just about anything you can put on a Web page.
Working with layers is a little different than working with most of the other elements on a Web page and that means there are concepts that you’ll need to understand before you continue. The two most important concepts, and the ones we’ll conveniently review, are the use of coordinates and positioning.
Coordinates
Layers are positioned using a standard x/y coordinate system, just like you’d expect on a sheet of graph paper. However, instead of having the point of origin in the bottom-left corner, it’s in the top-left corner, which really makes a great deal of sense, if you consider how a Web page is arranged. Also, since layers can also be stacked, or overlapped, there must also be a third coordinate to handle that other dimension (no, that’s not a sign post up ahead). That third coordinate is referred to as the Z-index. It tells your browser which layer is on the top of the stacking order, which is on the bottom, and in what order any others should be displayed. The higher the Z-index, the closer to the top the layer is.
Positioning
It’s also important to be familiar with the different types of positioning for layers–static, relative and absolute. Static positioning is treated like an image, or a block of text. It takes up space within the document, and moves in relation to the other elements within the page. Relative positioning is also included within the page, but placed on the page relative to the top-left corner. Absolute positioning is treated completely separately. Its placement on the page is determined by the coordinates given for its location, and won’t affect any of the content on the page (unless of course, it covers it).
Let There Be Layers…
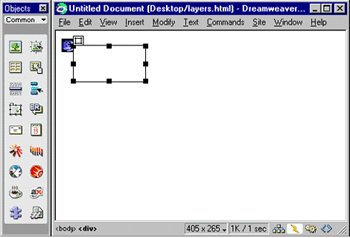
Now with the conceptual part out of the way, let’s proceed into how you can use layers within Dreamweaver. The application provides you with two methods for creating layers. First of all, you can click the Layers button on the Objects palette, which then transforms the mouse into crosshairs, allowing you to draw the layer onto the document window. You can also select Insert > Layer, if you prefer the menu method, and a default layer is placed in the top-left corner of the document window, as shown in Figure B. Don’t worry–no matter which method you use, you can edit the size and positioning at a later time!

Figure B
We’ve created a simple layout on our page.
Tools of the Trade
Now that you’ve created your first layer, the time has come for you to become acquainted with the tools available to you for your layer editing pleasures: the Layers inspector and the ever-popular Properties inspector, both shown in Figure C. Both of these tools are context-relevant tools (or tools that show only the properties of the selected element). The Layers inspector allows you to view and edit characteristics of your layers, including their stacking order, or Z-index (labeled as Z in the Labels inspector). With the View/Hide option button (ICON) you can also view or hide any of the various layers, allowing you to get a peek at what lies underneath. You can also opt to allow or disallow overlapping.
The Properties inspector allows you to change the layer name from a generic one to a more descriptive one (a practice that we highly recommend as it helps you recognize the layers later on), alter the positioning, size and background color of the layer. It even provides the option to drop a background image onto the layer, which produces a very nice effect!

Figure C
The Properties and Layers inspectors allow you to edit your layers easily.
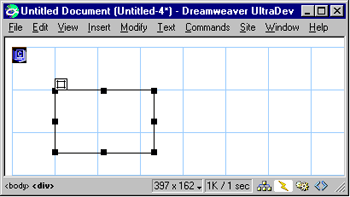
Another useful tool that might help you out when trying to get your layers arranged just so is the grid, which is illustrated in Figure D. You can place the grid onto the document window by selecting View > Grid > Show. It makes it a bit more accurate than eyeballing your layout, and you can even have your objects snap to the nearest gridline. (Should you need to alter the grid size or how it works, choose View > Grid > Settings and make any changes.)

Figure D
The grid helps with the lineup of elements, but won’t show up in your HTML file.
Selecting a Layer
In order to edit, delete or resize a layer, you have to first select it, which can be accomplished in a few different ways. You can click on the selection handle or on any of the borderlines of the desired layer, select the layer in the Layers inspector, or click on the Layer marker in the document window. (If the Layer marker is not visible, select View > Invisible Elements.) Once you have a layer selected, the Properties and Layers inspectors come alive, and provide you with many avenues from which to edit.
Moving a Layer
Typical of Macromedia-type interfaces, you once again have more than one way to edit an element. Once you select a layer, you can just grab the layer by the selection handle, and drag it to the desired location (don’t worry–you won’t hurt it!). You can also alter the layer’s x- and y- coordinates in the Properties inspector.
Resizing
At any point, you can resize any layer to your liking, using either click-and-drag, absolute sizing within the Properties inspector, or with keystrokes. To use the key commands, you simply hold down the [Ctrl] key in Windows ([option] key on the Mac) and use the arrow keys to resize the layer. If you’re using the Snap To Grid feature, you can also add the [Shift] key to snap the layer boundary to the nearest gridline, for that extra bit of precision.
Overlapping
The great advantage to using layers in page layout is that different elements of the page can overlap (which is a luxury that tables don’t offer, unless, of course, they’re contained within layers). And this luxury of overlapping layers comes quite easily in Dreamweaver. If you have two or more layers in the document window, just select each layer (making sure that the Prevent Overlap option is not selected) and arrange the layers so that they overlap. (That wasn’t too painful, was it?)
Now that you have overlapping layers, this is where the Z-index comes into play. You need to tell the browser how to interpret the stacking order of your layers. Remember, the highest Z-index is placed on the top of the stack, all the way down to the lowest Z, as you can see in Figure E. Don’t worry if the Z’s aren’t consecutive–it doesn’t matter. The browser will simply display the highest Z on top, and all others in order beneath it.

Figure E
Z-indexes of layers don’t need to be consecutive, just in order.
Conclusion
When layers were first introduced, they didn’t play well with the various browsers around. But now that the browser folks are making some concessions and coming to a feature-set consensus, layers can be a powerful tool in your Web arsenal.

Copyright © 2000, Element K Content LLC. All rights reserved. Reproduction in whole or in part in any form or medium without express written permission of Element K Content LLC is prohibited. Element K is a service mark of Element K LLC.


This is a very well-written article on the topic of layers. Would like to see more from this author!
This has some really great information – a great overview on what you can do with layers!!!