
Inside QuarkXPress: Producing a CD Jewel Sleeve Insert

![]()

Applications: QuarkXPress 4.x, Photoshop 5.0
Operating Systems: Macintosh, Windows
Whether designing a CD jewel sleeve insert for personal or professional use, the document setup is the same. The way in which an insert is produced also changes little–the difference being whether you’re printing the insert to a desktop printer or high-end press. Where the creativity kicks in is with the content and design. Depending on the subject matter, things can get pretty wild. Such was the case with the CD insert we designed, shown in Figure A, for an up-and-coming recording artist. In this article, we’ll show you design and file management techniques for producing a CD jewel sleeve insert that can be printed from a desktop printer or offset press.

Figure A
We used a digital camera, a computer and a desktop printer (plus one hip dude) to create this CD jewel sleeve insert.
In the Beginning …
There are two parts to a CD jewel sleeve insert–the front and the tray card. Their dimensions differ, so two separate documents are required. As stated earlier, though, neither part’s overall dimensions ever vary. The page count for the front part of the insert is the only variable. For this reason, it’s a good idea to create templates on which to base future inserts.
The overall page size of the front part of the insert (when folded) is 4.718 inches high by 4.75 inches wide. If you were to create a one-page insert for the front part of a jewel sleeve, those dimensions are what you’d enter in the Width and Height text boxes in the Page area of the New Document dialog box.
To create a four-page insert such as ours, however, you need to double the page’s width to 9.5 inches. Then, after the insert is printed, it’s folded down to 4.75 inches wide, creating four pages. To finish the document setup, we set our margin guides at 1/4 of an inch all around and deselected the Facing Pages check box. The Columns default was left at 1 and we deselected the Automatic Text Box check box.
Set the Stage
There are only a few guides you need to adhere to when designing an insert and they’re standard for each page. You can place two of the guides on the master page, which saves you from having to apply all the guides to each page. On the master page, you place a vertical guide at the 4.75-inch mark to divide the one page into two pages, even though (technically) there’s still only one page. The next guide indicates the live area. Keep pertinent content within these guides to prevent it from being trimmed off. Place the horizontal and vertical guides 1/8 of an inch from the page’s trim (edge).
We added a second page to accept the content for the opposite side of the first page. To create another page based on the master page, you drag the Master A icon from the top panel to the bottom panel of the Document Layout palette.
There’s one last set of guides that indicates the bleed, which needs to be added to complete the front part of the insert template. We didn’t add them to the master page because they fall outside of the page parameters; therefore, they won’t show up on the document pages. If you don’t allow enough of a bleed (providing there is a bleed), you’ll end up with white edges where there should be color. The horizontal and vertical bleed guides are placed 1/8 of an inch–the standard bleed allowance–outside the trim. The final page setup appears as shown in Figure B.
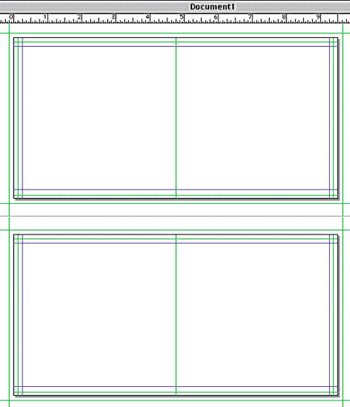
Figure B
This is the standard page setup for a four-page CD insert; make sure you’ve added enough of a bleed allowance to your page.
Save as a Template
With the basic setup complete, now’s the time to save the document as a template. If you press [c][spacebar]S ([Ctrl][spacebar]S in Windows), the Save As dialog box opens. From there, you can select a destination in which to save the file, name it, and select Template from the Type pop-up menu.
Now when you press [c]S ([Ctrl]S in Windows) to perform a save, the Save As dialog box opens automatically to prevent you from saving over the template. At this point, you can name the new file something specific to the job and select Document from the Type pop-up menu. Now you’re working in a document and the template is safely stored away for the next time you need to use it.
Check the Specs
If you plan to send your insert to a service bureau, you should call them for the material specifications before you start the design process. The following specs are fairly common, but always verify them with each printer:
- All images should be CMYK.
- All images should be saved as TIFF or EPS files.
- Images should be scanned at 300 dpi.
Design and Conquer
The cover of a CD insert doesn’t supply a lot of room to make an impact on someone who’s flipping through a store rack filled with hundreds of other CDs. Cover designs, therefore, must aptly reflect the artist’s style of music while fitting in the confines of the jewel sleeve. If you’re just creating an insert for personal use, this part is much easier.
For our cover design, we used a digital camera to capture the artist’s image and then enhanced the image in Photoshop. For specific details on how we created the cover, see the article “Cover design”.
While you’re creating the various image and text files, make sure to organize those files. A good system for file management is shown in Figure C. Note that we’ve saved everything that pertains to our job in a main folder and added subfolders to hold the images and fonts used in the QuarkXPress documents.
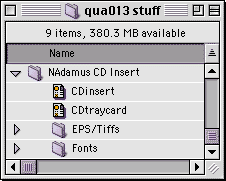
Figure C
Organizing your files from the start will prevent confusion later.
Lay it All Out
Once the image editing and design in other applications are done, you’ll probably need to do a little more prep work to the document. After which, you can place the graphics in the QuarkXPress document.
For example, we added the green color used in the cover to the QuarkXPress document’s Colors palette, so we could incorporate that color throughout the insert. Then we defined style sheets for the text: one for the lyrics and one for the song titles.
Next we were ready to add a picture box to the front side of page 1 and place the cover image. We placed another picture box on the back half of page 1 and placed the image created earlier for that area. We used the Picture tab of the Modify dialog box to position the image in the center of the page and to scale it down a fraction so that it fit in between the live area guides. The completed front and back (page one) are shown in Figure D.
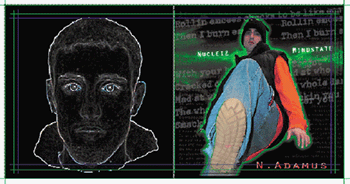
Figure D
We enhances a different image in Photoshop and used it for the last page of the front insert.
For the inside spread, we added a text box large enough to bleed off the page and filled it with a black background. Then we inserted the text file that contained the lyrics. We applied the Title style sheet to the song titles and the Lyric style sheet to the lyrics. Once the text was placed and the style sheets applied, we also went into the Text tab of the Modify dialog box and changed the Text Inset to 26 points and the Vertical Alignment Type to Justified. The final version of our inside spread is shown in Figure E.
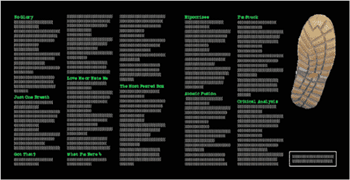
Figure E
Keep pertinent content within the live area to avoid it from being trimmed.
The Tray Card
The next step in creating a CD jewel sleeve insert is the back section, called a tray card or CD inlay. The method for creating the tray card is the same as for creating the front part, except the measurements are a little different to allow for the spine.
The spine, or sides of the jewel sleeve, is added to both sides of a standard CD insert page size. Each spine is 1/4 of an inch wide, so 1/2 of an inch needs to be added to the page’s overall width.
To create the tray card template, shown in Figure F, size a new document 5.906 inches wide by 4.625 inches high. All the other settings are the same as the front insert. Save the file as a template and then use Save As to create a document in which to work.
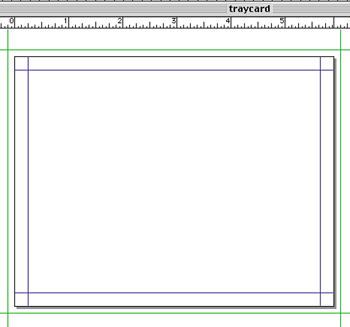
Figure F
Create a separate template for the tray card, which houses the insert’s spine.
For our insert, we added the background image that was used for the cover. We also added the song titles and applied the Title style. Rather than re-creating the style sheet, we imported it from the first document.
Next we added a text box to be used for the spine’s text. The same font that was used for the album title–Orator–was also used here. The text box was rotated 90 degrees and placed along the left edge of the page. Make sure when you’re placing the spine text to use a small enough type size to fit within the 1/4-inch margin. For the other side’s spine, just duplicate the first and rotate it -90 degrees. Place it on the right side, evenly aligned with the spine on the left. We also added a 1-point dotted line where the page folds to create the two spines.
The last step is to add the area in which we want the service bureau to strip in the bar code. (This isn’t necessary if your CD isn’t going to be sold in retail stores.) The standard size needed for bar code placement is 0.05 inches high by 0.75 inches wide. We created a space for the bar code in the upper-right corner of the back of the insert. However, its placement should be confirmed with your distributor. If it isn’t placed correctly, it may not be accepted.
Tip
- : Bar code placement should always be confirmed with your distributor. If it isn’t placed correctly, they may charge you to resticker each CD. This service is charged by the piece and can be extremely expensive.
Our finished tray card (prior to folding) is shown in Figure G. This completes the design and layout portion of creating an insert.
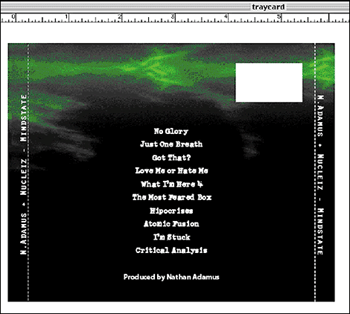
Figure G
It helps to indicate with a dotted hairline rule where to fold the page to create the two spines.
Press Time
Regardless of whether you’re sending your insert to a service bureau, you should print a composite and separations. Service bureaus typically ask for both and it’s a good way to verify that you’ve set up everything correctly.
The front part of our insert consists of two document pages. However, we really only want one double-sided print that will fold in half to create four pages. To print a double-sided color composite, press [c]P ([Ctrl]P in Windows) to open the Print dialog box, as shown in Figure H. Select Odd from the Page Sequence pop-up menu and select Centered from the Registration pop-up menu. Enter 0 pt in the Offset text box. Then, from the Setup tab, select the appropriate printer. The Preview tab, shown in Figure I, displays how the page will print. Click Print.
After the ink dries, place the printed page back into the printer so that it will print on the opposite side. This time, select Even from the Page Sequence pop-up menu in the Document tab of the Print dialog box, then click Print.
Tip
- : To figure out which side of the paper your printer prints on, it helps to place a small mark on the right, outside corner of the paper in the printer tray before printing the first page.
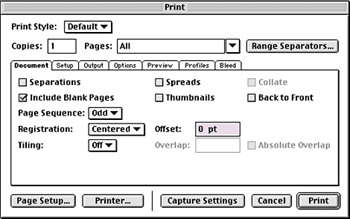
Figure H
You can make double-sided prints on most desktop printers.
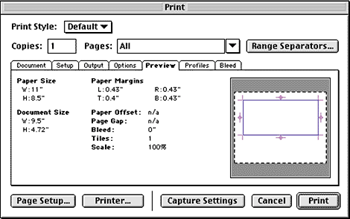
Figure G
Use the Preview tab to verify that the page’s setup is accurate.
Our tray card is one-sided, with the content facing out, so it didn’t require any additional printing steps. After both parts of the insert were printed, we trimmed them on a paper cutter, folded the front in half and the spines on the dotted lines, and fit them into a jewel sleeve. They fit perfectly!
Pack it Up
If you’re sending the insert to a service bureau, be sure to include specific editing instructions and color-break information in writing, as well as a mockup piece of the artwork. This prevents any misunderstandings between either party.

Copyright © 2000, Element K Content LLC. All rights reserved. Reproduction in whole or in part in any form or medium without express written permission of Element K Content LLC is prohibited. Element K is a service mark of Element K LLC.
This article was last modified on March 12, 2022
This article was first published on April 9, 2001
Commenting is easier and faster when you're logged in!

Recommended for you

Helping Photoshop and InDesign Play Nice
Chad Chelius and David Blatner offer advice on how to make these two software si...

Work Week Projects: Get Get a Grip on Photoshop’s AI Tools
Five quick exercises to do while you're at work to get comfortable using the gen...

InDesign Color Management
In this introduction to color management, David Blatner shows how a few easy tec...