Inside Photoshop: Kaleidoscopic Effects
Application: Photoshop 5/5.5/6
Operating Systems: Macintosh, Windows
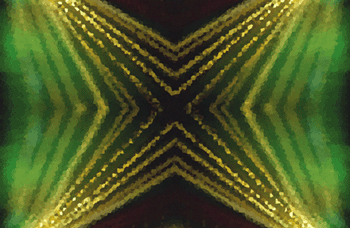
When creating background settings, digital imagery, Web pages or even screen savers, a simple solution for a unique graphic is to turn a regular photo into a kaleidoscopic vision. When you think of a kaleidoscope, it’s basically just an image being reflected by a series of mirrors to create the appearance of something new. With that idea in mind, this effect is very easy to reconstruct in Photoshop. In this article, we’ll go through the steps of copying and pasting one image four times to make a simple kaleidoscopic image. Then we’ll explore how certain filters can affect and enhance your image, as shown on this issue’s cover.
Finding the Perfect Image
You’ll want to be selective in deciding on a photo to use. You should find an image similar to that in Figure A. Make sure that there are many shapes that bleed off the page, or you can crop in on an area of the image. What you definitely don’t want is an image that’s in the center of the page with a solid background.

Figure A
When selecting an image find one that has many shapes that bleed off the page.
Preparing the Page
Once you’ve selected an image, open it in Photoshop. Note the size of your image. If the rulers aren’t visible on your document choose View > Show Rulers. Then open a new document and set the width at twice the width of your original photo and set the height to two times that of the original photo. Make sure that the resolution is the same for both documents. Then click OK. When the new document opens choose View > Show > Guides. Then drag a guide from the side ruler to the center of the page and one from the top ruler to the center of the page, as shown in Figure B. Once you’ve set up your guides, choose View > Snap To > Guides. This will ensure that the images line up properly.
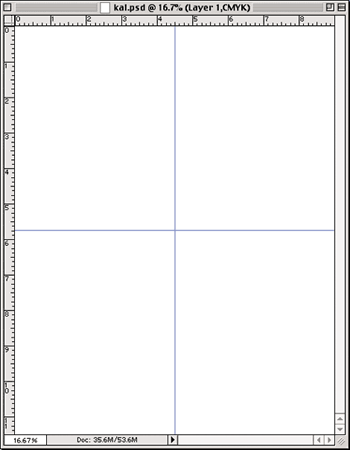
Figure B
Place vertical and horizontal guides in the center of your page, breaking it up into four separate components.
Drag and Drop, Copy and Paste
Now click back on the original image and select the Move tool. Then, click on the image and drag and drop it onto your new document. Place the image in the top-left corner of the page. Then drag the new layer with your image onto the Create A New Layer icon to make a copy of the image. Make sure this layer is selected and choose Edit > Transform > Flip Horizontal. Now move the image to the top-right corner. Your page should look similar to that shown in Figure C. Click on the layer containing the image in the top-left corner and drag it onto the Create A New Layer icon to duplicate it again. This time choose Edit > Transform > Flip Vertical and move the new image to the bottom-left corner of the page. Now, select the layer containing the image in the top-right corner, duplicate it and flip the image vertically. Place this final image in the bottom-right corner of the page.

Figure C
Place your images next to one another so the lines meet up.
To hide the guides choose, View > Hide > Guides. Your image should have been transformed into a kaleidoscopic picture, as shown in Figure D. You can leave the image as it is or you can have fun experimenting with different filters in order to add to the kaleidoscopic feel.
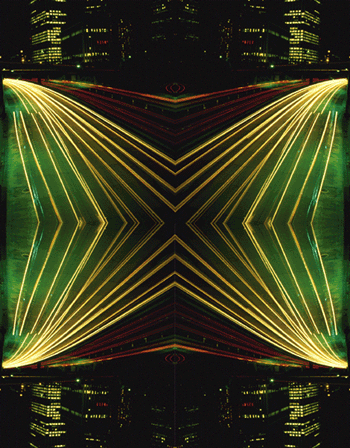
Figure D
Create a simple kaleidoscopic image by placing four copies of an image next to one another.
Playing with Filters
Flatten your layers before you begin experimenting with different filters. This way when you apply a filter it will affect the entire image, not just one layer. To do this, select Flatten Image from the Layers palette’s pop-up menu. In order to create our cover image, we applied the Radial Blur filter, the Crystallize filter and finally, the Glowing Edges filter. By applying these filters we were able to create an abstract mosaic, which is more reflective of an actual kaleidoscopic image.
Adding a Radial Blur
To add a radial blur, choose Filter > Blur > Radial Blur. In the resulting dialog box, shown in Figure E, adjust the settings of your blur. To change the amount of blur you can drag the Amount slider back and forth; the higher the number, the higher the blur. For our example we set the amount at 20. Next, select the Blur Method. You can choose between Zoom and Spin. The Zoom method blurs the image as it gets closer to you, working from the center out. The Spin method applies the blur in a circular motion, turning the entire image into a blurry spiral. Because we didn’t want to severely warp the image, we selected Zoom. Then select Good for the quality of blur and click OK. Your resulting image should look similar to our example shown in Figure F.
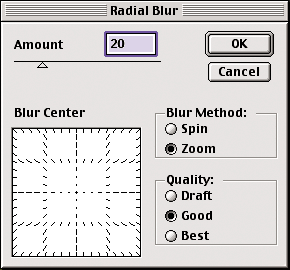
Figure E
Adjust the setting of your blur in the Radial Blur dialog box.

Figure F
By applying the Zoom method of the Radial Blur filter, our image has taken on a new appearance.
Crystallize the Image
To make your image appear as if it’s made of millions of small crystals, choose Filter > Pixelate > Crystallize. In the resulting Crystallize dialog box adjust the cell size with the slider or input a specific number for the size. The higher the number, the larger the crystal. For our example, shown in Figure G, we selected a Cell Size of 30. To ensure that you’re happy with the cell size that you’ve selected, preview the effects of the filter in the Crystallize dialog box before applying the filter to your image.
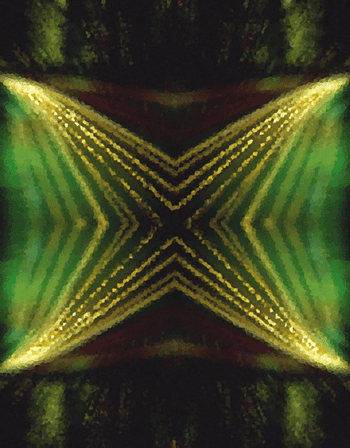
Figure G
The Crystallize filter made our image appear as if it’s made of millions of small crystals.
Make it Glow
For the final touch, add an element of whimsy with the Glowing Edges filter. First make a copy of your image by dragging its layer onto the Create A New Layer icon in the Layers palette. Select your new layer and choose Filter > Stylize > Glowing Edges. In the Glowing Edges dialog box adjust the Edge Width, Edge Brightness and Smoothness and then click OK. When creating our cover image we selected a width of 5, a brightness of 6 and a smoothness of 5. Once you’ve applied the Glowing Edges filter to your image, click on the Layers palette and change its layer blending mode to Screen, and viola, you’ve created an entirely new kaleidoscopic image.
An Endless Journey
As with kaleidoscopes, no image is ever the same. You can create hundreds of amazing patterns and designs from one photograph. Try experimenting with different imagery and filters to bring your work beyond the mundane into the psychedelic.


Copyright © 2000, Element K Content LLC. All rights reserved. Reproduction in whole or in part in any form or medium without express written permission of Element K Content LLC is prohibited. Element K is a service mark of Element K LLC.
This article was last modified on January 3, 2023
This article was first published on April 20, 2001
Commenting is easier and faster when you're logged in!
Recommended for you

Photoshop How To: Retouch Eyes With Photoshop CS6
When it comes to portrait retouching, a person’s eyes can be the most impo...
Using Photoshop’s Content Aware Scale and Content Aware Move
Speaking Photoshop This article is an excerpt from Speaking Photoshop CS6...

Creative Fuel: Death of a Hero
Jef Raskin, a gifted technology designer, artist, educator, musician, and pionee...


