
InReview: WordsFlow 3
This updated plug-in removes all the pain of placing and updating Microsoft Word documents

This article appears in Issue 143 of InDesign Magazine.
Placing Microsoft Word files into InDesign just might be the most common chore production designers do on a day-to-day basis. And often, no sooner do you get the text placed, formatted, and styled when you find out it needs to be updated with edits, additions, and deletions. Em Software’s WordsFlow has long been a tool that makes this process easier through its dynamic linking and sophisticated merge technologies. Best known for its non-destructive merge-update feature, WordsFlow allows you to merge updates in a story in InDesign to a linked Word file that has been changed, edited, or updated without losing any of the edits or formatting applied to the text in InDesign. Although InDesign will happily let you update a linked Word file, doing so without WordsFlow results in edits and formatting changes made in InDesign being totally removed, making the feature essentially worthless. Many a user has been frustrated by this limitation, which WordsFlow thankfully solves.
The recently released WordsFlow 3 supercharges the plug-in’s abilities with a new Microsoft Word import filter and advanced import options. The Pro version of WordsFlow 3 also works with imported Excel spreadsheet files and provides additional linking and export options.
Getting Started
Once you install WordsFlow and restart InDesign, the WordsFlow Word filter is enabled by default—whether you use InDesign’s Place command or choose WordsFlow > Place with WordsFlow (Figure 1). New to WordsFlow 3 is a preference (found in InDesign’s Preferences dialog box) to turn it off, which will disable WordsFlow’s linking feature on future documents you place. However, link updates or relinks of stories that were originally placed using WordsFlow will continue to use the plug-in. Additionally, you can revert to using InDesign’s native Word import filter with the Place without WordsFlow command found in the WordsFlow submenu. (Previously, the only way to accomplish this was by uninstalling WordsFlow.)

Figure 1. Access WordsFlow functions using the options in the WordsFlow submenu.
The most significant change to WordsFlow 3, however, is the use of a new Microsoft Word import filter designed from the ground up by Em Software to provide a superior, more manageable experience when placing and updating Microsoft Office Open XML (DOCX) documents. The older Word format (DOC), as well as RTF and TXT files, will continue to be imported with Adobe’s filter.
Even more impressive, WordsFlow can place any OpenDocument Text (ODT) file, such as those created with LibreOffice, OpenOffice, NeoOffice, Word Online, and even Google Docs.
WordsFlow 3’s import filter works better than InDesign’s native Word import filter in several ways, including advanced style mapping and improved import speeds. Plus, this technique allows the developers to directly address any issues that might come up, rather than relying on Adobe.
Word Document Import Options with WordsFlow
If you’ve ever used Em Software’s DocsFlow 3 plug-in (see my review in Issue #133), you’ll immediately recognize WordsFlow’s new Word Document Import Options dialog (Figure 2). You can access the import options by selecting the Show Import Options checkbox when using either InDesign’s Place or the Place with WordsFlow dialog box.
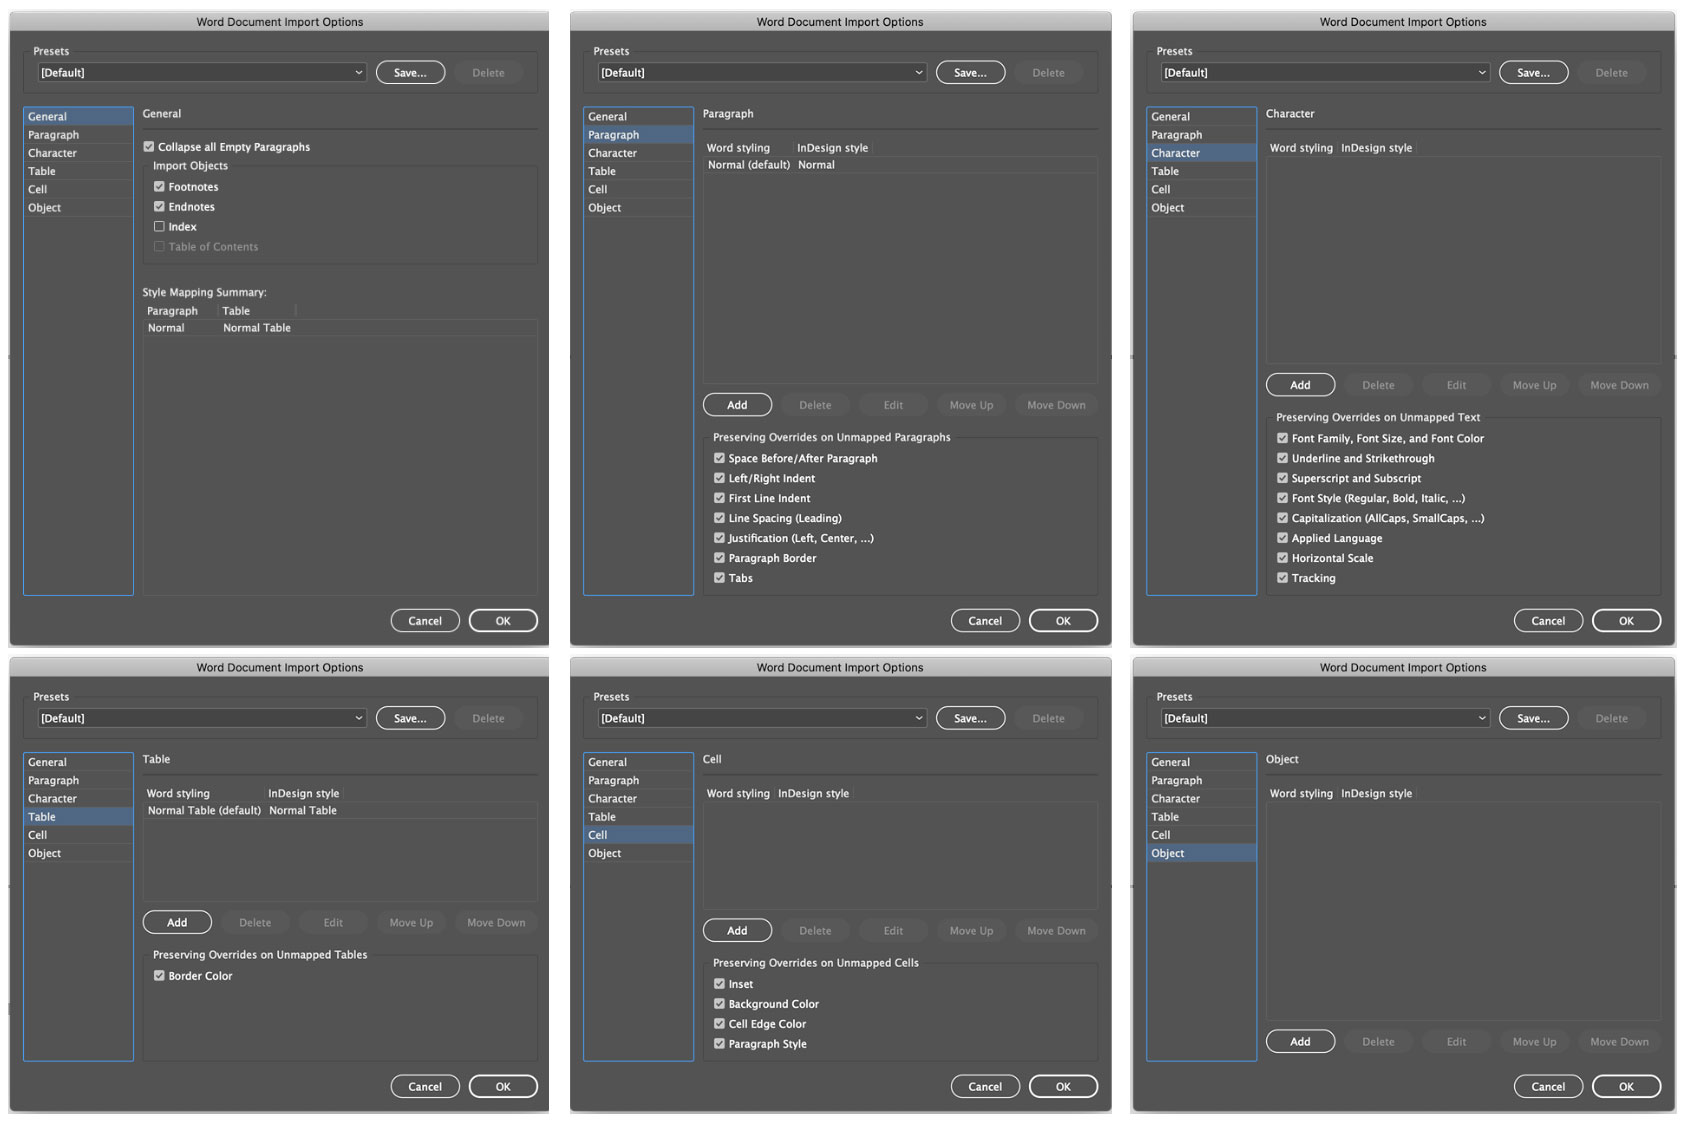
Figure 2. WordsFlow’s Word Document Import Options work similar to Em Software’s DocsFlow Import Options.
You may be aware of the shortcut of holding the Shift key when clicking Open to access the Import Options dialog box, even when the checkbox is not enabled. Note that this works only when using InDesign’s Place command; it will not work when using the Place with WordsFlow command. When I asked Em Software why, they replied they didn’t even know the shortcut existed, but they agreed it should be added.
At the top of the dialog box are controls to create and choose Presets, like those in InDesign’s Word Import Options dialog box. However, any presets you’ve saved using InDesign’s Word Import Options will need to be recreated using WordsFlow’s Import options, as there’s no way to move them into WordsFlow.
There are options specific to each Import method (InDesign’s or WordsFlow’s) that may influence which method you use. For instance, one thing unavailable using WordsFlow is the ability to import Word endnotes as static text, a feature I use frequently since I find InDesign’s handling of endnotes abysmal. (See my articles on endnotes in Issue #105 and #117.) InDesign also allows you to automatically convert straight quotes to typographer quotes, choose whether or not to import inline graphics, unused styles, or tracked changes, and whether to convert bullets and numbered lists to text—none of which are available as WordsFlow import options.
On the other hand, the style mapping support offered by WordsFlow is unparalleled. Not only can you do straight 1-to-1 style mapping as you can using InDesign’s import options, but you can also choose any combination of seven other variables applied to a Word style when mapping to an InDesign style. For instance, say you need to flow a chapter of text into InDesign where the style named Paragraph was applied to indented text in Word, which uses a left indent of .5 inches. However, that same Paragraph style was also applied to text that was set with no indent. You could go through all your text in either Word or InDesign and apply a different paragraph style to the flush left text. But with WordsFlow, you can simply define the different Left Indent settings to be mapped to a different style in InDesign (Figure 3). WordsFlow also allows you to apply InDesign styles while preserving certain overrides, such as Space Before/After, Justification, or Tabs. The extensive level of control offered through WordsFlow is quite amazing!

Figure 3. Using WordsFlow, you can fine-tune your paragraph style mapping options using seven other criteria options.
Believe it or not, it gets even better. Using WordsFlow, you can now easily map local formatting applied in Word to character styles in InDesign. Not only can multiple fonts, font sizes, and/or text colors be mapped to a character style, but the often-used italic, bold, and underline local formatting options in Word (or any combination of the three) can be mapped to InDesign character styles too (Figure 4). If you rely on character styles to format text, this can save you a ton of time.
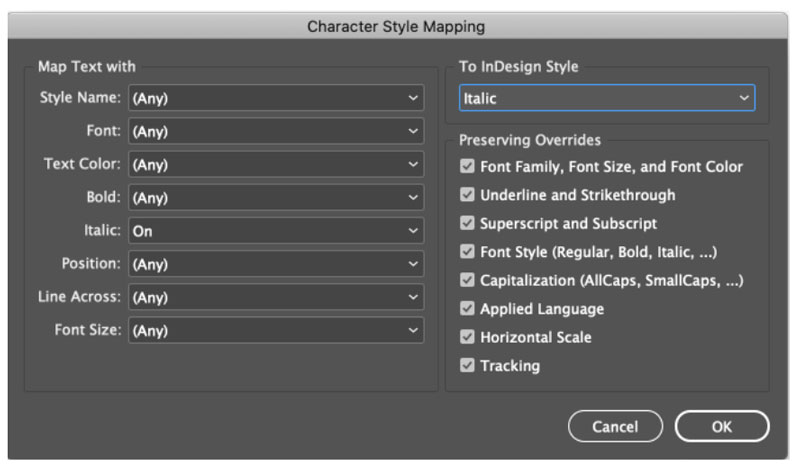
Figure 4. WordsFlow allows mapping of various local formatting options in Word to InDesign character styles.
All style mappings you create are listed in the main window and are run in the order they appear (Figure 5). You can move individual style mappings up or down the list, which is important to make sure your mappings are caught in the proper order. For instance, you would want to run a bold+italic mapping before running either just the bold or italic. Otherwise the import options will identify the bold/italic in your bold+italic text and apply just the bold or italic style mapping, thus overriding your bold+italic style mapping.
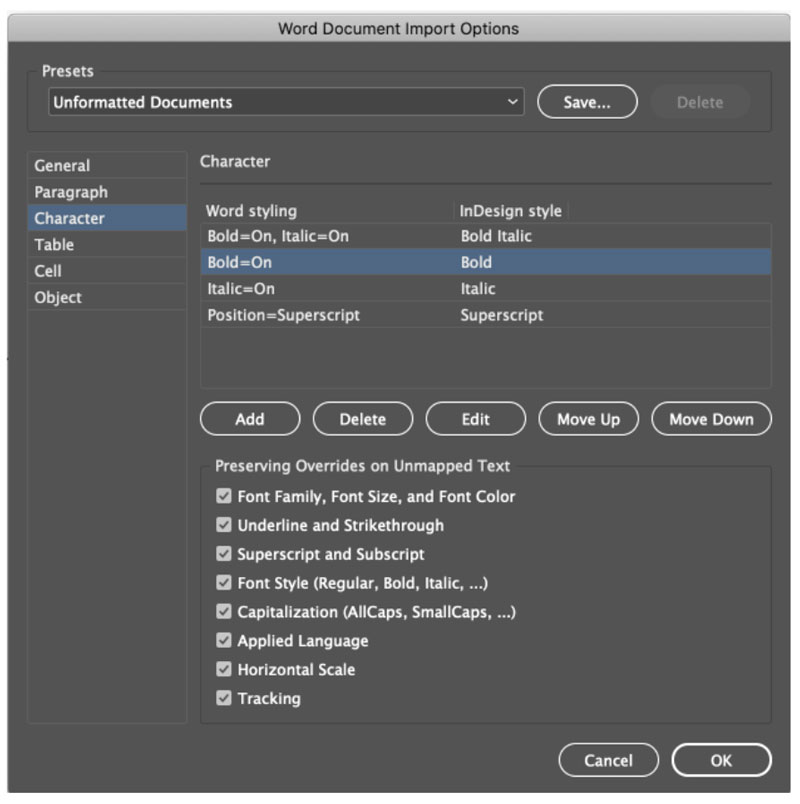
Figure 5. Be sure to order your style mappings carefully so as not to cancel others out.
Tables in Word can be mapped to table styles in InDesign based on the table’s color. Likewise, cells in Word can be mapped to InDesign cell styles based on the cell’s background color (Figure 6).
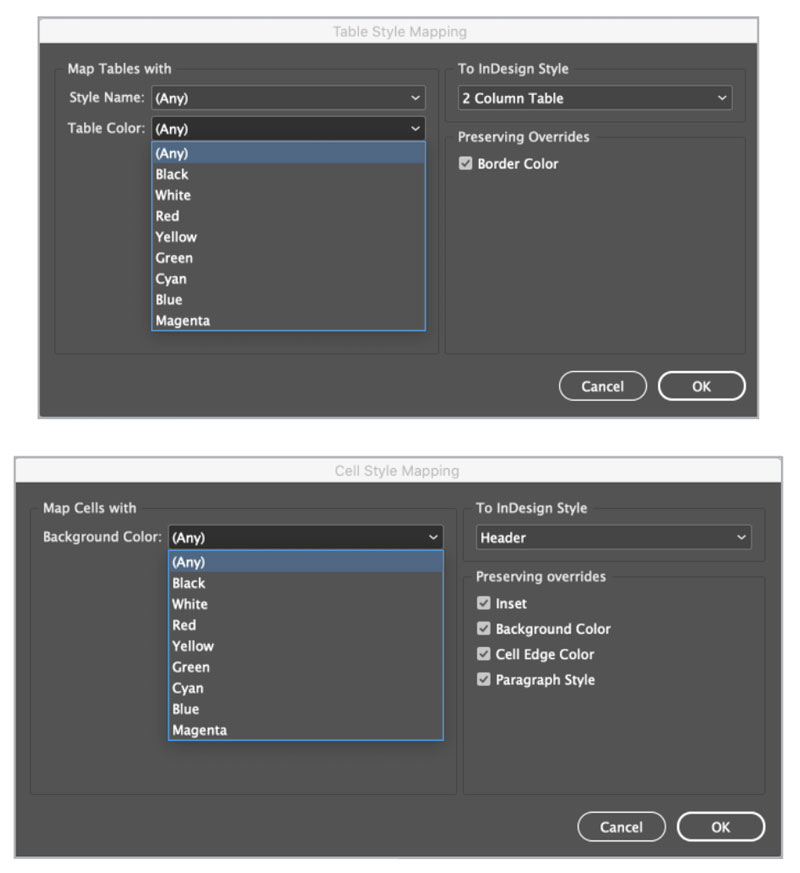
Figure 6. WordsFlow now allows you to map Word tables to InDesign table and cell styles, based on the table’s and cell’s color.
WordsFlow even takes a stab at applying InDesign object styles to images or grouped items (Figure 7).

Figure 7. You can map images or grouped items in Word to InDesign object styles.
Merged Updates
As mentioned earlier, WordsFlow’s raison d’être is its merge-update feature. After you’ve performed a merge-update, it’s a good idea to check for conflicts in your story. Conflicts are shown through View > Extras > Show Notes or by using the Notes Panel’s Show/Hide Notes button (Figure 8).
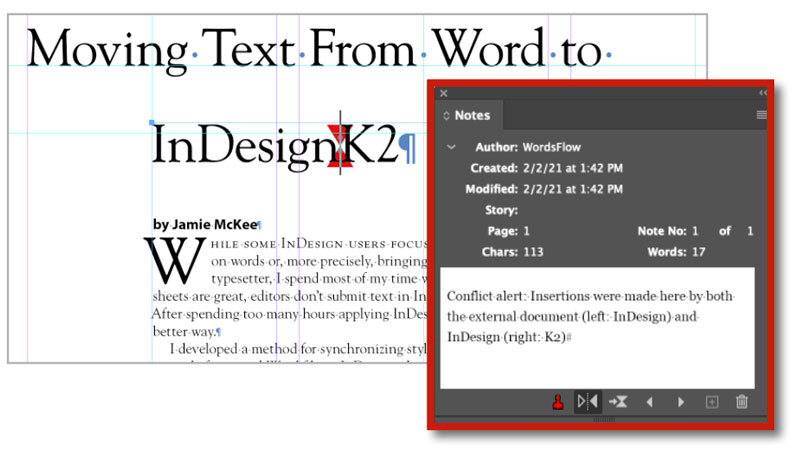
Figure 8. WordsFlow shows merge-update conflicts in the Notes panel.
You can review the Notes and decide how you want to handle them. From the Note panel’s menu you can delete Notes individually as well as completely remove Notes from your story. When there are conflicts in this merge-update process, the external Word document always “wins” for content order while the InDesign story always “wins” for formatting.
Export Like a Pro
The Pro version of WordsFlow provides additional export capabilities. With a story selected, choosing File > WordsFlow > Export with WordsFlow will export it as a new DOCX file and automatically link the newly created document as if it had just been placed in the original story. This is handy for taking existing InDesign content and saving it out in Word format for further editing and revision. While WordsFlow doesn’t currently supply export-specific options for Word exports, the formatting of the story will follow the contents as closely as possible.
Optionally, you can choose the Update Linked Document command from the WordsFlow menu to send your final story contents back to your original Word document, rather than creating a new one. In essence, the Pro version of WordsFlow allows authors and editors to work in parallel with production and layout without duplicating or losing work—and all without needing to introduce new programs or change workflows!
Besides these additional export options, the Pro version also adds one-way Excel functionality, similar to what it offers for Word—updates to Excel data can be made to InDesign tables without losing any formatting work, along with notification of any conflicts.
Tip: Showing Notes in the Links Panel
If you enable the # of Notes column in your Links panel, you can see how many Notes are in your story at a glance. To enable this column, open the Links panel and select Panel Options from the panel menu. In the Panel Options dialog box, scroll down to the bottom to locate the Show Column option and turn it on. Also, keep in mind that using the Story Editor (Edit > Edit in Story Editor) may be easier than working with Notes in the formatted text.
The Final Word
WordsFlow 2 was already a terrific plug-in for InDesign. The addition of the new Word import filter introduced in WordsFlow 3 gives you unmatched style mapping abilities, even for locally formatted text, while maintaining its terrific linking and merging capabilities. If you spend a lot of time wrangling text files placed into InDesign, there’s no doubt that WordsFlow 3 will save you time and trouble.
WordsFlow 3.0.2
- Em Software
- WordsFlow, $200; WordsFlow Pro, $300
- CS6–2021 on Mac and Windows
- Rating: 5 Stars
Commenting is easier and faster when you're logged in!

Recommended for you

InDesign Magazine Issue 127: InDesign at 20
We’re happy to announce that InDesign Magazine Issue #127 (November 2019) is now...

Designing with Gradients
Techniques for enhancing your page designs with attractive color blends.
InDesign Magazine Issue 93: Editorial Tools
We’re happy to announce that InDesign Magazine Issue 93 (January, 2017) is...