
InReview: Table Tools for InDesign
A useful set of scripts for anyone who regularly works with complex tables.


This article appears in Issue 20 of CreativePro Magazine.
InDesign’s table creation and editing features first appeared 21 years ago in InDesign 2.0. While their scope, precision, and typographic control were groundbreaking at the time, Adobe hasn’t made significant improvements to InDesign’s table features in many years. That’s a shame. The resulting tables are often large, detailed, and complex. But, wait—don’t we present information in table form because that information is complex in the first place? As designers, we find ourselves trying to fit lots of columns of information into a finite space, and tables turn into a production challenge as we work with them as quickly and efficiently as possible. We long for a better table experience. This is where Table Tools can help. Table Tools is composed of three scripts, not plug-ins, so no installer is provided; you’ll need a very basic knowledge of how to install a script and run it from the InDesign Scripts panel. This is something anyone can learn to do, and this knowledge will pay off in spades as you find other scripts to make your life easier. One good set of script installation instructions can be found here.
Autofit Columns
Autofit Columns automates the process of determining the narrowest possible width of a table column that will accommodate all the data in the column without the data becoming overset or wrapping to multiple lines. Basic operation is very simple and understandable. Just select one or more columns (or one or more cells within the columns) and run the script by double-clicking it in the Scripts panel. The dialog box (Figure 1) that opens contains a couple of options. In normal use, you’ll just click the Autofit button and be done with it. When you do, the script narrows or widens the width of each selected column
to accommodate the longest text in any cell in the column.
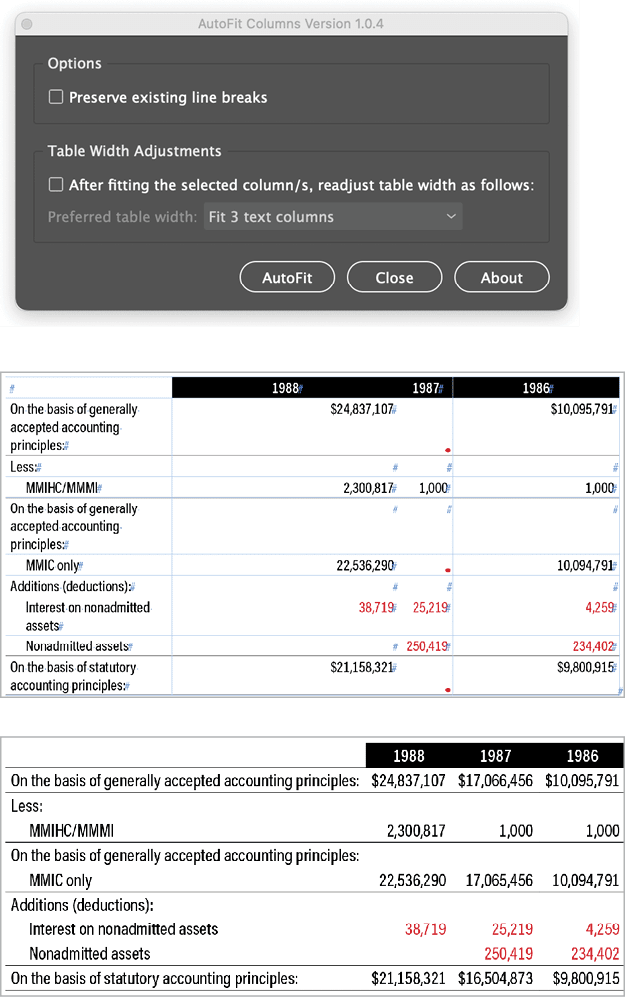
Figure 1. The Autofit Columns dialog box, and before (top) and after (bottom) running the script on all four columns of a financial table
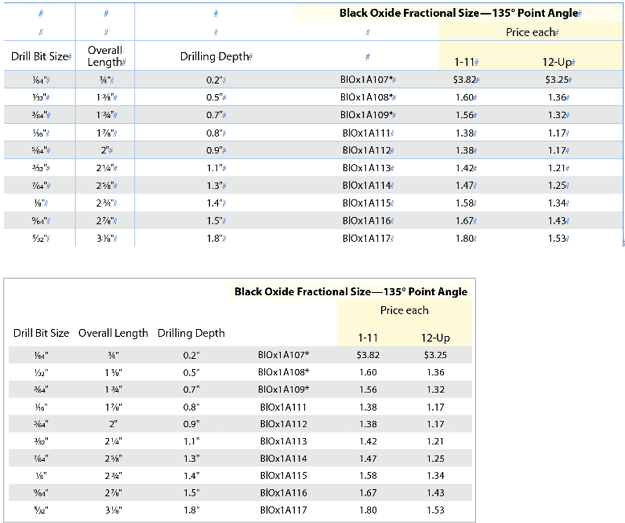
Figure 2. Autofit Columns gracefully handles spanned columns. Compare the before (top) and after (bottom) examples: The Black Oxide and Price Each heads span multiple columns.

Figure 3. The original table (left) has no line breaks or paragraph returns in the column heads. You can run the Autofit Tables script without Preserve Exiting Line Breaks selected (middle) or with the option selected (right).

Figure 4. The Table Width Adjustments feature offers several options for reapportioning the column widths so that the overall width of the table ends up a specific size, with your options based on the document’s margins and columns.
Center Columns in Table
Don’t let the simple name of this script fool you. Sure, it centers the contents of all the selected cells in a table. But, more importantly, it will center a long column of data while right aligning or decimal aligning the data with each other. You can see a before-and-after example in Figure 5.

Figure 5. A before (top) and after (bottom) example of what you can easily achieve with the Center Columns in Table script. Each column of numbers is center aligned within the column based on the longest number in the column. In addition, the numbers are decimal aligned with each other. Note that parentheses alignment is handled properly.
Delete All Empty Columns and Rows
This script, as the name states, deletes any empty rows or columns from any selected tables, or from all tables in the document. An “empty” row can optionally contain white space characters such as word spaces, fixed (em, en, thin, figure) spaces, or tabs. The script also performs three other very useful tasks. The Unmerge All Cells option unmerges all the table cells that have been merged, either vertically or horizontally. Again, you can apply it to either selected tables or all the tables in the document (Figure 6).

Figure 6. The Delete Empty Rows and Columns dialog box does a lot more than just enable you to delete empty rows and columns. It lets you unmerge all cells, set all cells to auto-grow, and set the width of multiple tables (the ones you select or all of them in your document) to a specific value.
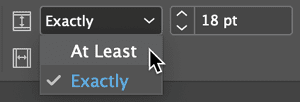
Figure 7. The Set All Cells to Auto-Grow option sets all the rows in the current table or all the tables throughout a document to the At Least setting. This setting causes the table rows to start at a minimum size (in this example, 18 pt), and then grow in height as needed to accommodate the cell contents in the row.
TableTV
The developer of Table Tools has published a video where he demonstrates the Center Columns in Table script, including what the Create Right-Side Outdent feature does. It’s the kind of thing that’s hard to explain, but easy to understand when you can see a demonstration!
Tables Enabled
The scripts included in Table Tools don’t address all the shortcomings of InDesign’s tables feature set, but they certainly remove a lot of the repetitive, painstaking production work that would otherwise be necessary to create attractive, easy-to-read tables.
- Collection includes Autofit Columns, Center Table Columns, and Delete Empty Rows and Columns scripts
- Bookraft LLC (dba Id-Extras.com)
- Annual subscription, $59/year (perpetual licenses: $99 for Autofit Columns and $49 for Center Table Columns)
- InDesign CS5 or later, macOS or Windows
- Rating: 4.5 Stars
Commenting is easier and faster when you're logged in!

Recommended for you

Tables to the Rescue: Centering a Bullet Character on a Paragraph
How to vertically center a bullet on the whole paragraph, regardless of the para...
Opinion: A Real Look at Artificial Intelligence
What past technological upheavals reveal about the future of AI
Free Script Identifies Word Stacks
At the 2015 Print and Electronic Publishing Conference (PePcon) last week, the I...