
InReview: PDF2ID
This trusty plug-in for converting pdf files to editable InDesign documents can get you out of a tough spot.

This article appears in Issue 131 of InDesign Magazine.
In an ideal world, when a client wants you to edit an old layout they give you the InDesign file, along with all the images and graphics used in that file. But we don’t live in such a design paradise. It’s more than likely your client won’t have the original document. Maybe they mislaid or deleted it, or maybe an external designer prepared the layout and didn’t provide your client with the original InDesign file. So in many cases, you may have only the final PDF as your starting point.
If you’ve ever opened a PDF file in Adobe Illustrator, you know that although it might be an accurate representation of the content, it is far from easy to edit. What appear to be neat columns of text are actually stacks of separate text objects; other text may be outlined, apparently at random; and words that are bold or italic are separated from the surrounding text. Even a simple task, such as changing a couple of words, can be difficult because the lines of text are not threaded into a single text object.
PDF2ID is a plug-in from Recosoft that aims to overcome these problems by allowing you to open PDF files as fully editable InDesign documents. The results aren’t perfect, but given the apparent impossibility of the task, the plug-in does a remarkably good job. It can also convert XPS files, a page description format used by Microsoft.
Three Flavors
PDF2ID comes in three varieties. For $99.99, the Lite version does basic conversion but lacks the ability to link text frames in a page or across pages. The Standard version ($199) adds the ability to batch convert up to five files at a time; supports InDesign CS4 to CS6 as well as CC; converts
bookmarks, URLs, and transitions to InDesign equivalents; and creates separate layers for text, tables, and graphics; and links text frames. For $299, the Pro version adds the ability to batch batch convert up to 20 files and recovers interactive form fields, such as buttons and lists.
Installing the Plug-in
The PDF2ID installer requires you to choose the location where you want to install it, so you need to make sure you select the correct InDesign folder. This is especially important if you have multiple versions of InDesign installed. Note that unlike most add-ons, the installer requires you to restart your computer to complete the installation. This is annoying, but apparently necessary because, behind the scenes, PDF2ID runs a small server app.
Opening a PDF File
Once the plug-in is installed, you can use the Recosoft item on the menu bar to select a PDF file for conversion. The first message you’re likely to see is a warning that the PDF document contains fonts that couldn’t be matched against your active font set (Figure 1).

Figure 1. PDF2ID displays this standard warning when it encounters unexpected font names.
That’s because when a document is rendered as a PDF, the font names are stored in Postscript format, rather than as the original names. You can, to a large degree, sort this out later in the process.
Next, the Options dialog box opens to show its Conversion Options tab. Here you can decide which pages to import, how to handle blank pages, whether to create separate layers for text and graphics, and whether to link text frames across pages (Figure 2).

Figure 2. The Conversion Options tab of the Options dialog box lets you specify several basic settings for PDF conversion.
You can also choose the color space to use for the new document. By default, this is the same color space as the original document.
Font Substitution
The Font Substitution section of the Conversion Options tab allows you to select unmapped fonts (marked by an asterisk) and choose the correct fonts from your library to map them. You have to do this for each weight of each font used, rather than just selecting a font family. Any unmapped fonts default to Times New Roman.
In my test document, converting all the body text to Amasis, the font I used in the original, was a straightforward process; but strangely PDF2ID was unable to map my own dingbat font, SCDingbats, which didn’t show up in the Font Substitution list, despite being installed on my system. The list of replacement fonts itself makes your task harder. Because the list shows just six fonts at a time, you may have to scroll quite a bit to find the one you’re looking for (Figure 3). Although they’re in alphabetical order, scrolling through all the weights of all the fonts on your system can be a lengthy process. The ability to select a font by typing the first few characters of its name would be a huge advantage here.

Figure 3. You can match fonts that PDF2ID doesn’t recognize manually, but be prepared for a lot of scrolling.
Once you locate the correct fonts, however, PDF2ID remembers them for future conversions (or is supposed to), and you can save your conversion settings as a preset for later retrieval. In my tests, however, I had to specify the fonts manually each time I opened a new document.
Graphics Options
The Graphics Options area lets you determine how embedded graphics are treated. You can set the color format you want for RGB and CMYK images, both with and without ICC profiles, and choose whether to convert complex vector graphics into native InDesign graphics to allow them to be edited later (Figure 4).

Figure 4. Choose how you want colors in the PDF file to be converted.
If you choose to save images as linked files, rather than embedding them in the new InDesign document, you can also set the file name you want to use for those images.
The resulting names are the name you choose plus a numerical increment, but the plug-in saves each image in a folder with the name of the page on which it appears for ease of reference (Figure 5).

Figure 5. PDF2ID saves exported images in folders named for the page where the images appear.
Advanced Options
The Advanced Options area is where you tell PDF2ID whether you want it to create character styles and paragraph styles in the new document. Styles that were used to format text in the original layout program aren’t stored inside a PDF, of course, so PDF2ID has no access to them. Instead, the plug-in analyzes the text formatting in the PDF and creates new styles on the fly. This can make it much easier to edit the document later; however, PDF2ID has a tendency to create a new paragraph style for each text block, so expect to have to do some cleanup of styles by deleting redundant ones and replacing them with the style you decide to keep.
One key choice in the Advanced Options area is what to do about hyphens. If the original document contained hyphenated text, then those hyphens will be rendered in the PDF text as if they had been typed. PDF2ID allows you to remove all these hyphens, but, of course, doing so also removes them in places where they should be present. Despite this, I found removing all the hyphens produced cleaner text and helped to avoid broken words in the resulting InDesign document (Figure 6). Reinserting the hyphens manually where needed is generally quicker than taking them out where the words had appeared at the ends of lines.

Figure 6. Deciding how to handle hyphens is a matter of personal choice. Whatever option you choose will require some manual tidying up.
Using the Inspector
The second tab in the Options dialog box allows you to inspect the data stored within the document. This includes listing the program originally used to create the file, the PDF version in which it was saved, and the page size (Figure 7).
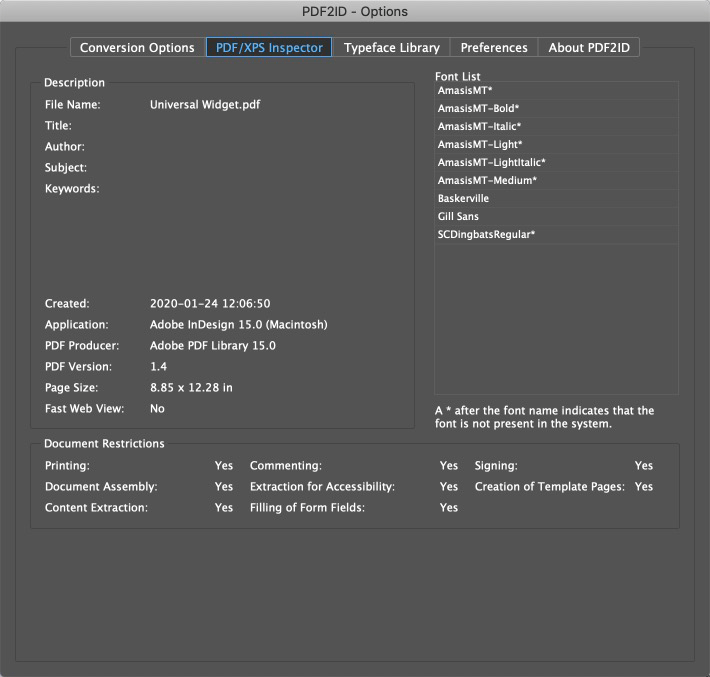
Figure 7. The PDF/XPS Inspector tab shows everything PDF2ID knows about the file it’s converting.
Note that if the PDF was saved with bleed, then the plug-in defines the original page size plus the bleed as the page size of the converted InDesign document. The inclusion of crop marks in the original makes the converted document’s size still larger.
Setting Preferences
PDF2ID tries to do a nearly impossible task: convert PDFs to editable documents. In the process, it has to make a myriad of choices. Fortunately, you can fine-tune its decision-making by adjusting the settings in its Preferences tab. Here, you can define table and cell properties, choosing either to read the weight of cell borders from the document or to change them to the weight and style of your choice. You can also choose to convert images with transparency to PNG files, set the working color space, decide how you to handle annotations, and more.
The tricky part comes when dealing with how text within paragraphs is aligned. PDF2ID is unable to read the justification method from a PDF file, so you have to decide whether you want all the text to be aligned left, right, centered, or justified—and I mean all the text in the document, regardless of how it was originally set (Figure 8). This is where the use of paragraph styles is helpful, as it allows you to fix the alignment of text in the new InDesign file later, without having to do it for each individual paragraph.

Figure 8. The Preferences tab lets you determine how tables appear, as well as how to align all paragraphs in the document.
Converting the Document
Choosing between all these settings isn’t a quick process, although you can save a group of settings as a preset. Once you’ve made your choices, return to the main Conversion Options tab and click OK.
Converting a PDF file can take several minutes, and a large document can take much longer. This may be a good time to have a coffee break.
For my text, I deliberately created a tricky file for PDF2ID to work with, including text with drop shadows, cutout images on graduated-tint backgrounds, tables, graphs built in InDesign, text wrap, multiple font styles within a block of text, bullet points, and text on colored backgrounds.
Figure 9 shows the front page of the dummy report I created in InDesign, together with the version recovered from the resulting PDF file.

Figure 9. Before and after: the cover page in the original PDF (left) and the file after conversion (right)
On the whole, PDF2ID did a good job of converting the file. The plug-in correctly placed the cutout image on its graduated-tint background, correctly mapped all the fonts, and rendered both blue and white lines with arrowheads precisely in the right place, although in the resulting InDesign document the arrowheads are graphic objects detached from the lines.
To be fair, PDF2ID did leave a number of things I need to clean up in this converted document. The text right at the top, which originally was tracked out to fill the width of the page, is now aligned left. The headline, which was set with a drop shadow, is in place, although the last line is overset (a problem easily remedied by increasing the height of the frame slightly).
Although the plug-in rendered the drop shadow beneath the text as a PNG graphic, it lacks transparency, and the drop shadow beneath the machine (created in InDesign) lost its feathered edges. The only other problem is the overset text in the caption (bottom left).
When we turn to the following spread, we see some more inconsistencies, although these are not as drastic as they might appear at first glance. Figure 10 shows the original file together with the version recovered by PDF2ID.

Figure 10. Before and after: the inside spread in the original PDF (top) and after conversion (bottom)
On the plus side, the plug-in placed the text neatly into columns, implementing the correct font in most places. The squared-up text wrap on the image on the far left can be easily adjusted. The headline is perfect, and the placement of text into frames is largely correct. The graph at the top of the second page rendered perfectly, as did the table. Even the vertical rules between the columns of text appear at the correct weight and length.
But, of course, I have a few more issues to contend with. The conversion process replaced the original leading with standard automatic leading and broke up the body text (originally a pair of two-column text boxes, one on each page) into multiple text boxes. These are threaded except where a table or page break intervenes. The conversion ignored the text wraps for the two pull quotes, although the pull quotes themselves are largely correct (except for the alignment and the lack of the dingbat font for the pale blue quote on the first page).
As expected, all the text is aligned left, even when it had been justified or centered in the original. One notable error is that bulleted lists are not currently supported. Instead, PDF2ID rendered them as regular text with (weirdly) a lower case b replacing the bullet.
The fact that the page size now includes both bleed and crop marks is a minor irritation; I can easily change the page size afterwards in InDesign. And, naturally, page margins and column guides are not implemented, as these are not included in the PDF file from which the plug-in made this conversion.
Making the Best of a Tricky Situation
Given that the job it’s trying to do is incredibly difficult, PDF2ID produces a remarkably workable file. The results may look messy at first glance, but correcting the structural and cosmetic defects is not an arduous process. The initial results aren’t perfect, but the plug-in provides a solid base from which to reconstruct the original file.
Ultimately, you will always get a better result if you can find the original InDesign document. For those times when all you have is the PDF, however, PDF2ID can really save you a lot of time.
- PDF2ID
- Recosoft
- Lite version $99.99; Standard $199; Professional $299 (see difference at the end of this feature)
- Supports InDesign CC to 2020. Requires Intel-based Mac with 1.4 GHz processor, or Pentium III running Windows 7 or higher
- Rating: 7/10
Commenting is easier and faster when you're logged in!

Recommended for you

InDesigner: AARP Magazine
The most popular magazine in America looks so good you’ll want to lie about your...

InDesign Magazine Issue 90: InDesign Nightmares
We’re happy to announce that InDesign Magazine Issue 90 (October, 2016) is now a...
InReview: Zevrix Output Factory 2
A high-end solution for automating the printing and exporting of your InDesign f...