
InReview: iziImport
Get to know a solution for placing web content into InDesign layouts for cross-media reuse.

This article appears in Issue 7 of CreativePro Magazine.
You may have web content that you’d like to repurpose for another medium, such as print or PDF. And websites are ephemeral; useful resources, art portfolios, and great writing can disappear as websites are updated, migrated, or abandoned. How do you get all of that content out of a website and down to your computer? iziImport, an extension by Revolumedia, is an answer to that question. It can download content directly into an InDesign layout from compatible websites, such as those built using WordPress.
Readers with a long memory may recall that I reviewed iziExport in 2016. As you might guess, iziImport and iziExport are two sides of the same coin. iziImport lets you download compatible web content into an InDesign document; iziExport lets you upload InDesign content to a supported website.
What You’ll Need
iziImport is primarily marketed for importing content from WordPress websites. It actually works more generally with websites based on content delivery networks (CDNs) driven by Structured Query Language (SQL) databases. WordPress is the best known of these, so this review uses a WordPress site as an example. If you have an online store that runs on an SQL database, iziImport can download from it, as well. iziImport supports SQL-based e-commerce services that are often integrated with WordPress, such as WooCommerce and PrestaShop.
For iziImport to connect to your website, you must have direct access to and a username and password for the SQL database that drives your website. Those are not the same as the username and password for a WordPress or shell account; more on this later. This also means iziImport works with self-hosted WordPress sites, but not sites hosted at WordPress.com, which does not provide direct database access.
You’ll also need an InDesign document with text and graphics frames that use InDesign articles and tags.
And, of course, you’ll need to install the iziImport extension, which works on macOS and Windows versions of InDesign 2014 (version 10) through InDesign 2022 (version 17).
Installing iziImport
You can easily obtain iziImport from within InDesign by choosing Window > Find Extensions on Exchange. When the Adobe Exchange website opens in your web browser, search for iziImport.
You have to complete a purchase transaction before it will install, but because the first month is free, you can use iziImport as a free trial by canceling before the first month ends. If you continue past the first month, you’ll be charged $5.95 a month. Completing the transaction opens the Creative Cloud desktop app, which installs the extension on your computer and notifies you that it’s ready.
The next time you start InDesign, you can open iziImport by choosing Window > Extensions > iziImport. That opens the iziImport panel (Figure 1).

Figure 1. The iziImport panel before configuration
Connecting iziImport to Your Website
If you’ve used WordPress only to create posts and pages through its authoring tools in web browsers and its desktop and mobile apps, some parts of the iziImport workflow may be unfamiliar. You’ll understand iziImport more quickly if you’ve worked directly with the SQL database that drives a WordPress website. Although I’ve used WordPress for years, I wasn’t aware of its SQL database until I tried iziImport.
Creating a configuration
To connect iziImport to your website’s database, click the New button in the iziImport panel to create a configuration with connection details.
After you enter a name for Configuration Name, iziImport needs four specific pieces of information to connect to the site’s SQL database (Figure 2):
- The hostname, which typically includes the domain name of your website
- The database name, username, and password
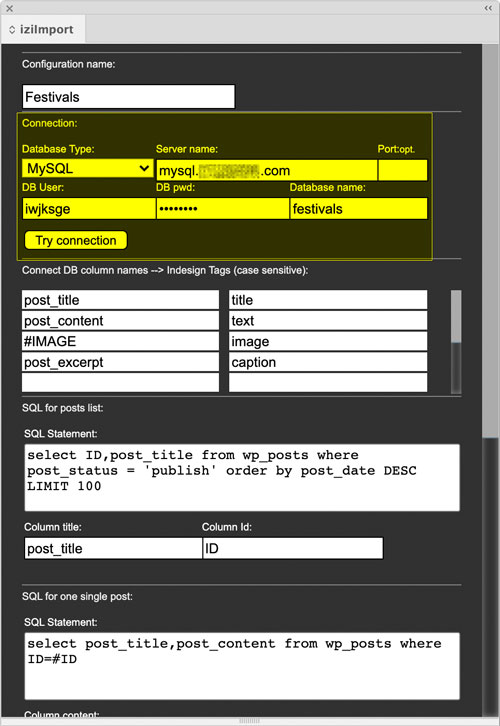
Figure 2. A database connection set up for one website called Festivals
Many WordPress websites create and use those values automatically, so many WordPress users aren’t aware of them, and that can lead to confusion:
The hostname is not the URL of the public website; it’s the URL of the website’s SQL database.
The database name is, if you’re like many non-technical WordPress users, something you haven’t had to use before.
The username and password are not the same as your WordPress account and not the same as the login details of the shell/FTP account for your web host. They are the username and password specific to the SQL database, which, again, many WordPress users may not know about.
Initially this tripped me up; I entered the wrong information. Where do you find the correct details? You might find them in the section of your hosting company’s control panel where you manage websites, but they may not be labeled in an obvious way. After some web searching, I decided to browse my WordPress site files using FTP, download its wp-config.php file, and look in there (Figure 3). I confirmed with Revolumedia that the following four values are what you want to enter:
- For Server Name, enter what you see in DB_HOST.
- For DB User, use DB_USER.
- For DB Pwd, use DB_PASSWORD.
- For Database Name, use DB_NAME.
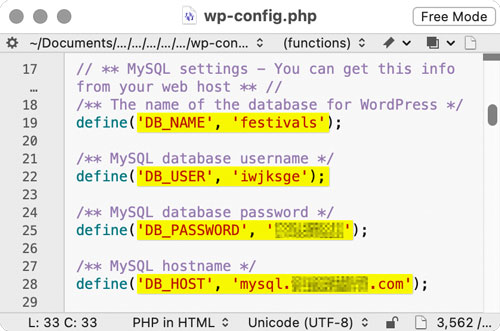
Figure 3. A wp-config.php file, where I found the login credentials for the WordPress site’s SQL database
When you’re done, click the Try Connection button. If you get a Connection OK alert, the connection is working and ready to use. If there is a connection error, you’ll need to troubleshoot it. For example, I didn’t know the company hosting my WordPress website restricts direct SQL database access to approved IP addresses, so I was blocked until I entered my current external IP address on the website’s control panel—not in InDesign or iziImport.
Click Save to return to the main iziImport panel. If you work with multiple websites, you can use the New button to store a named configuration for each of them.
Loading the list
In the iziImport panel, make sure the configuration you want is selected, and click Load to display a list of posts and pages from the website (Figure 4). (Where WordPress posts are discussed in this review, the same applies to WordPress pages. Not sure what the difference is between a post and a page? Check out this article at WordPress.com.)
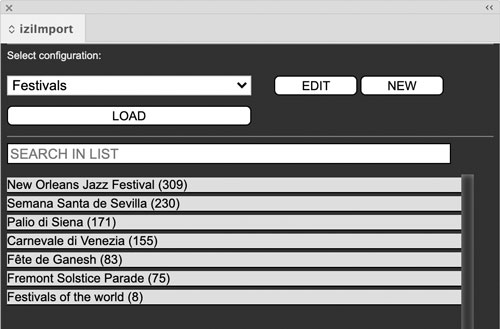
Figure 4. The post list for the Festivals website. The number after each post title is its WordPress post ID.
If the post list doesn’t load properly the first time and an error message appears, that might mean that the SQL statement for the posts list (Figure 5) needs to be adjusted. For example, I got the error ER_NO_SUCH_TABLE. It took some technical investigation to figure out that SQL table names for my website did not match up with the default table names that iziImport was set up to look for. I edited the SQL statement for the posts list to match, and then it worked—the list loaded.

Figure 5. I had to add the part highlighted in yellow after discovering how the table names were actually listed in the SQL database for the WordPress website.
This was pushing the edge of my abilities, because I have no experience with SQL. I reached out to Revolumedia to resolve various issues, and they were responsive and helpful.
Setting Up an InDesign Document for iziImport
In the InDesign document, the most important part of working with iziImport is setting up articles and tags for the downloaded content. An article receives the content of the imported post, and tags tell InDesign which frames receive different types of content in that post. For example, an InDesign text frame assigned with the title tag receives the WordPress post title, and a graphics frame with an image tag receives the WordPress featured image.
Articles and tags are fundamental features for creating EPUB documents and working with XML and databases with InDesign. If you haven’t yet worked with articles and tags, becoming familiar with them not only simplifies using iziImport and its companion product iziExport, it’s a marketable production skill in general. Although iziImport can work without first creating tags, doing so gives you precise control over where and how the web content appears on the page.
To set up an InDesign document for iziImport, create an article, set up a frame for each tag type, and assign an appropriate tag to each frame (Figure 6). Then add the frames to the article (Figure 7).
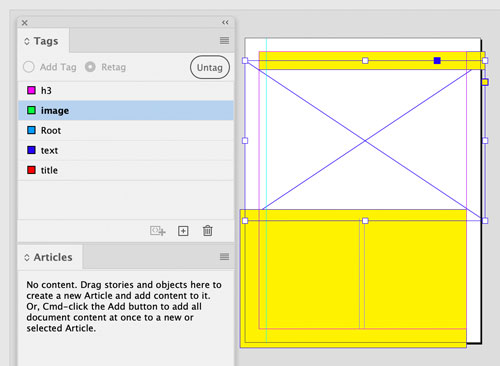
Figure 6. Assign the image tag to a graphics frame to have iziImport place a post’s featured image into the frame.

Figure 7. A new article ready for a post, created by dropping tagged frames into the Articles panel
Note that in iziImport, a default tag called caption maps to the post excerpt, the short blurb you can write to summarize the post when it’s linked to or in a post list.
That’s a quick overview of the technical side, but you want to make it look good too. Design the document’s InDesign paragraph styles so that they correspond to incoming WordPress text styles such as Title, H1, and Paragraph. Then set up that mapping using the Map Tags to Styles command in the Articles panel menu (Figure 8). You can customize HTML tag support, such as adding tags to map or stripping tags, by editing the code in the JavaScript to Clear Text Field in the iziImport configuration for that website. To save time laying out each post’s featured image, set up a graphics frame with Auto-Fit (Object > Fitting > Frame Fitting Options) set the way you want.

Figure 8. In the Map Tags to Styles dialog box (top), you can associate content tags from iziImport with InDesign paragraph styles (bottom).
Importing a Post
After you get everything set up in both iziImport and your InDesign document, the actual import process is quick and easy. Select any frame that’s part of the article into which you want to import. Then, in the iziImport panel, select a post in the list and click Import (Figure 9). The post content flows into the article frames (Figure 10). The featured image is downloaded to the folder containing the InDesign document. Want multiple posts to appear in the same story? Select the option Add the Text to a Single Text Frame.
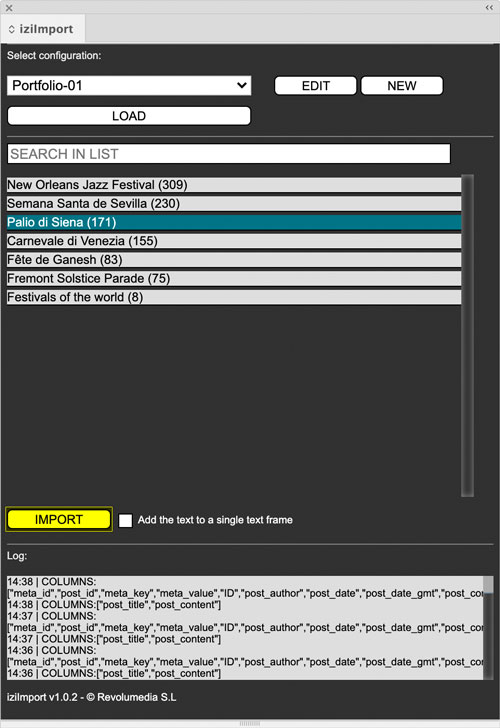
Figure 9. After everything is set up, simply select a post in the list and a frame for its article, and click Import.
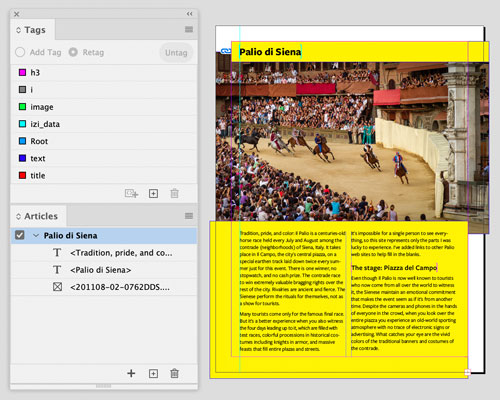
Figure 10. The WordPress post content flows into the frames, automatically restyled for a multi-column InDesign layout suitable for print or PDF. Getting to this point required several rounds of tuning both the iziImport configuration and InDesign styles.
Select a list item with a post title you recognize. Don’t select items that are just numbers in parentheses, because those are other types of site content. (It’s possible to filter what displays in the list, by editing the SQL statement for the posts list in that website’s iziImport configuration.)
The process is typically easiest if each post on your WordPress site is text with a featured image. Other inline and embedded content, such as images that are part of the post, may not import as expected. It might be possible to resolve issues by editing the SQL and JavaScript statements in the iziImport configuration; if not, you may need to add back those content types manually. iziImport plans to expand the types of content that can be imported by default.
Differences in the ways that individual websites are set up may cause unexpected results at first. Don’t be surprised if you have to do a few rounds of testing and tweaking before posts consistently import as you expect.
When you reach the point where posts import properly, importing more posts should simply involve selecting another InDesign article, selecting another post in the list in iziImport, and clicking Import.
The ability to edit the SQL and JavaScript statements provides the flexibility to adapt iziImport to websites that are customized or different than a blog, such as a company’s online product catalog. For example, if your website uses custom fields, you can use iziImport to map those to tags you create in InDesign.
Giving Web Content Another Life
iziImport is an effective tool that does what it says. Its defaults may work right away for simple WordPress sites; other websites may require you to adjust settings in iziImport. You’ll find iziImport easier to use if you’re already familiar with the technical details of WordPress and the SQL database it uses. Depending on your website and skill set, you might need to work with someone with SQL and JavaScript experience to troubleshoot or to customize the connection between iziImport and the database.
The demo videos you’ll find at iziImport.com can help you get moving, and Revolumedia is working to expand the online documentation for the software. The FAQ is a good place to start.
If you aren’t sure about iziImport, the first month is free, so you can use that time to make sure it works with your websites.
A website’s content can be a rich resource that may also be valuable in another form. Some bloggers have taken their online body of work and published it as a conventional paper book. If you have an idea for such a project, IziImport might save time when you want to get your content from your website to other media through InDesign.
- iziImport 1.0.2
- iziImport.com
- $5.95 per month
- Windows and macOS, InDesign 2014–2022
- Rating: 3 stars
Commenting is easier and faster when you're logged in!

Recommended for you

Getting Started with Canva
Design like a pro without breaking the bank, and have fun while doing it.

5 Freelancing Mistakes to Avoid
Freelancing can be a source of freedom or overwhelming anxiety depending on situ...
