
InReview: CI HUB Connector
Connect your InDesign files directly to the cloud and search for assets without leaving InDesign
This article appears in Issue 141 of InDesign Magazine.
After almost 20 years of using InDesign, it is rare for a new plug-in to make me flush with excitement. But CI HUB Adobe Creative Cloud Connector excites me. In practical terms, this new plug-in will save you time and frustration by connecting InDesign directly to all of your cloud-based asset services in one panel. CI HUB Connector helps you browse all of the assets in your DAM, MAM, PIM, MDM, and CMS systems.
(These acronyms refer to various systems for managing and accessing large sets of product data and related information. DAM = Digital Asset Management, MAM = Media Asset Management, PIM = Product Information Management, MDM = Master Data Management, CMS = Content Management System. This PDF has details on what differentiates each type of system.)
You can also search for images from stock photo partners and place them directly into your file without having to go to a browser. You can see previews for every version of an asset, every page of an InDesign file, and view metadata as you link and relink images directly from the CI HUB panel within InDesign.
Registration and Installation
Once you register with CI HUB for a 30-day free trial, you’ll get an email providing you with links to download and install the plug-in. The installation is intuitive and there is a Quick Installation Guide for other installation options, in case the preferred method doesn’t work smoothly. To verify installation is complete, navigate to Window > Extensions > CI HUB. Doing so opens a panel that you then can add to a custom InDesign workspace if desired (Figure 1).

Figure 1. Verify your installation was successful by navigating to Window > Extensions to see CI HUB. Click on this to open the CI HUB panel.
Panel Sections
The CI HUB panel has six sections. Founder Andreas Michalski demonstrates each section in short online videos on the CI HUB web site. To access the video links from the CI HUB panel, click the Info button, next to each section name (Figure 2).

Figure 2. To launch online tutorial videos about any feature in the CI HUB panel, click on the circular “I” icon beside each header.
Connections
You begin by logging in to services through the CI HUB panel. Click the disclosure triangle beside the word Connections, and then click the + to the right (Figure 3).
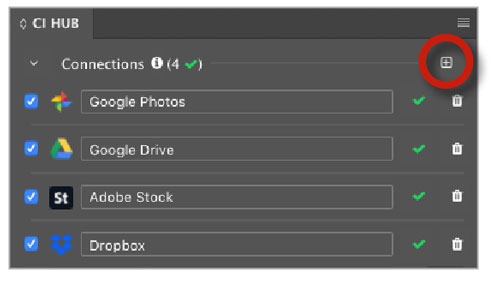
Figure 3. To add services to the Connections section of the panel, click on the “+” beside the Connections header. Choose the logo for the service you would like to add.
Click the logo for the service you would like to connect to jump to the appropriate login page in your web browser. After logging in, you’ll get confirmation the connection was successful. You activate services by selecting their checkboxes (Figure 4).
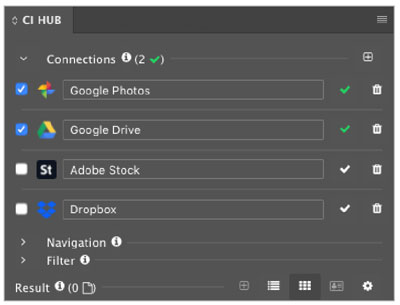
Figure 4. Activate and deactivate Connections by clicking the checkbox beside the service’s name.
Once you’ve connected to all of your services, you will reduce the amount of time you spend logging into websites and switching between them and InDesign. There are currently 20 services integrated into the plug-in—including Dropbox, Adobe Stock, Bynder, and more—with more connections expected to be added in the future.
Navigation
After you connect your services, you use the Navigation section to search within your folders or a service. The options here differ for each service when you select the folder icon or the magnifying glass. For example, a stock service shows you assets you have licensed when you click the folder icon, or you can click the magnifying glass to search by keyword (Figure 5). Or you can search within a folder structure, for a keyword, or for a specific filename for any file type when you click the magnifying glass (Figure 6).

Figure 5. The icons beside the Navigation head will change the options you see under Results. When you choose a stock image agency and you choose the magnifying glass icon, you’ll be able to type in a keyword and see all assets for that keyword. If you select the folder icon, you will see only assets you have previously licensed.

Figure 6. If you choose a cloud hosting service like Dropbox, the folder icon will let you see the folder hierarchy. Or you can search by keyword or filename if you choose the magnifying glass icon.
Filter
The Filter section helps you fine-tune your search results after you’ve selected the magnifying glass under Navigation. The options in this section vary for each service and by the metadata available for images. As you select your filters, they will appear in your panel. If you no longer want a filter, click the X to make it disappear and update your results (Figure 7).

Figure 7. As you choose filters to narrow your search, you will see blue boxes appear to show which filters you have chosen. You can click the x in the blue box to remove any filter.
Result
The Result section is where the plug-in really starts to shine. Once again, your options will vary depending on the service you’ve chosen. There are two view options for each: List view and Tile view. Under List view, you choose which columns of information you would like to see for each file from the settings wheel. You can then sort the results by clicking the column header. Under Tile view, you can choose the size of your image preview and whether you want to include items in subfolders.
If you connect to a service, such as Dropbox, and click the folder icon under the Navigation header, you will see your folder structure in the Result section and can navigate to your files and assets (Figure 8).
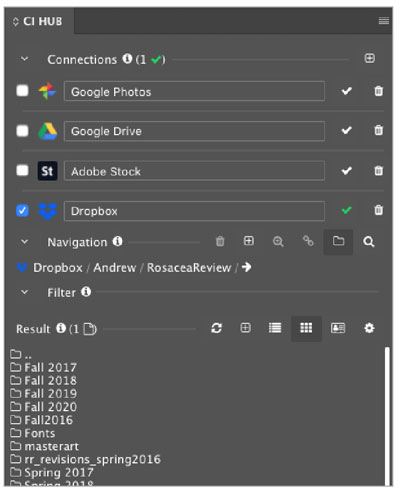
Figure 8. If you choose a cloud storage service and click the folder icon by the Navigation header, you will see the folder structure appear to the right of the service name with the contents of each level appearing under the Result header.
In either view, you can double-click the preview image to see your options and metadata. If an asset has multiple versions available (based on the features of your asset manager), you will see the number of versions. Click the arrows to preview the versions. You can also open an image in your browser or download it to your hard drive. If you have the proper permissions, you can replace an image with a locally saved version, lock it, or delete it.
If you navigate to a folder that contains InDesign files, you will see the number of pages in each file in the bottom-left corner of the preview. Click the arrows to see a preview of each page of your InDesign file. This is a great feature for when you have multiple files with the same first page, but works with files saved in CC 2018 or later only.
To open an InDesign file, drag the preview off the panel. Or you can right-click the preview, and then choose Open In InDesign or Save Local (Figure 9). If you have an InDesign file open, you can right-click the preview of any asset in the panel (an image, PDF, or even another InDesign file) to select Place And Link to place an image at full-size in your file or into any existing image frame.
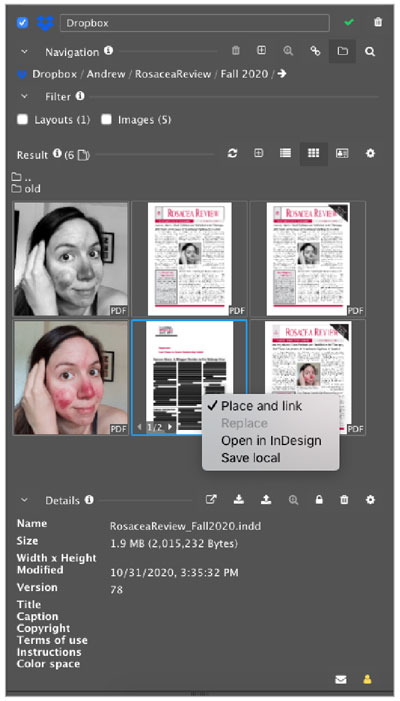
Figure 9. If you select and right-click on a preview for an InDesign file in the Result section, you will see options to save the file to your local hard drive, open the file in InDesign, or place and link an InDesign file (or any asset type) into your open layout.
The best part of this section is the “similarity search” feature. With it, you can narrow or expand your search options. I found an image I mostly liked, for example, chose this option, and CI HUB Connector refined 10,000 results to 64. You can also use it to search for similar images from a different stock agency. With this feature, you no longer have to open multiple browser tabs and search and filter in each service. You can search in the panel and place files into an open InDesign document.
Details
This section permits you to see almost every bit of metadata about an asset without ever leaving InDesign. Whether you navigate to a folder of images or search for images from a stock agency, you can click once on an image to see what CI HUB calls “quick details” below the image. Click the Settings button on the far right to choose which of the dozen metadata fields you want to display. (Figure 10)

Figure 10. To narrow the metadata fields you want to view as part of your asset search, you can choose the Settings button to the far-right beside Result and select the desired metadata fields from the pop-up window.
After you double-click a preview, the CI HUB panel will show every metadata field presently available below your preview. You can also view XMP, EXIF, and IPTC info available for any asset.
Link and Relink
The Links area of the panel is the section that deserves the most applause. After you open an InDesign file from Dropbox or a similar host, you will see a Links section in the CI HUB panel (Figure 11).

Figure 11. The Links section lets you see if an asset is missing (red icon) is available (green icon), or needs to be updated (blue icon). A gray + means the art is saved in your cloud storage location, and a blue + means it is saved locally. You can update all assets, or each asset individually, by selecting the blue arrows at the far-right.
At first glance, it is similar to what you see in the InDesign Links panel—for each link you will be able to tell if the link is missing (red icon) or available (green icon), and if it needs to be updated (blue icon). But that’s about where the similarity stops. You can tell if the art is present on Dropbox (gray plus (+) icon) or saved locally (blue plus (+) icon). If the art is saved locally you can upload it to your desired service by clicking the + icon, verifying the Target folder, and clicking OK. You can update all assets or individual assets, by clicking the blue arrows at the far right. Once the asset is relinked, the arrows turn white. If the arrow is grayed out, then it means that you have art saved locally. This feature is great for confirming that you’ve uploaded all assets and don’t have them stored on your local hard drive.
You can also see the same basic information you can see in the InDesign Links panel: filename, path, modified date, file size, if it is embedded, and which page it is placed on (with a clickable link to take you directly to the image). You will also see how many versions of an image are available, and you can place any version in your file. Or, you can use this panel to switch between a lo-res version and a hi-res version of an image, if your host has that option (Figure 12).

Figure 12. Click on each asset to see more metadata about the image, similar to what is visible in the InDesign Links panel. In addition, you can also see how many versions of an image are available, and you can place or link any of them in your layout.
Try It Out!
CI HUB will save you a lot of time if you search for stock photos. Being able to search for similar assets across multiple services and place art directly into your layout while never leaving InDesign seems like a dream come true. If you’re a freelancer who uses a wide variety of cloud services that are different for each client, being able to quickly activate just the few you need for a specific client will decrease the amount of time you spend logging into websites, manually downloading assets and files, and make tracking easier.
I’m thrilled to know I can quickly verify I haven’t forgotten to upload an asset to a client. The 30-day free trial, which is compatible with InDesign 2018 or later, should give you enough time to see the value this plug-in can bring to your own workflows or processes.
- CI HUB Adobe Creative Cloud Connector
- CI HUB
- €19 per month
- Compatible with Adobe Photoshop, InDesign, InCopy, Illustrator, Premiere Pro, and After Effects CC 2018 and later
- Rating: 5 stars
Commenting is easier and faster when you're logged in!

Recommended for you

Stealing Great Design
See how to embrace your influences and borrow from them to make something totall...

Indic and InDesign
A primer on Indic scripts and how to create stunning documents with them in InDe...
RGB vs. CMYK
It’s time to close the case on this ancient debate that stretches back to the be...