

This article appears in Issue 99 of InDesign Magazine.
Q: I’ve just started exploring the interactive features of InDesign with Fixed Layout EPUB and Publish Online. I’ve been trying to come up with the best way to show and hide various elements on a page. Buttons are way too cumbersome. I tried a multi-state object but there’s no way to hide that. Do you have any suggestions for me?
A: Of course I do! And you’ll be happy to know that you were on the right track using a multi-state object (which I prefer to call an MSO). So, let’s address your need to “hide that.” Most users who want to hide an MSO are looking for something obvious, like a hide button. Unfortunately, there isn’t one. But where there’s a will, there’s a workaround!
One of my favorite things about MSOs is that not only can a state contain just about anything, it can also contain just about nothing. That may sound a bit confusing, so allow me to clarify.
Let’s say you have an MSO with four pictures you’d like to use as a slideshow—but you also want to be able to “hide” that slideshow until the user needs it. To do this, add a fifth state that contains… almost nothing.
I’ll demonstrate this for you; I think it will make perfect sense once I’m done. We’ll start with a 4-state MSO with each state containing a photo plus Go To Next State and Go To Previous State buttons for navigation (Figure 1).
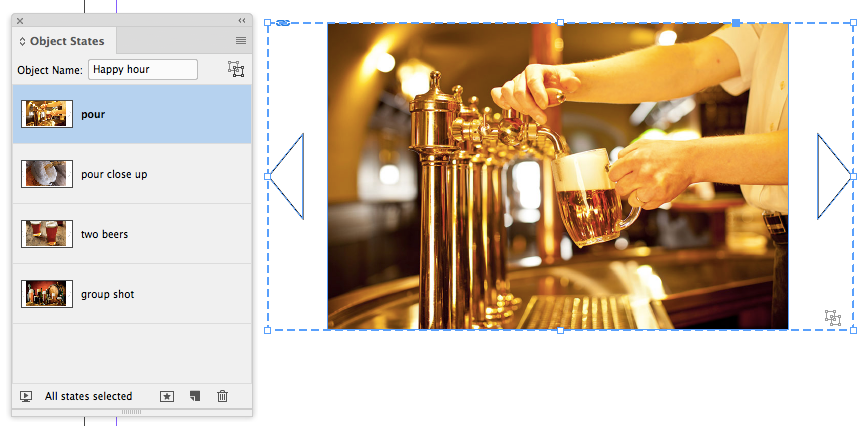
Figure 1: Start out with four images and their navigation buttons.
To add a “hidden” fifth state, first draw a no fill/no stroke rectangle. The Rectangle Frame tool will allow us to do that easily with its
no fill/no stroke default. With the rectangle drawn, use the Align panel (Window > Object > Align) to align it to the MSO (Figure 2).
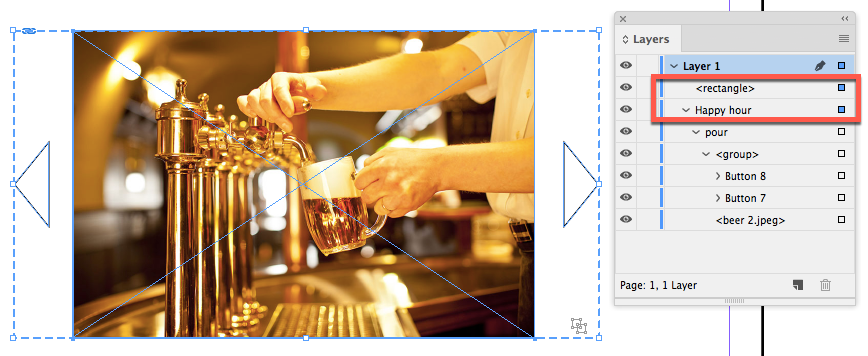
Figure 2: You can verify that the rectangle and the MSO are selected by checking in the Layers panel. You’ll see the filled-in selection indicator icon for both objects.
Now we need to add this frame as a new state. With both objects still selected, click the Convert Selection to Multi-State Object button at the bottom of the Object States panel (Figure 3); the frame will be added as a new state.

Figure 3: When is a frame not a frame? When it’s a state.
To make that empty state be the default, drag it to the top of the panel (Figure 4).

Figure 4: If you’re into small housekeeping items, you can even rename the empty state.
We’re almost there! Users will expect there to be a way to close the slideshow, and you don’t want to disappoint them. So draw a “close” button (anything will do, as long as people understand it to mean “close”), and while it’s selected, open the Buttons and Forms panel. At the bottom of the panel, click the Convert To Button button (Figure 5).
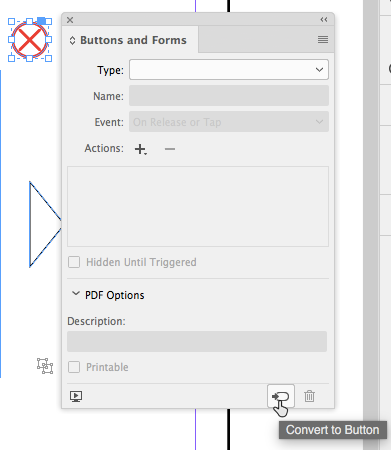
Figure 5: Making a new button (out of anything).
But don’t add an action to it just yet—buttons with state actions lose those actions when added to a state—so we’ll add the action after adding the button to a state. We’re going to need this button in each of the states that contain a picture so we can close it from any of them.
Select the MSO and then, from the Object States panel, select the second state—which is now the first one with an image. Move the button into position above the MSO, and cut it to the clipboard. Select the MSO, and from the Object States panel, click the button for “Paste copied object into selected state.” The button will be added to the state and will be selected. Now, from the Buttons and Forms panel, click the Add New Action button. Choose Go to State (Figure 6).

Figure 6: The first state will be the default choice, and, since that’s the “hidden” state, it’s the one we’re going to accept.
You’ll want to do this for each state with an image. As the old saying goes, “lather, rinse, repeat.” With all the states completed, we have a couple more things to do. Because the buttons to control the slideshow have Go To Next State and Go To Previous State actions, they’re now going to lead to an empty state from the first and last images. The easy fix for that is to delete the Go To Previous button from the first image and Go To Next button from the last image (Figure 7).

Figure 7: Delete the first and last navigation buttons to indicate to your readers when they’ve reached the end(s).

One last step: with the empty state “visible,” there’s no way to know there’s a slideshow to view. We’ll add a button to launch it. The procedure is the same as for the close button we added previously. Create the button, position it above the MSO, and cut it to the clipboard. With the MSO selected and the closed state active, click the Paste Copied Object To Selected State button (Figure 8).

Figure 8: Add an element to the empty state so folks know there’s a slideshow they can view.
Now let’s test our work. Open the EPUB Interactivity Preview panel. The quickest method is to click the button in the lower left corner of the Buttons and Forms panel. (Tip: Resize that panel to get a better view of the page you’re previewing.) Click the play button if the spread didn’t load.
Wondering how it all looks? I’ve uploaded it to Publish Online for you to see.
Q: I’m laying out a book and looking for an efficient way to style quotes from historical figures. I need a shaded box with the quote in large type and the author in a smaller typeface. I have a ton of these to create. I’ve heard this can be scripted but I don’t know anything about that. Please tell me that there’s a quick way to do this!
A: Yes there is—no scripts required—but it takes a little bit of effort to initially set up the styles. Since you need two paragraphs (one for the quote and one for the author), you’ll first apply manual formatting to two “example” paragraphs in your layout, using the Control panel or the Paragraph and Character panels.
With that done, we’ll create our paragraph styles. For this, of course, we’ll need the Paragraph Styles panel (Window > Styles > Paragraph Styles). Here’s a tip: create the second style first (you’ll see why shortly).
With your cursor in the author-name text, open the Paragraph Styles panel menu, and choose New Paragraph Style. Give it a name, and then select Basic Character Formats (Figure 9); you’ll see that the text matches the selection. Click OK to accept this.

Figure 9: Starting to formalize your style into a “Style.”
Now for the quote: move your cursor into that text and, as before, choose New Paragraph Style from the panel menu. Again, give the new style a name, and before accepting it, set the Next Style pop-up menu to the Author style (now you can see why we created the author style first). This will help the automation of this task (Figure 10).

Figure 10: Next Style saves you a lot of keystrokes, and will never accidentally choose the wrong style.
Moving on to the text frame itself, we’ll start with the shaded background that you wanted. For this step, you’ll use the Swatches panel. Make sure you have the text frame selected. If the text itself is active, press the Esc key to switch the focus to the frame.
From the Swatches panel, make sure that the fill color is targeted. If not, press the X key to toggle to the fill color. Choose a fill color for the frame. If the color you’d like to use is not already saved as a swatch, create a new one by opening the panel menu and choosing New Color Swatch. For the purposes of this exercise, I’ll go with yellow for the fill.
With the color set, you can pay attention to the text.
Again, making sure the frame is still selected, open the Text Frame Options dialog box (Object > Text Frame Options), or right-click and choose Text Frame Options from the contextual menu. Add some inset spacing (Figure 11).

Figure 11: Inset Spacing gives you control over the amount of breathing room your text has within the frame.
Click OK to accept the changes.
Finally, depending on your layout, you may want to apply text wrap to this frame, using the Text Wrap panel (Window > Text Wrap).
That’s a lot of steps, and not something I’d want to do repeatedly. The good news is that you don’t have to—didn’t I tell you this already?—you’re going to use what I think is one of the most overlooked features in InDesign: object styles.
Open the Object Styles panel (Window > Styles > Object Styles). With the frame still selected, open the panel menu, and choose New Object Style. Go ahead and give it a name.
Most of the options in this long list of traits don’t matter for your project, but let’s look at those that do. The obvious first choice is fill. The color should be the one you’ve chosen; in my case, yellow. Then we move on to the paragraph styles (Figure 12).

Figure 12: Conveniently, a paragraph style can be part of an object style.
Remember how we set up the author style as the next style after the quote style? Here’s where that will come in very handy. The first paragraph style will be selected by default. Just enable Apply Next Style, and you can move on to Text Frame General Options and change any desired settings there if you like.
Then Click OK to accept everything, and give your new style a test drive on a new frame (Figure 13).

Figure 13: A new, unstyled quote box for your project.
Select the object style we created, and voilà (Figure 14)!

Figure 14: You have now semi-automated the formatting of however many quote boxes you wish to create.
Object styles are easy to create and even easier to use! And later on, when you (or your artistic advisors) decide you need to change the fill color or the text inset, you can change the style definition, and all your quote boxes will instantly update.
Commenting is easier and faster when you're logged in!

Recommended for you

Creating an Interactive Portfolio
Sandee Cohen shows how to collect and display your best work in an interactive p...

Changing the Default Stroke to Inside or Outside (instead of centered)
When you want to change the default stroke, you need to remember these few essen...
A Script to Collect All Objects With A Particular Object Style
In the course of my editorial duties here at CreativePro, from time to time I...