
InQuestion: Formatting Lists & Threading Text Frames
We answer the CreativePro InDesign community’s questions about multilevel bulleted lists, adding text frames to a thread, and more.

This article appears in Issue 1 of CreativePro Magazine.
The CreativePro InDesign community extends far and wide, with our online groups on Facebook, LinkedIn, and Discord. The members are passionate about the program and are ready to jump in and help their fellow InDesigners when issues come up.
In this Q&A column, I highlight a handful of member questions and offer solutions, including those from other community members. Note that the discussions have been edited for brevity and clarity.
Creating Multilevel Bulleted Lists
Q: Sacha Rein asked: What are your favorite bullets for lists with three levels?
A: Folks chimed in with their preferred groupings, from a sequence of en dash/bullet/dash to a series of circles and squares to various assortments of dingbats. I do wish it were possible to create a custom hierarchy of bullet symbols with their own levels of indentation that I could assign as a group from a simple menu. Alas, for now, we must create separate bulleted list paragraph styles for each level and assign each to our text individually (Figure 1).
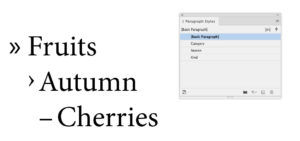
Figure 1. Use mixed bullets to show hierarchy.
Start with your cursor in some text, and choose Bullets and Numbering in the Control panel menu. In the Bullets and Numbering dialog box, choose Bullets from the List Type menu. At first glance, it seems like slim pickings—including a bizarre one, a Greek capital letter Alpha with multiple accents. David Blatner unraveled that mystery in this post at CreativePro.
But don’t worry, you can add pretty much any character that you like for a bullet. To do so, click the Add button in the dialog box. This opens the Add Bullets dialog box, which looks like a slightly simplified version of the Glyphs panel (Figure 2). When you find a glyph you want to use as a bullet, click it to select it, and then click Add. Note that you can choose glyphs from any active font by choosing it from the Font Family and Font Style menus. Next, indicate whether the chosen font should be remembered with the bullet—which is important if you select a dingbat or other character not likely to be in other fonts. You don’t have to stop at one custom bullet character; you can continue adding others and click OK when you’re done.

Figure 2. Add custom bullets.
Next, use the Text After field to set any characters that should come after the bullet. You can choose common ones like an en or em space or a tab from the menu indicated by the triangle to the right of the field. Or, if you just want something like a regular space you can simply type it in the field (Figure 3). In the Character Style menu you can create or apply an existing style to change the appearance of the bullet and any text in the Text After field. Lastly, position the bullet with the Alignment and Indent controls. As always, working with Preview turned on allows you to dial in the perfect settings without guesswork.
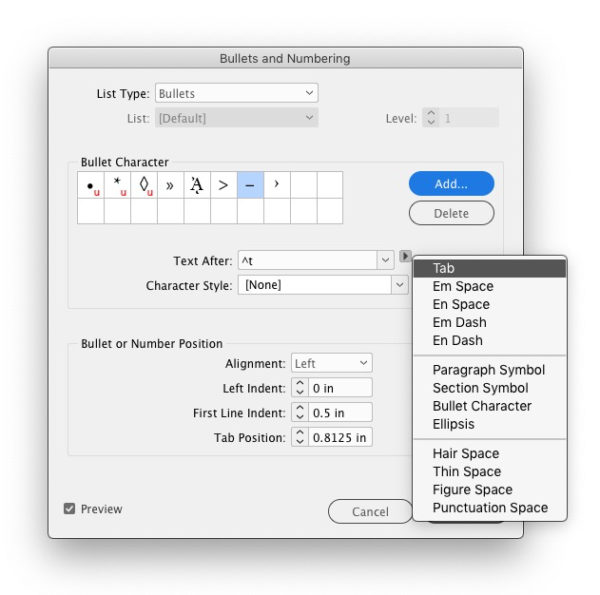
Figure 3. Set up what will follow the automatic bullet.
Now you’re ready to create a paragraph style from your bulleted text. To make multiple levels of bullets, create a hierarchy of styles. Create the top-level style, then create a new paragraph style and base it on the top level, and continue on down as needed. Change the bullet character and the indent amount for each in the Bullet or Number Position section and save out each style. When naming these styles, using unambiguous names like Bullet Level 1, Bullet Level 2, and so on, is good practice. When it comes time to actually format the text in your document, you may be able to automate the process using the Next Style feature if you have a repeating pattern of bulleted items at each level. Otherwise, you’ll have to assign the styles manually as you go.
Tip: Making Unique Bullet Characters
If you want to create a unique bullet character using any vector shape, check out the demo version of IndyFont, a script that lets you create your very own one-character font. Here’s how:
- Create a unique vector object. You can draw a shape, import one from Illustrator, or convert a text character to outlines and tweak it).
- Fill it with black, and make sure there’s no stroke or other formatting.
- Select and copy the vector object to your clipboard.
- Run the IndyFont script.
- In the document created by the script, paste the vector object on the bullet character page and make any size or position adjustments.
- Name and generate the new font.
- Back in the Bullets and Numbering dialog box, choose the bullet character from your new font as your custom bullet.
Adding Text Frames in the Middle of a Story
Q: Pat Creedon asked: How do you add in new text frames within a threaded document? The idea is to add in a section that needs to be within the flow of the whole book.
A: Most experienced InDesign users probably know how to create threaded text frames when placing text. (For comprehensive basic instruction on flowing text, check out Sandee Cohen’s article at CreativePro.)
But what if you’ve already created a long text thread and need to add new frames into the middle of the chain (Figure 4)? It’s actually quite easy!
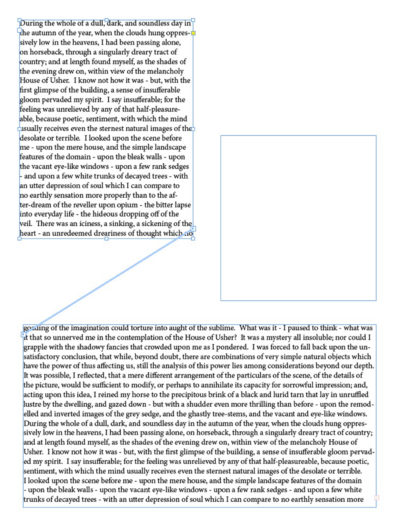
Figure 4. Threaded text frames with a blank frame to insert into text flow
InDesign’s text threads are pretty smart, in that they will continue the flow, even if you add new frames to the story (or remove them), without losing the rest of the story contained inside. And all of this tinkering with text threads can happen if there is text already in the frame or if the frames are empty. In fact, you can create threaded text frames at the beginning of the layout process before there is even any text to fill them, and the process is exactly the same.
But back to the original question of adding a new frame to the story. You can create the new text frame first or do it on-the-fly. For this example, we will create the frame first.
- With the Type tool, draw out the new frame where you want it.
- With the Selection tool, select the frame that will come just before the new frame in the story.
- Single-click on the text out port, which is the small square with a right-facing arrow on the lower-right side of an unrotated frame. The rest of the story content will be loaded in your pointer.
- Move your pointer over the new frame, and the pointer icon changes to an unbroken chain link (Figure 5).

Figure 5. Roll over the empty frame with the loaded pointer and click to add the frame to the thread.
- Click in the new frame. The story flows from the first frame to the new frame, then continues into the next frame in the story (Figure 6).
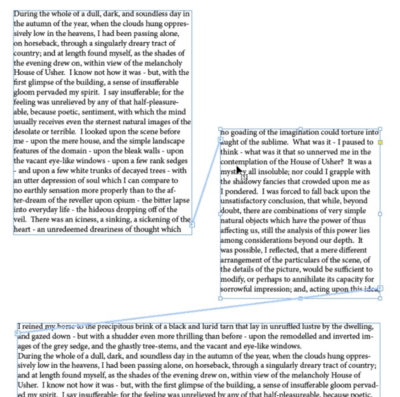
Figure 6. After you click, the blank frame is added to the thread and text flows through it.
If you want to see how the frames are threaded—which is super helpful when your text flows across many pages or you have empty text frames—choose View > Extras > Show Text Threads (or press Command+Option+Y/Ctrl+Alt+Y). Now, when you select a frame, you’ll see the connector lines. When you don’t have a frame selected, those lines disappear.
Tip: Semi-Autoflow Is Fully Magical
If you’ve been creating long sets of threaded text frames by clicking the first frame’s out port, then drawing out a new frame, then clicking its out port, and repeating the process ad nauseam, you’ll be glad to know there’s an easier way!
Create your first text frame, then click the out port with the Selection tool. Press Option/Alt, and the loaded cursor icon changes to a sort of serpentine shape with a partially dotted line.

This semi-autoflow mode not only lets you click and drag out a new frame that is connected to the previous frame, but also picks up the rest of the story into the cursor.
Be sure to continue pressing the Option/Alt key while you drag out new frames. They will all be linked together, and you can, of course, use it on empty frames. It’s the fastest way to drag out multiple, threaded text frames.
Adding Leader Lines Before a Numbered List
Q: Hoang Nam wanted to know how to make leader lines before a numbered list.
A: I covered a few methods that can be used for making leader lines in Issue #126 of InDesign Magazine, but this time I’ll take it to the next level by building the lines into an automatic numbered list. And it’s a super simple style to set up.
First, I suggest manually creating the look you want (Figure 7), then using that info to build the style. Start with figuring out how many spaces will make the ideal leader line using a series of underscores. Next, type a number—I tend to accommodate the widest number I think my list will include—followed by a period, and set a tab between the period and the start of the list item. Once you’ve perfected the look it’s time to build it into a style.

Figure 7. The desired look: leader lines before automatic numbers
With your sample text selected, go to the Paragraph Styles panel and Option/Alt-click the button to create a new style. In the New Paragraph Style dialog box, navigate to the Bullets and Numbering area and choose Numbers from the List Type menu. Having Preview turned on during this process will prove handy. Near the bottom of the dialog box you can see that the tab amount you set is auto-filled in the Tab Position field and that the default Numbering Style is also applied. At this point, seeing both the manual number from your initial design and the automatic one from the style can be confusing. So, I tend to save the style and exit the dialog box (be sure to give the style a name first), then delete the manual numbering, leader line, and tab applied at the beginning of this process. That will all be applied by the style.
Head back to the Paragraph panel. Right-click your newly created style, choose Edit, and then click Bullets and Numbering again. In the Numbering Style section’s Number field, you need to enter the formula to insert everything that will come before the list items. The first thing is the set of underscores, so enter as many as you used in your prototype (I had four in my example). After the underscores you might want a space for some breathing room, so just type in a space.
For the next item, click the menu to the right of the field—it looks like a little triangle. Choose Insert Number Placeholder > Current Level. Next, add a period after the number by simply typing the period. Finally, insert the tab character, which can be found in the menu under Insert Special Character. Click OK (Figure 8).
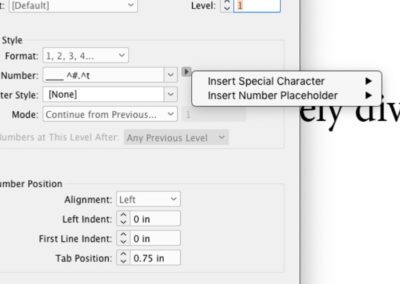
Figure 8. Type in text as part of the auto numbering. Some items are in the Insert Special Character menu.
There is a lot of customization you can do in the Number field to incorporate into your numbering styles. You can add text that you want to appear before or after the numbering, or use en spaces and em dashes instead of a period and a tab. Just note that there can only be one tab character in the string and it has to appear at the end of the string.
When setting up number styles, it’s often a good idea to use Number Lists. This allows numbering to happen even when lists are interrupted by other paragraphs of text or when lists are in separate stories. Create a new list or choose an existing one when creating a numbered style (Figure 9). Building that into the paragraph style will help keep your numbering consistent, even if the paragraphs with numbered text are not right next to each other.
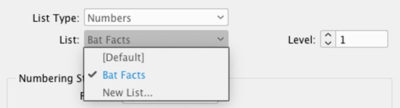
Figure 9. Create a list style to continue numbering across stories and paragraphs.
Commenting is easier and faster when you're logged in!

Recommended for you

The Daily Drop Cap Reaches "Z"
In September 2009, typographer and illustrator Jessica Hische began an online pr...

Enfocus Software Ships PitStop Professional for Acrobat 7
The latest, feature-rich version of the world’s most popular PDF editing,...

Using Generative Fill in Photoshop
A first look at the new Generative AI Fill features coming to Adobe Photoshop