
InDesign’s Magical Span and Split
In which the age-old conundrum of managing multiple columns of text is solved at last!

This article appears in Issue 35 of InDesign Magazine.
Arthur C. Clarke, the late science fiction writer and futurist, wrote, “Any sufficiently advanced technology is indistinguishable from magic.” The feature that most approximates magic in InDesign CS5 is not one of the interactive features—which do sometimes seem like they can pull a rabbit out of a hat—but rather a feature that lets you span or split paragraphs across multiple columns.
This innocuous, somewhat-hidden feature might sound boring when compared to Motion Presets and Multi-state Objects, but it will quickly prove itself to save you hours (perhaps hundreds of hours) of work and hassle when creating documents. And if that’s not magic in these tough economic times, I don’t know what is.
This feature is a two-for-one: On the one hand, it allows you to span a single paragraph across two or more columns in a multi-column text frame. For example, newspaper headlines typically span (or “straddle”) over a story that is broken down into two or more columns (Figure 1). In InDesign CS5, this is far easier and more efficient than the old method of breaking a story down into multiple frames.

Figure 1: The Span Columns feature in InDesign CS5 lets you do two things: span a headline across two or more columns of a text frame (A), and split a single column into multiple sub-columns (B).
On the other hand, the feature lets you split a single column of text into multiple sub-columns—very helpful when dealing with lists. This, too, saves a lot of time over the pre-CS5 method of anchoring tables or inline frames into a story.
Multi-Column Frames
It’s important to note that the span columns feature only works inside a single text
frame with two or more columns. If you’ve created your columnar layout with separate-but-threaded frames, span columns can’t recognize the other frames on the page, so it simply won’t function.
You can create a multi-column text frame by selecting the frame and choosing Object > Text
Frame Options. In the Text Frame Options dialog box (Figure 2), you can specify the number of columns, the gutter (the space between the columns) and—optionally—the width of the columns themselves. If you change the Width field, InDesign will also alter the width of your text frame.

Figure 2: Span Columns only works inside a single text frame that has been divided into columns with Text Frame Options.
Span Columns
Once you have a multi-column frame, you can select any paragraph with the Type tool and tell it to straddle by choosing Span Columns from the Control panel menu. Alternatively—if your screen is wide enough—you can find these controls in the Control panel itself (Figure 3). Tip: For more options, open the Span Columns dialog box by Option/Alt-clicking on the Span Columns icon in the Control panel.
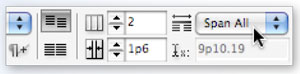
Figure 3: The Span Columns feature also appears in the Control panel. Option/Alt-click the icon to open the dialog box for more options.
In most cases, you’ll probably want to set the column span as part of a paragraph style. Fortunately, Adobe has added a Span Columns pane to the Paragraph Style Options dialog box (Figure 4).

Figure 4: You can (and probably should!) tell paragraphs to span or split as part of a paragraph style.
The Paragraph Layout pop-up menu lets you choose Single Column (in other words, “make it work like it has in previous versions of InDesign”), Span Columns, or Split Columns. Let’s look at Span Columns first.
When you chose Span Columns, you get three additional options. The first, Span, lets you specify how many columns the paragraph should straddle. The default is “All,” but you can choose any number you want. For example, in a three-column frame, you may want a heading to span over only two of the columns, leaving the third full height (Figure 5).

Figure 5: You can choose how many columns you want a paragraph (such as this heading) to span.
The next two options let you control the space before and after the heading—very useful for tasks
like adding a bit of extra space before or after a large headline. This is analogous to changing Space Before and Space After the heading paragraph. (In fact, it’s unclear to me why Adobe offers two separate methods to change space before and after these paragraphs. Both controls appear to do the same thing.)
Mid-Story Spans
Interesting things happen when you set a paragraph in the middle of a story to span more than one column.
In this case, InDesign treats the paragraph almost like the beginning of a new page or frame. That is, all the text that comes before the spanned paragraph (let’s say it’s a heading) balances out in the columns above the heading (Figure 6).

Figure 6: (A) The original story in a 3-column frame. (B) Setting the first heading to Span All and the second heading to Span 2 columns. (C) After changing the second heading to Span All. Note how InDesign splits the frame into “zones” above and below the second heading.
I like to think of it as InDesign creating little zones, or invisible frames, into which it pours the text. As soon as you span a paragraph across two or more columns, it creates new zones—one before the heading and one after the heading.
However, it means that you cannot use the Span Columns feature for something like pull quotes. For those, you’ll still need to place a separate text frame that has text wrap around it (Figure 7).
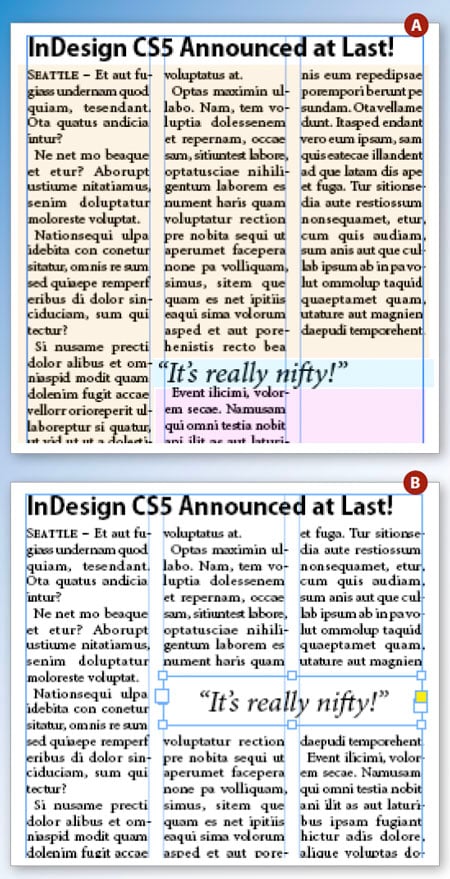
Figure 7: (A) This pull quote was set to Span 2 columns. The colors (added for illustration) indicate the three zones InDesign creates, which is probably not what you want for this kind of effect. Instead, (B) put the quotes in a separate frame with text wrap.
Split Columns
Instead of telling a paragraph to span across two or more columns, you can instruct it to split into two or more columns within the single column. Weirdly, this “split” feature is also found inside the Span Columns dialog box (or Control panel pop-up menu, or pane within the Paragraph Style Options dialog box).
This feature is a wonderful way to save space when including numbered or bulleted lists inside a wide column of text. But there are other, more subtle uses for this feature.
For example, the fact that you can split a single column into multiple columns offers an entirely new way of creating multi-column stories. In the past, you could split a story into columns by making a multicolumn text frame, or by making a bunch of narrow frames and threading them together. Now you have a third option: Place your text into a single, one-column frame and then select the text and split it into multiple columns using Span Columns (Figure 8).
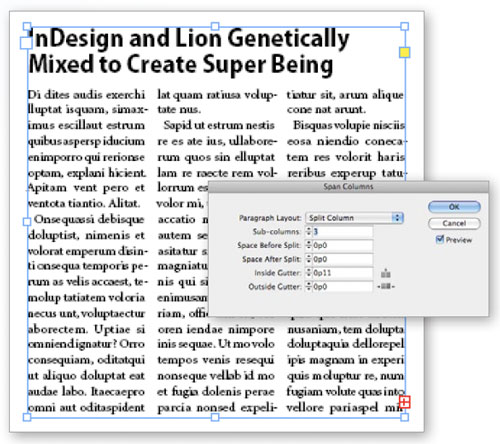
Figure 8: You don’t need to make multi-column text frames anymore! This story appears to be three columns, but is actually a single-column text frame. The heading has no span, and the paragraphs are set to Split 3.
This technique can greatly simplify layouts require multiple columns, though it will require you to rethink your method of dealing with multiple columns in your documents and templates.
Managing Columns
There is no doubt that these new options for managing columns of text—whether by spanning or splitting them—can save hours of work. It’s a magical feeling to see the text reflow into these invisible zones and balance out so easily, after so many years of having to manually set up multiple frames, anchored frames, tables, and other time-consuming workarounds.
However, while simplifying the workflow, these features also add a new level of complexity when thinking out how best to set up a document or a template. Should you make a new frame or span a paragraph? Should you use the Text Frame Options dialog box to arrange columns or use Split Columns. Ultimately, though, knowing your options means you can make the right choice for your layout needs.
Commenting is easier and faster when you're logged in!

Recommended for you


Avery Dennison Unveils Free Design and Print Online Tool
Avery Dennison Office Products unveiled its new online software tool, Avery Desi...

Creating Two Or More Automatic Text Flows
Andrew B. wrote (on the InDesign mail list): I have yet to find out how to set u...