
I had expected a brass band to come marching down the middle of New York City with banners waving: InDesign 2.0 Ships! Instead, on Sunday, January 20, 2002, a friend sent a message to the Blueworld InDesign listgroup: A press release, dated the following day, had been spotted on the Adobe Web site that said InDesign 2.0 was shipping.
Where was the hoopla? The big hype? Could it be that Adobe was going to let the product speak for itself? If so, they made the right move. InDesign 2.0 offers creative professionals compelling reasons to switch from QuarkXPress. However, the real competitor to InDesign 2.0 may not be QuarkXPress 5. But, before I tell you which product that is, here are the strengths and weaknesses in InDesign 2.0.
Disclosure: I am the author of “InDesign 2 Visual Quickstart Guide,” to be published soon by Peachpit Press. But over the past 14 years, I have used QuarkXPress as my main page-layout program and taught it to thousands of students. However, for the past nine months I have been using InDesign 1.5 as my primary page layout program and my most recent two books were laid out using InDesign 1.5. While I do not have the shipping version of QuarkXPress 5, I did download the beta version from the Quark Web site (along with many other folks) so I have a good idea of how it compares.
It’s easy to be creative using InDesign.
I divide using a page-layout program into two distinct experiences. The first part is the creative experience. This is when a designer or art director uses a page-layout program as part of the initial design process. InDesign 2.0 excels here.
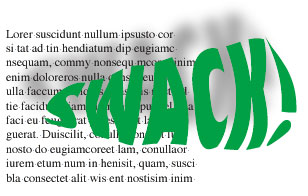
For example, InDesign allows users to import native Photoshop files without having to first flatten the images into TIFF files. Not only that, InDesign is the first (and right now the only) page-layout program that recognizes the transparency in Photoshop layers. This means that hard-edged clipping paths are no longer the only way to silhouette images. Designers can just lay a transparent Photoshop image over text and lets the image softly fade into the type (see figure 1). One caveat, though, is that creating transparencies is only one step in the publishing process. Adobe must do a good job to educate service bureaus and print providers as to how to handle files that have transparency applied. For instance, unless the Transparency Flattening settings are set correctly, text may become thicker as it passes through a transparency effect.

Figure 1: InDesign lets you import transparencies from Photoshop, allowing your graphics to have softer edge effects.
However, InDesign doesn’t just recognize Photoshop transparencies. It also has its own complete set of opacity controls and blend modes. So any native InDesign text or objects can be made transparent to each other or to placed images. Drop shadows and feather effects can be added to text and images right in InDesign (see figure 2). So instead of jumping back and forth between Photoshop and the page-layout program, you add those effects right where they belong — on the InDesign page. This makes it much easier to see how those shadows and feathers will interact with text and other elements on the page.

Figure 2: You can apply sophisticated shadow and feather effects inside InDesign without having to jump back into Photoshop.
To be fair, drop shadows aren’t entirely unknown to QuarkXPress users. QX-Effects from Extensis and ShadowCaster from A Lowly Apprentice Production (ALAP) both add shadow features to XPress to either XPress 4 or 5. In fact, importing native Photoshop files is already a possibility with ALAP’s ImagePort. And although ImagePort doesn’t recognize Photoshop’s transparency layers, it does let you turn layers on and off, change their opacity and blend modes, and turn channels into spot colors, varnishes, or die cuts. But these features are not built into QuarkXPress — not even version 5 — and therefore cost extra.
InDesign also offers vector illustration tools similar to those found in Illustrator, like pencil, eraser, and smooth tools. But instead of struggling with the mathematics of Bezier control handles, InDesign’s tools are much more natural and easy for creative people to understand.
InDesign 2.0 is integrated with Adobe applications.
InDesign’s integration with the adobe canon is especially helpful for anyone who uses Adobe Illustrator. InDesign lets you copy and paste (or drag and drop) Illustrator paths onto the InDesign page. This lets designers use Illustrator as a sort of “back room” illustration tool in addition to their InDesign tools. You can easily add envelope and warp effects from Illustrator 10 as native InDesign objects. Color management is also easier to coordinate when InDesign is used in conjunction with Illustrator and Photoshop. Once you have created color settings in Photoshop, those settings can be exported as an electronic file, and then imported into InDesign to be used as its color settings.
This cross-program integration also means that it’s much easier to learn InDesign. If you know how to add a new layer in Photoshop, you know how to add layers, pages, and style sheets in InDesign. If you know how to create a color or gradient in Illustrator, you’ve got the whole thing mastered in InDesign.
InDesign offers great typography controls
Twenty years ago, before the age of QuarkXPress and PageMaker, setting type was a real art. Type directors at ad agencies and publishing houses spent time to make sure type was set properly. Then came desktop publishing — the fast-food equivalent of typesetting — and the art of fine typography was almost lost completely.
InDesign resurrects many of the nuances of typesetting that were endangered species. Some of these features have been in InDesign since version 1.0. For instance, optical margin alignment lets an entire generation of designers see how the hanging punctuation makes the edge of justified text look cleaner. The Adobe Paragraph Composition engine looks at all the lines in a paragraph and reflows the text so that the color of the text is consistent (see figure 3). (Any designer who has spent hours entering forced line breaks to re-rag text will immediately appreciate this feature.)

Figure 3: This animated GIF shows how InDesign’s Paragraph Composition command reflows text to adjust spacing, color, and so on.
Now, with this new release InDesign adds new hyphenation controls that let you adjust the overall number of hyphens in a paragraph. As you drag the hyphenation frequency slider (called Nigel for its eleven ticks in honor of the Spinal Tap guitarist) you can improve the word spacing or decrease the number of hyphens.
InDesign 2.0 is also the only page-layout application that supports all the alternate characters for the OpenType font format. Instead of only 256 glyphs (characters) in a typeface, Open Type faces can have thousands. For those designers old enough to remember alternate characters for double-letter ligatures or terminal swashes at the end of a word, InDesign can automatically insert those alternate characters from OpenType faces (see figure 4).

Figure 4: InDesign’s support for the OpenType font format means it can automatically substitute alternate characters when called for.
Creativity is only half the goal.
At the opposite end of creativity, the other part of what makes a page-layout program popular is how well it handles the dull and tedious chores of laying out pages and long documents. When InDesign 1.0 was released, it broke new ground with the ability to base one master page on another. That meant you could adjust the page numbers on one master page and the change would ripple through the other masters based on that page.
However, many users were frustrated by the lack of other book features such indexes, tables of contents, coordinating documents for book production, and applying hyperlinks for use in Acrobat and HTML files. Fortunately Adobe listened to those users as all those features have been added to version 2.
In fact, InDesign’s book coordination is easier to use than the one in XPress 4 or 5. In XPress, if you add a page to a document in a book, you have to re-synchronize all the elements in the book — pages, colors, and styles. In InDesign, you have the choice to synchronize just the page numbers–which is much faster. This, along with the master pages, gives InDesign a slight edge over QuarkXPress when it comes to working with multi-chapter long documents.
Both Adobe and Quark must feel that XML is one of the most important new features for automating documents. (Why else would XML have been added to both InDesign 2 and QuarkXPress 5?) XML allows users to “tag” objects and text with identification codes that make it possible to import fully formatted text as well as graphics. It also means that tagged XML layouts can be exported from the page layout and then easily reformatted for the Web using an XML program such as Adobe GoLive or Macromedia Dreamweaver. This allows for repurposing of documents from print to Web, also known as the hot new area of “cross-media” publishing.
Quark has added XML support by incorporating avenenue.quark XTension into XPress 5. This is a valid XML that requires DTDs (document type declarations) to map how the XML tags should be interpreted. Adobe has added well-formed XML that works without strict document type definitions. However, neither valid XML nor well-formed XML is the sort of feature that the ordinary designer is going to be able to pick up quickly. Most designers I see can barely use paragraph and character style sheets. Perhaps some large magazine publishers have the discipline and technology resources to implement XML tags, but most small shops don’t yet have the understanding to incorporate XML into their workflow.
InDesign lets you create and import tables.
Tables may not be as sexy as transparencies, but the table features in InDesign 2 are pretty exciting. For starters, you can easily create a table and enter text by tabbing from cell to cell. However, once you’ve created a table, InDesign lets you apply all sorts of formatting to create alternating fills or strokes for the table rows or columns. Plus, the alternating rows and columns are smart — insert or delete a row or column and the alternating fills and strokes adjust accordingly (see figure 5).

Figure 5: When you delete a table entry that’s set with alternating fills, InDesign is smart enough to reapply the fill based on the updated content.
InDesign does more than create its own tables, too. You can import tables from Microsoft Word or Excel complete with all the formatting that the accounting department applied in either of those programs. (Thankfully you can also strip all that ugly formatting off the imported tables.)
Finally, InDesign tables can flow vertically from page to page. That means you don’t have to recreate a table for each page; you just flow the table onto the new pages. (I didn’t appreciate how helpful this would be until I created a table of data that extended over four pages.)
I do have a few suggestions for Adobe to improve InDesign’s tables. First, there must be a way to see the cell dividers when strokes are turned off. Next, although it is possible to paste an image frame in as an inline graphic, there is no way to turn a table cell into a graphic cell. Although QuarkXPress 5 lets you create tables filled with either text cells or image cells, it does not have automatic formatting for fills and strokes.
InDesign as a page-layout program for the future.
One of the most important reasons to consider InDesign is that the program has been created for today’s needs — not the past. Adobe has made the InDesign program modular so that new features can easily be added. For instance, it only took six months for Adobe to add new tools and features to InDesign in version 1.5. So not only can Adobe issue updates and bug fixes, but also third-party developers can create their own plug-ins. (True, QuarkXPress has allowed plug-ins for ages — witness the thousands of XTensions written for the program. But the core program isn’t modular. Perhaps that is why it has taken Quark Inc. so long to release new features for its flagship program.
InDesign 2 is also carbonized for Mac OS X (meaning it runs in native mode under Mac OS 10.1). Designers only need Photoshop for Mac OS X to fill in the last piece of the Carbon software lineup of graphics applications. For those designers who are anxious to stop jumping into the Classic mode — which doesn’t have protected memory and the sexy Aqua interface — this may be an important reason to switch to InDesign as QuarkXPress 5 is not yet Mac OS X-native.
InDesign does have a high cost.
The high cost of InDesign isn’t its price — at $699 a new version of InDesign 2 is $200 less than a new version of XPress and its limited-time upgrade price for existing users is only $99 compared to $299 for XPress 5.
No, the real cost of InDesign is its system requirements. It doesn’t list this on the box, but in the Macintosh OS 9 environment, the suggested minimum memory allocation for InDesign is 50MB dedicated to the program alone. My version of QuarkXPress 4.1 runs great with just 9 MB assigned (imagine trying to run InDesign, Photoshop, and Illustrator at the same time).
InDesign also requires G3 or G4 processors running Mac OS 9.1 or higher or Mac OS X 10.1. Meanwhile, many designers I know are still using XPress 4.1 on old PowerPC “hundred” machines such as the 8500 or 9600 with only CPU speeds of 180 to 200 MHz. The Mac version also requires 240 MB of hard disk space — twice what’s needed under Windows. As for Windows memory, the system will just grab as much memory as it needs — if you’re a PC user, be sure you have a lot of it. The program may be state of the art, but it also requires state-of-the-art computers to run it. (Find the full system requirements list here.
InDesign is also slower than XPress. It took me almost three minutes to scroll through a 200-page, all-text InDesign document with anti-aliasing turned off. But it took less than a minute to scroll through the same text file laid out in XPress 4.1.
The real-competition to InDesign 2.0 is…
So, which one will be the winner? After many years of searching for a “Quark killer” it may be that Adobe has finally gotten the right weapon to go up against QuarkXPress 5. When it comes to a feature-for-feature comparison, InDesign 2.0 has an impressive list of features for print designers.
However, InDesign’s strongest competition is the status quo to stay with QuarkXPress 4.1. After all, it’s not like most people have been unable to produce any work with XPress 4.1. Quite the contrary, it’s been quite reliable. So the choice is not just to switch to InDesign 2.0, it’s also to switch from XPress 4.x. You’ll have to work that one out for yourself.
Read more by Sandee Cohen.
This article was last modified on March 10, 2025
This article was first published on January 29, 2002
Commenting is easier and faster when you're logged in!

Recommended for you
Fine Tune Slider Speeds in Photoshop
Use keyboard shortcuts to modify the speed of your Photoshop scrubby sliders wit...

Creating Smarter Text Styles for Long Documents
Working as both a designer and prepress specialist, I receive a lot of files tha...

Object Styles for Marking Content in InDesign
How to use objects styles that make it easy to spot images that need work