

Content area
As you navigate using the Source panel, the files to be imported are displayed in a Grid view in the content area and you can use the Thumbnails slider in the Toolbar (Figure 7) to adjust the size of the grid cells. As with the Library module Grid view, you can double-click on a grid cell or use the E key to switch to a Loupe view of the selected file. The Loupe view mode allows you to check photos more easily before you import them into Lightroom. This may be useful if you are importing photos from a folder and need to ensure you have the right ones selected before you carry out an import and check for things like sharpness. The Loupe view Toolbar options (Figure 8) allow you to adjust the Loupe view zoom setting; you can also use the Spacebar to toggle the preview between a “zoom to fit” and a close-up zoom view (use the G key to return to a Grid view). In the Grid view, each cell has a check box next to it. You can use the “Check All” And “Uncheck All” buttons in the Toolbar (Figure 7) to select or deselect all the photos in the current Grid view that you wish to import. With all the cells deselected you can make a custom cell selection. Use a -click to make contiguous selections of photos, or use a -click(Mac) or -click (PC) to make a discontiguous selection and then click on any one of the check boxes to select or deselect all the photos that are in that selection. Furthermore, in both the Grid and Loupe views, You can use the “pick” keyboard shortcut (P) to add a photo to an import selection and use the “unpick” keyboard shortcut (either U or X) to remove a photo from an import selection and use ` to toggle between selecting and unselecting. If you hold down the key as you apply these key shortcuts you can auto advance to the next photo. Lastly, you can also use the spacebar to toggle adding or removing a photo from an import selection. Also in the Grid view Toolbar (Figure 7) is a Sort menu. This lets you sort files by Capture Time, Checked State, or File Name, which can play a useful role in helping you see more easily which specific files you wish to select when making an import.  Figure 7: The Import dialog Toolbar with the Content area in Grid view mode.
  Figure 8: The Import dialog Toolbar with the Content area in Loupe view mode (note that an “Include in import” check box is on the Toolbar in the Loupe view mode). Tip You can right-click a folder to select “Dock Folder” and switch to a docked folder view and use the same contextual menu to quickly switch to an undocked view. Remember, the Lightroom Import dialog can only show supported image and video files. If no files can be imported you’ll see a “No photos found” message. If you select a folder to import from in the Source panel and “Include Subfolders” happens to be unchecked (see Figure 5), you may see an “Include Subfolders” button in the middle of the content area (Figure 9). If you click on this it will switch this option back on and display the subfolder contents.
  Figure 9: The “No Photos Found” message plus “Include Subfolders” button. The Grid view cells provide some visual clues regarding import status. Files that are unselected are displayed with a dark vignette, meaning they won’t be included in the import. If you have the “Don’t import suspected duplicates” option checked in the File Handling panel (see page 51), any files that are suspected duplicates will appear grayed out. Lightroom is able to work this out by carrying out a background check to see if any of these files are already in the current catalog. Note Lightroom applies the following file check when determining whether a file is a suspected duplicate. First, Lightroom checks the filename to see if it matches. It also checks the EXIF metadata to see if the original capture date/time and file length match. Content area segmenting options How the photos are segmented in this view depends on which option you have selected in the bar at the top of the content area. As you might expect, the “All Photos” option shows all files without any segmenting. The “New Photos” option is useful as this hides any duplicate photos. The “Destination Folders” option works in conjunction with whichever Organize option you have selected in the Destination panel (see page 57) to determine how the photos appear segmented. If the “Into one folder” option is selected there will be no segmenting of the files. If the “By original folders” option is selected, the files in the content area will appear segmented in subfolder groupings (if any) from the selected source folder. And if the “By date” option is selected, the files in the content area will appear segmented by the date the files were captured. To illustrate this, Figure 10 shows photos ready to import by “Destination Folders.” Here, the Destination panel is set to organize “By original folders” (circled in red) and the photos are separated into dated segments in the content area. You will notice that some of the thumbnails are grayed out, which indicates these are suspect duplicate photos, which if the “Don’t import selected photos” option in the File Handling section is checked, won’t be imported. In the Figure 11 example, this shows photos ready to import by “Destination Folders.” Here, the Destination panel is set to organize “By date” (circled in blue) and the photos are separated into dated segments in the content area. Note how the photos that have been deselected here are displayed with a dark vignette.
  Figure 10: This shows photos ready to import by “Destination Folders” where the Destination panel is set to organize “By original folders.”
  Figure 11: This also shows photos ready to import by “Destination Folders” where the Destination panel is set to organize “By date.” Note In Figure 11 you’ll see that the date destination folders appear in italics in the Destination panel. Basically this is telling you that these folders have not been created yet and also tells you how many files will be placed in these new folders.
File Handling panel
The File Handling panel (Figure 12) is where you decide how the imported photos should be managed. The Render Previews menu allows you to decide how previews should be rendered during the import process. The default setting here is Minimal, which imports photos as quickly as possible without devoting resources to building the previews just yet. The Embedded & Sidecar option makes use of any previews embedded in the original images or sidecar files. This can help speed up the import process from a camera card and let you see some kind of image preview right away, but the previews may only offer a rough guide as to the images’ appearance. You can also forc
e Lightroom to build Standard previews as the files are imported, or choose 1:1, which will go the whole nine yards and build full-size previews (this can really slow down the import times). Fortunately, Lightroom always prioritizes importing the photos first before it proceeds to render the finer-quality previews. Of the four available options, I reckon “Embedded & Sidecar” makes the most sense, because although the previews may not be as accurate, this will still be the fastest way to get some kind of preview to appear as the files are imported.  Figure 12: This shows a full view of File Handling panel options (top) and the Render Preview options (bottom). It should be noted that Lightroom is able to import all the supported raw file formats plus RGB, Lab, CMYK, and grayscale images saved using the TIFF, JPEG, or PSD file formats. Non-raw images can be in 8-bit or 16-bit mode, but PSD files must be saved from Photoshop with the Maximum Compatibility option switched on (see Figure 13). If there are no compatibility problems, everything should import successfully, but if there are files Lightroom cannot process you’ll encounter a feedback dialog like the one shown in Figure 14.
 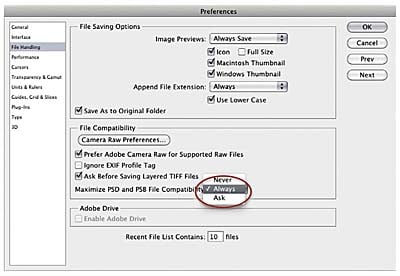 Figure 13: To ensure that your layered Photoshop format (PSD) files are recognized in Lightroom, make sure you have the Maximum Compatibility option switched on in the Photoshop File Handling preferences before you save layered PSD files via Photoshop. If you ever find you are unable to import PSD files into Lightroom, try switching this option on in Photoshop and resave the PSDs overwriting the originals. Shown here is the Photoshop CS5 Preferences dialog.
  Figure 14: If there are files that can’t be imported into Lightroom, you’ll see the warning dialog shown here, which lists the files that couldn’t be imported and the reasons why. Note Here is a summary of why some images may fail to be imported into Lightroom: imported files are in an unsupported color mode such as Index Color mode. The file size is too big because it exceeds the maximum pixel width of 65,000 pixels. It could be due to files becoming corrupted because of a hardware corruption (this can particularly be a problem at the camera card import stage). Or, if you have the “Don’t Import Duplicates” option checked, they may already be in the catalog.
Making backup copies of imported files
Whenever you choose Copy as DNG, Copy, or Move to import files into Lightroom you can check the “Make a Second Copy To” box and select a folder for storing backups of the files that are about to be imported. The backup option is therefore extremely useful when importing photos from a camera card, because you never know when a hard disk failure might occur. If you copy the original camera files to a separate backup drive at the import stage (as shown in Figure 15) the chances of losing all your camera files due to disk failure or human error will be greatly diminished. Note that the backup copy images are always stored in their original file state with no file renaming and no develop settings or metadata settings applied to them (although when you choose “Copy as DNG” the backup copy files will be renamed). What you end up with is an exact copy of the files that were captured on the original camera card before they were imported into Lightroom. After you have renamed and edited the master selection of images and have backed up these images, you’ll no longer need to keep the initial backup copy files. Nonetheless, it’s a wise precaution at the camera card import stage to temporarily keep more than one copy of the master files stored on the system. 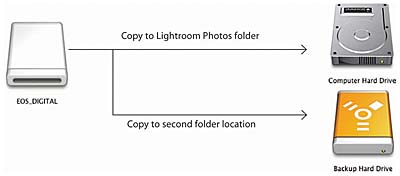 Figure 15: This illustrates the standard Lightroom file handling backup procedure where you can assign a Second Copy folder to save backup files to at the time of import. Note I know some people would like the second copy backup feature to store copies of the files after they have been imported into Lightroom (i.e., renamed and with the added metadata and develop settings). However, it can actually be quite a good idea to have the security of keeping backup files that have been untouched by Lightroom.
Photos shot as raw + JPEG
If you have your camera set to capture both raw + JPEG and the “Treat JPEG files next to raw files as separate photos” option in the General Lightroom preferences is left unchecked (the default setting), the imported photos will appear grouped as a raw+JPEG image in the Lightroom catalog (Figure 16). If you decide later to import the JPEGs as separate photos, you can check the “Treat JPEG files next to raw files as separate photos” option in the preferences, select the relevant folder, and choose Synchronize Folder… from the Library module Library menu. This will allow you to import the JPEGs that accompany the imported raw files as separate JPEG photos.  Figure 16: If “Treat JPEG files next to raw files as separate photos” is unchecked the raw files and accompanying JPEGs will both be copied to the destination folder during the import process, but only the raw files will actually appear “imported” into Lightroom. You will see such imports named using an extension suffix such as: .CR2+JPEG or .NEF+JPEG.
File handling limitations
As you may have gathered by now, Lightroom is principally a photo cataloging and raw editing program that can also edit non-raw files. You can import Grayscale, CMYK, and Lab mode images and these can be previewed and adjusted in Lightroom, but when you do so, the edit calculations are carried out in RGB and exported as RGB only. Lightroom does actually support importing CMYK photographs and makes it possible for you to edit them in the Develop module (via an internal RGB conversion), but I don’t recommend doing this. Basically, it is best to use just the Library module to manage your CMYK images and not take them anywhere near the Develop module. Even so, I am sure many photographers will now appreciate being allowed to manage all their image assets (including CMYK originals) in Lightroom and have the ability to export them in their original format. Many digital cameras are capable of shooting movie clips as well as stills, so Lightroom also allows you to import video files; plus, Lightroom 4 now offers support for previewing movie clips inside Lightroom. You could argue that Lightroom has gone somewhat beyond its original remit as a “photography only” program. But as many photographers are now getting more and more into shooting video on their stills cameras, it makes sense that Lightroom should be able to handle the import, viewing, and (limited) editing of video files. Besides, anyone who has a video mode on their camera is likely at some point to want to shoot a few video clips alongside their still photos and will want to import these along with their stills shots. So while it is great that Lightroom 4 allows video clips to be played and edited inside Lightroom, I don’t anticipate a shift toward full video editing capabilities being built into the program just yet. I mentioned already the limits of files saved in the PSD format with backward compatibility switched off in Photoshop and how to resolve this. One other thing to bear in mind is how the pixel limit for importing photos into Lightroom is 65,000 pixels per side. This means that where the widest dimension of an image exceeds this value, it can’t be imported into Lightroom. But 65,000 pixels s
hould be enough to satisfy most users.
File Renaming panel
In order to manage your image files successfully, it is important you rename them as early as possible. Ideally this should be carried out at the import stage. This can be done by checking “Rename Files” in the File Renaming panel (Figure 17). The Template menu contains several file renaming templates ready for immediate use. For example, if you select the Custom Name – Sequence template, you can enter text in the Custom Text field and the imported files will be renamed using this custom text followed by a sequence number starting with the number entered in the Start Number box. For an initial import of images, you may well want the numbering to start at 1, but if you are adding files to an existing shoot you will want to set the numbering so that it follows consecutively from the last number in the current image sequence. Note that once the start number has been set, Lightroom automatic-ally readjusts the numbering sequence as you import further images to the current folder. 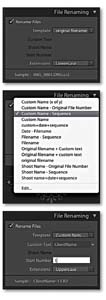 Figure 17: The File Renaming panel is shown here with the default Filename renaming template in use (top), the full Template menu list visible (middle), and with a Custom Name–sequence renaming template selected (bottom). If you choose the Edit… option from the bottom of the Template list, this opens the Filename Template Editor (Figure 18). This allows you to customize and save your own File Naming template designs using tokens, such as Date (YY) or Sequence #(0001). In the Figure 18 example, I clicked the “Insert” button next to the Custom Text item in the dialog to add a Custom Text token at the beginning of the File Naming template. Next, I went to the Additional section and clicked on the Insert button to add a series of Date format tokens (see the list options in Figure 19). I then went to the Numbering section and added a four-digit Sequence number token. This template was then saved and added to the File Renaming template list.
  Figure 18: The Filename Template Editor.
 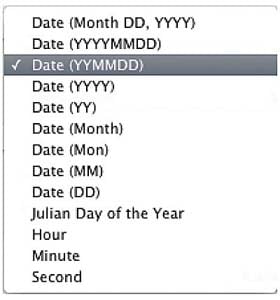 Figure 19: This shows the Date options that are available when renaming. Note that the Julian Day of the Year option is applicable to things like astronomical dating. Alternatively, you can use the Custom Name – Original File Number template. This is actually quite a useful renaming option. When you use this template the sequence number uses the original, camera-generated file number and the file renamed sequence numbers will keep rolling over from one job to the next. So, instead of your imported images always being numbered from say, 1 to 500, you will end up with a much broader distribution of sequence numbers throughout the catalog. Consequently, this can make it easier for you if you need to narrow down an image selection based on a sequence number only search. Let’s say for example that a client orders a photo, giving you just the last four numbers and nothing else. If you reset the numbers when renaming so that they start from 0001 before each job, then every shoot you import will most likely have photos that are renamed with sequence numbers in the 0001–0100 range. If on the other hand, you use the Custom Name – Original File Number template to rename your photos, the chances are that there won’t be many other photos in your catalog that have the exact same four-digit number. This method of renaming should work in most instances, although I am aware that with certain camera models there is a compatibility problem where the camera-assigned sequence number cannot be recognized. Lastly, the sample filename at the bottom of the File Naming panel gives you an advance indication of how the chosen renaming will be applied to the imported files. Tip I find the only time I ever need to use the Rename Photos dialog is when I have to correct files that have been imported out of sequence. For example, when I shoot in the tethered mode in Lightroom things only ever go wrong when I am at my most busiest! Consequently, I do sometimes end up manually importing files from the camera card to add these to the files that have been correctly imported (and automatically renamed). It is here that I find the original file number renaming really helpful. Renaming files based on the sequence number contained in the original camera-generated filename is far more reliable than manually trying to work out how to renumber files so that they fit within an existing sequence of imports.
This article was last modified on July 20, 2021
This article was first published on May 14, 2012
Commenting is easier and faster when you're logged in!

Recommended for you

Reducing the total ink limit in CMYK images using Photoshop
Having too much total ink in your CMYK document is a pretty common problem. Sure...

Working with Albums and Collections in Lightroom, Part 2
How to use filters and smart collections in Adobe Lightroom to organize your pho...

How to Work with People in Lightroom
Working with people can have its own challenges as a photographer, so it’s a rel...