is now part of CreativePro.com!

Importing Camera Raw Files into InDesign

19

I love it when I learn how to do something that can’t be done. Even if it’s a workaround — a kludge, a hack, or whatever you want to call it. I walked into Mike McHugh’s images session at The InDesign Conference today for 2 minutes and saw him present something I didn’t think was possible: Using the flexibility of a Camera Raw file inside an InDesign document. It’s a simple trick but has wonderful applications because Camera Raw incredibly flexible and lets you make radical changes to your image with no image degradation.

Here’s what you do: When you open a Raw file in Camera Raw (either via Bridge or directly inside Photoshop), you can make any global edits you want. You’ll notice that in the lower right corner, there is a button labeled Open Image. If you click that, you’ll open the image in Photoshop. Don’t do that. Instead, press the Shift key and the button changes to Open Object. If you Shift-click, the Raw file is embedded into a Photoshop file as a smart object layer.
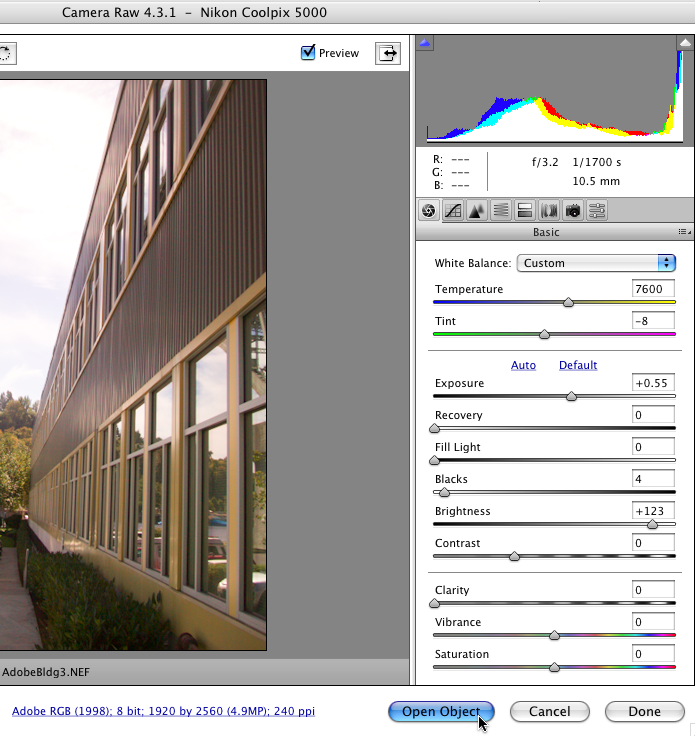
rawsmart1

Now you can save your file as a regular Photoshop PSD file and import it into InDesign! Okay, so we didn’t really import the Raw file into InDesign — we imported a PSD file. But you still get all the benefits of Camera Raw: If you want to change your Camera Raw settings, just Option/Alt-double-click on the image in InDesign. That opens it in Photoshop. Then double-click on the layer thumbnail in Photoshop and Camera Raw opens!
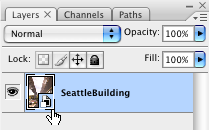
rawsmart2

Make the change, click OK, press Command/Ctrl-S to save the file, switch back to InDesign, and the image is updated.

I knew the basics of using Camera Raw files as smart objects before, but for some reason I never put 2 + 2 and saw how this would help in InDesign. Thanks, Mike!

By the way, Michael Stoddard reminded me that you can also click the blue text along the bottom of the Camera Raw dialog box to open the Workflow options dialog box. That offers a checkbox to make the button always show Open Object (so you don’t have to hold the Shift key down to get a smart object).

David Blatner is the co-founder of the Creative Publishing Network, InDesign Magazine, CreativePro Magazine, and the author or co-author of 15 books, including Real World InDesign. His InDesign videos at LinkedIn Learning (Lynda.com) are among the most watched InDesign training in the world.
You can find more about David at 63p.com

Follow on LinkedIn here
  • Martin says:

    Nice workaround, I never thought about this way.
    Great!

  • Peter says:

    I knew that one ;-)

    I wish InDesign had real Camera Raw support instead of just using the embedded low-res thumbnail from RAW files when placing them (which in case of Nikon have a black border to make things worse) but a regular “developed” version based on the camera raw settings in the XMP. That would make experimenting and doing rough comps much easier.

    But speaking of smart objects, there is much more cool stuff you can do with them: For example, if you are printing in b/w, you can convert a layered RGB image with a “Black & White” adjustment layer into a smart object, then convert the enclosing photoshop document to grayscale mode and then go back whenever you want and change the b&w conversion settings without having to export it to a grayscale image again and update the link in InDesign. It’s also a way to have both RGB and LAB adjustment layers in a single Photoshop document without having to flatten the image first. And you never have the “Wish I had kept that original” situation again. However, I do have to admit that I usually work the old way, i.e. have separate RGB PSDs and then export flattened grayscale or CMYK TIFs for InDesign.

  • Neil Oliver says:

    Same goes from the new Lightroom 2.0 beta that now allows you to open smart objects from your images in Lightroom.

    David, Im coming down to the conference tomorrow, hopefully we cross paths.

  • Roland says:

    Smart objects are great, except for the huge file size increases.

  • Andrew says:

    Another approach is to try Apple’s Aperture. Check out https://www.apple.com/applescript/aperture/indesign/index.html

    Raw processing through Aperture and then update to high resolution images via “fingerprinting”.

    A little different in workflow but still has some RAW file benefits from Apertures use of versions.

  • Klaus Nordby says:

    Roland poiints out the VERY annoying problem with both Smart Objects and Smart Filters (in PS CS3): using any of those “Smart” approaches auto-doubles your file size. That’s . . . less-than-smart?

  • Roland and Klaus, you are absolutely correct that these files can be huge! No doubt about it: It’s a balance between increased flexibility vs. the need for a larger hard drive.

    I have a 7.7 mb .NEF file (nikon raw file), which — when saved as a flattened PSD (no smart object) is 11.2 mb. When saved as a PSD with a smart object layer (as I describe in the post above), it’s 30 Mb! I’m not sure why there is so much overhead, even beyond the flattened psd + the camera raw file. Strange.

  • Roland says:

    David, the problem isn’t so much the hard drive space as it is speed to open files. Drive space is cheap, having to get a new computer just to open files faster isn’t.

  • Klaus Nordby says:

    Roland is right, the storage space is so cheap these days that for any professional this expense is a non-issue. But Roland’s point about opening them files from the drive is only part of the problem: once opened, these files suck up vastly more system RAM — and, due to all the bits and bytes, they’re *slower* for the CPU to process. (And while RAM is cheapish now, too, few motherboards can handle more than 8Gb.) So space isn’t the real problem with fatass files: time is.

  • Klaus Nordby says:

    Heh. Here’s a relativistic-sophistic afterthought to my above posting: “Space may be infinite, but time is absolute.” :-)

  • Roland says:

    How about “Space is infinite, time is absolute, patience is limited” ;)

  • Alan G says:

    Valid points on disk and RAM, but as far as load times I haven’t seen them slow down noticeably until the file size gets over about 150 MB. I have one whopper (from a client) PSD that’s over 700 MB. That one does take a while to load in or save.

  • Klaus Nordby says:

    I have several panorama landscape PSD files which are around 1Gb — and they take more than a minute to save, even on a 2x RAID 0 drive (2.9GHz dual-core). Adding *any* SmartCrap layers/filters to such files would make them balloon insanely and become a total PITA to deal with, both in RAM and for open/save. The SmartCrap stuff is only workable without baaaaad time-penalties on “smallish” PSD files, i.e., less than 100 Mb.

    I hope Adobe will seriously re-engineer all their SmartCrap stuff for CS4 — the first-time implementation, in CS3, is just too sluggish.

  • Peter says:

    I’m not 100% sure, but I’m suspecting that the increased file size of a smart object vs. a flattened version is partly caused by the fact that you have “Maximize Compatibility” turned on. That makes Photoshop save a flattened version of the entire image into the file in addition to all the individual layers so that applications that cannot deal with layered PSDs can read them. InDesign also takes advantage of that flattened image so that you don’t have to wait half an hour for a print-res 150-layer composite to import (unless you change layer visibility in InDesign of course, in which case InDesign has to re-render the image).

    If there is only one background layer (showing up in italics in the layers panel), I suppose Photoshop only writes the flattened version into the file, whereas if you unlock and smart-objectify that layer, it’s a regular layered PSD and Photoshop writes the flattened version *and* the smart object layer into the file, even if they are identical.

    That’s just the first explanation that comes to mind, I might be completely wrong here.

  • […] * New design for InDesignSecrets.com blog * Free script extravaganza: Swatch Switcher, Label Graphics, Swap Object Positions, IndexMatic (beta) to index on character styles, Select Objects from Keyboard, Selection to PDF * “Smallest File Size” PDF preset caution, and related issues with PDF presets * Obscure InDesign Feature of the Week: Orthogonal Line Links mentioned in the Podcast: Sweet deal from our sponsor! Recosoft’s PDF2ID plug-in discount, just for InDesignSecrets users (this is the last week for the discount!) Support your local scripter! Home pages for Dave Saunders, Steve Wareham, Marc Autret, Kris Coppetiers, Martinho da Gloria Anne-Marie’s post about PDF Presets […]

  • Stephan Möbius says:

    Sweet trick. My 15mb Raw got blown up 120mb.

    Another caveat would be that you loose the ability to sync all those RAW-Settings like exposure, sharpening, contrast, camera profile. Especially wonderfully easy to sync in Bridge with CTRL-ALT-C and CTRL-ALT-V. ;)

  • Ann says:

    Does anyone know why indesign would not “see” files in a folder that are photophop generated tiff, pdf, or psd files?

  • @Ann: That seems strange. Do they have .psd, .tif, or .pdf at the end of the file names? Sometimes ID gets confused and need a quit-and-relaunch. Sometimes it needs its preferences rebuilt.

  • David Bridges says:

    Nicely explained but so complicated! Why importing RAW files somewhere where it’s not supported? Instead , it is much easier to import them like this: https://www.aftershotpro.com/en/pages/raw-file/ and then edit them just in five easy steps

  • >