

Big news! Last week on Facebook Live, David and Anne-Marie announced that CreativeProWeek 2018 will take place June 4-8 in New Orleans!

You can see the recording of the announcement here.
Mmmm, I can almost taste the beignets. In honor of this announcement, I thought I’d share a few of the tips from my session on working with images in InDesign from this year’s CreativePro Week in Atlanta. By the way, if you didn’t make it to Atlanta, you can still grab a Virtual Pass for all the session recordings and speakers’ handouts.
5 Quick Tips for Working With Images in InDesign
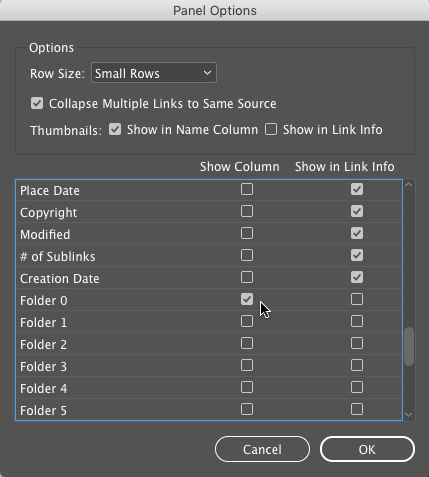
1. Customize the Links panel display to show just the information you want about your placed files. For example, to see the current folder where your linked files reside as a column in the Links panel, go to the panel menu and choose Panel Options. Then click the checkbox next to Folder 0 (Folder 1 is the next level up in the file directory and so on).
Notes: if an image is embedded in the InDesign document, Folder 0 will be the location where the image file was when it was embedded. No folder is shown for images placed from a Creative Cloud library.

2. Want to see the effective resolution of placed image without the Links panel taking up a big chunk of your screen? Use the Info panel.

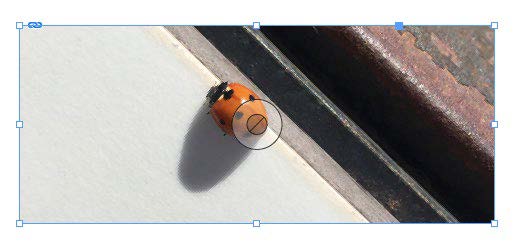
3. I’m not a fan of the Content Grabber but it is good for one thing. It will show you if an image has been rotated. The angle of the straight line in the center of the grabber matches the angle of rotation.
4. Use a custom preflight profile to flag low-res images. InDesign’s default Basic preflight profile does not check images at all!

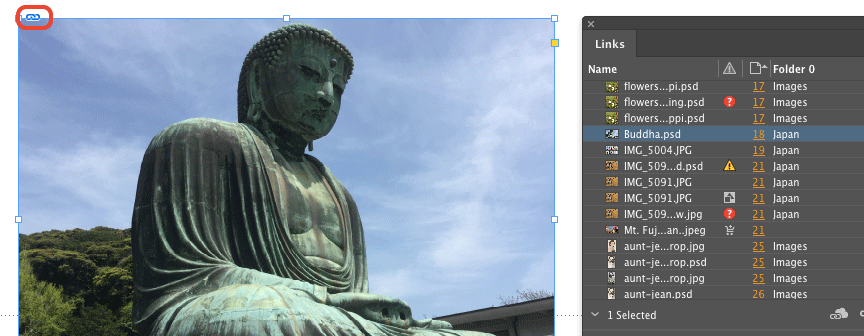
5. A super-quick way to open the Links panel (and select an image in the panel) is to Option/Alt-click the link adornment on the frame of a placed image. The image does not have to be selected first.
This article was last modified on July 25, 2019
This article was first published on July 10, 2017
Commenting is easier and faster when you're logged in!

Recommended for you

Tip of the Week: Setting Font Preview Size
This tip was sent to Tip of the Week email subscribers on May 14, 2015. Sign up...
Tip of the Week: Export Images from Word Files
This InDesign tip was sent to Tip of the Week email subscribers on April 4, 2019...
InDesign Magazine Issue 103: Adobe Dimension CC
We’re happy to announce that InDesign Magazine Issue 103 (November 2017) is...