


If you’re an Illustrator user, you are probably familiar with the Live Paint tool (and if you aren’t, you owe it to yourself to become acquainted with it). Although that tool is a powerful ally for adding color to Illustrator objects, I find its less popular sibling to be even more beneficial. I’m talking about the Live Paint Selection Tool. This handy tool allows Illustrator to select paths, even if that path is only a small segment of a larger path. In short, if the segments seems like a separate objects to your eyes—think of two lines crossed in an “x” and how you could visually break that shape into four separate segments—this tool can select them individually. I find that this unassuming tool lets me tidy up my artwork easily, whether I’ve used Illustrator’s shape tools or if I’ve taken the freehand route using the Pen or Pencil tools.
Using the Live Paint Selection Tool
To use the Live Paint Selection tool, you’ll need to isolate the objects you want to work with by creating a Live Paint group. Do this by selecting the objects you want in the group, then choosing Object > Live Paint > Make.

A Live Paint group
With the Live Paint group still selected, go back up to the Object Menu, then Live Paint, then choose Gap Options. The settings in here give you a little more leeway in that you can set how much of a gap can be present and still force Illustrator to treat the space as an enclosed path.

Setting the Gap Options
- Turn on Gap Detection.
- Set the gap tolerance to small, medium, large, or set a custom amount.
- Set the gap preview color. It’s red by default, but choose a color you can see within your design.
- The number of gaps that fit those parameters will be displayed. You can choose to automatically close the gaps by having Illustrator draw an enclosing path.
Bring up the Live Paint Selection tool (which shares space with the Shape Builder and Live Paint Bucket tools) and double-click on it to set its options.
- Choose to allow the tool to select fills only, strokes only, or both.
- Choose a highlight color and thickness for displaying the selection. These options are just for display purposes while working with the selections.
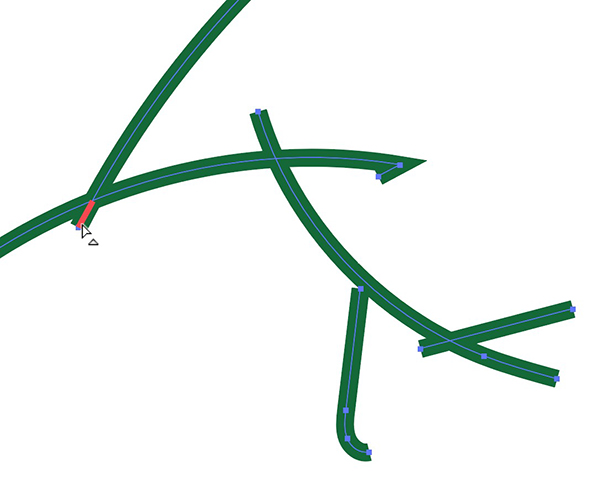
A segment selected using the Live Paint Selection tool
With the Live Paint Selection tool selected, roll over the elements of your Live Paint group.
- Each segment of a stroke—and each enclosed path’s fill—are highlighted.
- Click on any element and make changes to its stroke or fill colors.
- Delete any object that you don’t want.
- To modify an element, double-click with the Selection tool to enter Isolation Mode. Make any changes, then hit Escape.

The final artwork, after cleanup
The elements in the Live Paint group are just that: live. That means that as you move and manipulate the individual objects, the fill and stroke effects update. One caveat, if a fill was created and you later move any element that created the enclosed path outside the gap option parameters, the fill will change.
This article was last modified on July 25, 2016
This article was first published on July 25, 2016
Commenting is easier and faster when you're logged in!

Recommended for you

CreativePro Magazine Issue 5 Now Available
CreativePro Magazine Issue 5 has articles on alternatives to Adobe, metadata, Af...
T-Shirt Design and Production: Direct To Garment Printing
It’s time to talk t-shirts again! My name is Sebastian bleak and for over...

T-Shirt Design and Production: Using Graphic Styles for a CutContour
It’s time to talk T-shirts again! My name is Sebastian bleak and for over...