
Illustrator How-To: Make your own Magic Markers

This story is taken from “Inside Illustrator” (Element K Journals).
Creativepro.com readers can subscribe to Element K Journals at a discount. Click here to learn more.
In the design world, the marker technique predates personal computers and illustration applications. If you’ve been designing only in the era of desktop publishing, you might not even know what markers and illustration have to do with each other. Essentially, the marker technique is a step in a process of design. First comes the idea, second a sketch, and finally, markers are used to shade, color, and outline the design. Many professional designers who use markers mix them with other mediums such as airbrushing and charcoal to create almost photographic illustrations. The final result is an illustration with varied colors, line thicknesses, and textures. Though this use of markers isn’t as popular as it was, the look remains a popular way to showcase designs.
In this article, we’ll explore the marker technique and show you a way to create “markeresque” drawings in Adobe Illustrator. First, we’ll explain which situations are best suited to the marker technique. Then, we’ll create some custom brushes that we’ll use as our “markers.” Finally, we’ll use these custom markers to execute an illustration of a light bulb, from the main line art to the fine details.
The Benefits of the Marker Technique
Of all other mediums in the design world why choose markers? Well, there are several reasons that people design in markers. For one, it’s a common way to present a proposal. If you show your client a 3-D model of a house with every screw in place, you invest a lot of time in a design that’s almost sure to be changed. It takes a lot less time to create marker designs while getting the general design across to the client. This makes the project less permanent, allowing the client to be more involved in changes and the overall development of the project.
Once you’ve practiced a bit with the technique, you’ll find using it becomes fast and intuitive. You may even be able to create some of the work with the client present. While you may shudder to think of this scenario, having a solid illustrative technique to bring conceptual ideas to life makes you all the more valuable to your client.
Of course, any new technique that you can learn and place in your design arsenal gives you the power to use the marker technique to create a different effect or feel to a project. While developing a personal style is important, having the flexibility to show a design in different formats highlights your flexibility and illustrative talent.
Designing with real markers is a quick, efficient and fun technique — providing you have all the markers and paper you need. The markers can run dry rapidly, especially if a marker rolls out of site without the cap on it. Oh, and there’s always the problem of making an irreversible, permanent mistake. The markers can run about $2.50 each and there are literally hundreds of colors, sizes and percentages of lights and darks to choose from. For all of these reasons, getting the hang of the marker technique in the more forgiving world of Illustrator makes good sense.
Creating this effect in Illustrator
It sounds like a great technique, but how is it done with Illustrator? Well, thanks to the Transparency option in Illustrator 9 and 10 and the ability to create and control custom brushes, a lot. You can create images in Illustrator that are almost identical to the results from real markers.
One of the many advantages to working in Illustrator is that you can delete, move, and change lines that would otherwise be permanent once the marker touches the paper. You can use any color, width, or lightness you want without having to buy more and more markers.
The first few strokes. The marker technique works best if you start with an outline of your image. Since this article is about the marker technique and not creating an outlined image, we’re starting with a pre-made outline. You can adapt the basics to suit any outline.
Select the Pen tool and set the fill to none and the stroke to black. Create a line along the left side of the light bulb, as shown in Figure 1. Next, change the stroke to 10 in the Stroke palette. Then, create a second line on the right side of the bulb using the same settings, as shown in Figure 2. Don’t worry too much about staying in the lines. Part of making this effect look realistic is creating some stray strokes and overlapping.
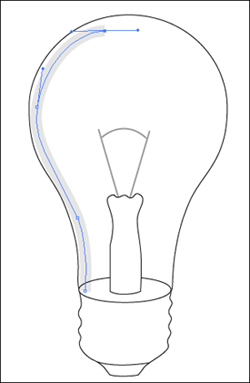
Figure 1: The first marker stroke adds a line to the left side of the light bulb.

Figure 2: By adding another line to the right side of the light bulb, we begin to establish a light source in the illustration.
Editing your strokes. With real markers you have the ability to change the intensity of your stroke while you’re drawing by pivoting the tip of the marker or applying additional pressure. In Illustrator, it’s a little trickier since the strokes remain at a constant width. Plus, without applying a gradient to the stroke, the intensity remains consistent. However, let’s try creating this effect on the bottom of the light bulb. Create a line similar to the one in Figure 3. Now choose Object > Path > Outline Stroke. You should now have a black-filled shape with no outline. Use the Direct Selection tool to move the corner points of your shape around until your design looks similar to Figure 4. Next, change the Opacity of your fill to 25 in the Transparency palette. This gives you a very light highlight on the bottom of the light bulb.
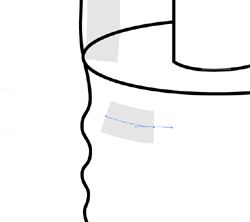
Figure 3: In order to create a stroke with a variable thickness, we need to draw a small line at the base of the light bulb.

Figure 4: By outlining the stroke, we can then use the Direct Selection tool to create a line with a variable thickness.
Expanding Your Marker Strokes
You’ll need to create more lines, but with different fill, transparency and stroke settings. Instead of changing all your settings again, use the Direct Selection tool to select one of the two lines you created on the sides of your light bulb, then select the Pen tool and you’ll be able to create more strokes at the same setting you were originally at. Use the same technique of using the Pen tool to create more strokes on the bottom of the light bulb, outlining the stroke by selecting Object > Path > Outline Stroke, changing the points with the Direct Selection tool, and changing the Opacity to 25 until your design resembles Figure 5.
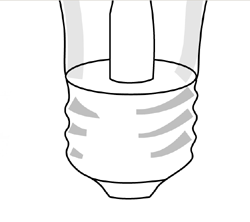
Figure 5: Create shapes similar to these to create the effect of the screw threads of the bulb.
With the Pen tool, create a new line at the bottom of your light bulb with a stroke of 10 and an Opacity setting of 50, as shown in Figure 6. With the same settings, create two more lines over the line you just created. Drawing over lines you’ve already created is a common method of shading when using markers. Drawing over the same spot with a marker often eats through normal paper, which is the reason that special marker paper is commonly used.
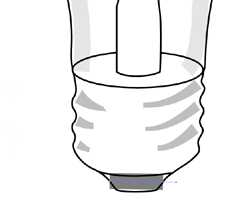
Figure 6: To give the bottom of the bulb some density, create a line at the bottom of the bulb.
Create two lines in the center stem of the bulb with the stroke set at 10 and the Opacity set at 25. You can create a center stem in the glass tube, as shown in Figure 7, by creating a line with the stroke set at 9 and the Opacity set at 25.
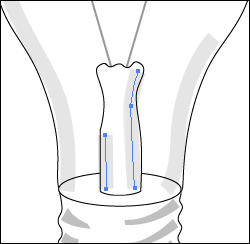
Figure 7: Using two marker strokes, create the highlights on the center stem.
Using the Pen tool, create a line around the left side of the bulb with the stroke set at 40 and the Opacity set at 5, which should resemble ours shown in Figure 8. Remember it’s okay to overlap lines and other strokes. Getting used to this technique can be trying, especially if you’re comfortable with the precision and control that Illustrator offers.

Figure 8: Large marker strokes help fill in negative space and add texture to your illustration.
Something that you couldn’t do with the marker technique that you can do in Illustrator is create a white line over a black one to lighten it. As shown in Figure 9, we’ve drawn several white lines over the darker gray lines, which provide highlights and help solidify our light source.

Figure 9: One thing you can do in Illustrator that you can’t do with markers is draw a white highlight over a dark stroke.
Mark It Up
While we didn’t get into colors, the marker technique can easily be expanded to use all sorts of fills and patterns. The flexibility of this technique is one of its greatest strengths, along with the speed in which you can create eye-catching illustrations. By adapting the conventional marker technique to your Illustrator skill set, you can get a fine-looking illustration without the permanence of real markers.
Copyright 2002 © Element K Journals. Used by permission.
This article was last modified on January 3, 2023
This article was first published on March 28, 2003
Commenting is easier and faster when you're logged in!

Recommended for you

Using the Character Viewer on macOS
This utility makes it easy to always find and insert the perfect character.

Playing with Color
No matter where we are on our design path, there is always more to learn about o...
Free Webinar—Photoshop + Illustrator + InDesign: Three Apps Working as One
Join us Tuesday, June 4 at 10 am Pacific for our 75-minute free webinar to learn...