
Illustrator and InDesign
Steve Caplin explains how to combine the strengths of InDesign and Illustrator into one design superpower.

This article appears in Issue 110 of InDesign Magazine.
If you want to understand InDesign, you have to get to know its faithful partner, Illustrator—after all, Illustrator was Adobe’s first commercial product, its first tool, invented in the 1980s to provide a human face for an ugly programming language called PostScript. More importantly, if you want to be efficient with InDesign, you should understand how to combine the unique superpowers of these two programs, and how together they make an unbeatable design duo.
If you’re familiar with Illustrator, you’ll have a solid head start for using InDesign. Sadly, this doesn’t work the other way around: Illustrator has its own unique workflow and way of behaving, and you just have to knuckle down and work with it.
The two apps work well in partnership, however, each offering functionality that’s lacking in the other. Typically you’ll use Illustrator to create vector artwork—logos, diagrams, illustrations, even graphs—which you’ll then assemble into page layouts alongside text and Photoshop images in InDesign. But while single pages can be created entirely in Illustrator, you’re always going to be better off making use of InDesign’s superior layout and typographic controls.
InDesign’s Biggest Competitor
Here’s a dirty little secret: InDesign’s biggest competitor over the past couple of decades hasn’t been QuarkXPress, but Illustrator and Photoshop! Many designers who learned Illustrator early feel more comfortable laying out full pages in it—even whole brochures or magazines. While Adobe officially discourages this, they unofficially look the other way. But please, do yourself and everyone around you a favor: Use Illustrator as a drawing app, and use InDesign as your page-layout tool. From styles to master pages, tables to text flow, InDesign is just the right tool for the job.
There are three ways you can move artwork from Illustrator into InDesign. You can save an Illustrator file and import it into your layout using the Place command; you can simply copy and paste from one application to the other (a process which has some distinct advantages, as we’ll see later on); and you can use Creative Cloud libraries, which offer you a secure and effective way to share assets between all your CC applications.
The Place Command
The most traditional (and often “safest”) method for getting artwork from Illustrator to InDesign is saving and then placing. You can save your Illustrator files in a variety of formats, including AI or PDF (you could also choose EPS, but that format is outdated, so I don’t recommend it).
When you import a file into InDesign using File > Place, it behaves just like any other graphic: you can resize it, you can crop it, but you can’t access the individual paths of which it’s composed. That’s because placed Illustrator artwork is treated as a PDF file, even when it’s saved in native Illustrator format. In fact, even if you save your Illustrator file in the native AI format, it cannot be imported into InDesign unless you also enable the “Create PDF Compatible File” option when saving.
The first thing you’ll notice when placing Illustrator artwork into InDesign is that it may appear jagged and low resolution when your display is set to Typical Display quality. To see it at high resolution, you need to choose View > Display Performance > High Quality Display, but bear in mind that this may slow down your InDesign editing, as the application will have to take time to render all images at high quality. The alternative is to Ctrl-click or right-click important placed elements, such as logos, and change their Display Performance setting to High Quality. That way, they’ll look clear irrespective of the quality setting for the rest of the document.
(Note that if you have a suitable graphics card and screen, InDesign may enable GPU Performance, so your screen may already be set to High Quality by default. For more information, see this article.)
If you turn on the Show Import Items checkbox when you place an Illustrator graphic, you’re then presented with a set of options. You can choose how you want to crop the imported artwork—the default is to crop to the Bounding Box, which means that all the white space around the original is ignored. This is usually the best method, as it means you won’t be dealing with unwanted extra space. But if you wish, you can crop to the original full artwork size, or to the size of crop marks if you’ve included these.
If you use the File > Place approach, the placed item is linked to the original file on disk. If you update that file in Illustrator, you’ll see a warning in InDesign’s Links panel telling you that the file has changed and needs to be updated (Figure 1).

Figure 1. When you place artwork from Illustrator into InDesign and then modify it, the Links panel in InDesign will alert you if that artwork has been modified, showing you each instance of the changed file.
Note that the updating does not happen automatically unless you use InDesign’s Edit > Edit Original feature. If you don’t notice the warning—you might have the Links panel hidden—then when you try to output a PDF from the InDesign document, the Preflight process will detect the change and warn you.
Copy and Paste
As I said earlier, if you import Illustrator artwork onto a page in InDesign using the Place command, you won’t be able to edit it directly in InDesign. However, if you copy the artwork in Illustrator and then paste it into InDesign, you’ll be able to edit the individual paths, just as if the artwork had been created in InDesign in the first place. However, there are a few gotchas you should be aware of.
You’ll need to use Object > Ungroup first, and then you’ll be able to work with the image just as you were doing in Illustrator. Well, not exactly like in Illustrator: multiple strokes, variable widths, and other Illustrator-specific effects and features will probably be outlined and converted into individual filled objects. Also, some of Illustrator’s fancier effects may simply not come across—for example, objects filled with a gradient mesh. Because of this, it’s usually best to reserve copy and paste for simple artwork—basic paths work best.
Other advantages of using Copy and Paste include the fact that pasted artwork will always be displayed at full resolution (Figure 2) and the ability to distort a pasted object and still maintain a uniform stroke width (Figure 3).

Figure 2. Illustrator artwork placed into InDesign will look ragged onscreen (but not in output) with your view set to Typical Display. Artwork that has been copied and pasted, however, will look crisp at any size.

Figure 3. When you place an Illustrator object with a stroke into InDesign and you distort it, the stroke will distort as well. But if you copy and paste instead, the stroke remains uniform when you distort the object.
The downside, of course, is that if you edit the original Illustrator file, your changes won’t be reflected in the version pasted into InDesign.
Using CC libraries
The third way to move artwork from Illustrator to InDesign is through a shared Creative Cloud library. In InDesign, you can find these by choosing Window > CC Libraries. In Illustrator, it’s just Window > Library. You can add Illustrator artwork to a library either by dragging it into the Libraries panel or by selecting the artwork and clicking the + button at the bottom of the panel. Clicking the button brings up options so you can choose how you want to add the element. You can choose whether to add items as graphics, plain text, paragraph or character styles, or text fill color—depending on the objects you drag into the panel (Figure 4).

Figure 4. Click the + button at the bottom of the CC Libraries panel to choose which type of assets to save from a selected item.
After you’ve added an item, you can change its name to make it easier to identify.
If you open a logo in Illustrator and add it to your library, then it will be stored as a separate graphic object in its own right. You won’t be storing the original logo here—that remains on your hard disk, independent of the library version. This is really important because it means changing the version on disk won’t change the version in the library, as it would if you used the Place command to place the object into InDesign using the Place dialog box.
If you simply drag a CC library item from the library into your layout (or right-click on the item and choose Place Linked) any changes made to the library item in Illustrator will automatically be reflected in your InDesign file. Placed objects that are linked to a CC library are marked with a small cloud icon in the top left corner. Alternatively, you can create a new instance of an item that is independent from the version stored in the library by holding the Option or Alt key as you drag the item into your layout (or by right-clicking on the item and choosing Place Copy).
As with using the Place command, you can’t edit the contents of Illustrator objects in InDesign. To edit a library item, double-click the item in the CC Libraries panel to open it in the app in which it was created—so a logo will typically open in Illustrator. The name that appears in the file title bar won’t be the name of the original file, but a 32-character hexadecimal string that includes the date the file was created, encoded for security reasons. When you’re done editing, simply save this temporary file and close it. When you return to InDesign, the artwork will be updated automatically.
CC libraries can hold almost any kind of graphic asset: logos, images, graphs, colors, text, styles, and much more. Retrieving a logo from a library is far quicker than searching for it on your hard disk or network drive, and by storing logos in this way you can be sure that you’re always using the most up-to-date version—as long as it has been updated using the method described above.
For more information, see Steve Werner’s article on CC libraries in Issue #83.
The Trouble with Text
If you copy a block of text from InDesign and paste it into Illustrator you may be in for a surprise: you’ll be copying just the raw text—none of the formatting is supported (Figure 5)!

Figure 5. Text copied from from InDesign (top) loses its formatting when pasted into Illustrator (bottom).
Text copied from Illustrator and pasted into InDesign retains its formatting but becomes an uneditable embedded vector object. Users have been frustrated by this inability to copy and paste live formatted text between applications for years
Fortunately, now there’s a partial solution: you can add a block of text to your Creative Cloud Library by clicking the + button at the bottom of the panel. When you do that, you can choose between three different ways of adding that text. If you choose to add it as a graphic, when you drag the object out of the library to place it, it will appear exactly as the text block you initially placed in the CC library—the same size, with the same formatting. But you won’t then be able to edit the text or change the fonts, although you can of course scale it to the size you want.
If you add it as text, then it will appear unformatted, and you can use it as regular text in any document. This is useful for boilerplate text, mail and web addresses, company information, and anything else where you want to reuse the content. If you double-click the text in the library and edit it, then the edited version will appear everywhere the library text has been used—even if you had formatted it with a different font and size.
If you edit the text in the library in Illustrator, any font changes you’ve made in InDesign will be replaced with the fonts you choose in Illustrator, and any text edits you’ve made in InDesign will be lost if you then edit the library version in Illustrator. For this reason, it’s best to hold Option/Alt as you drag it from the library into InDesign, so you place it as a copy that isn’t linked to the original.
You can also choose to add both paragraph styles and character styles, if these are present in text blocks copied to the library. This means you can easily share styles between Illustrator and InDesign without having to reproduce them manually in each application (Figure 6).
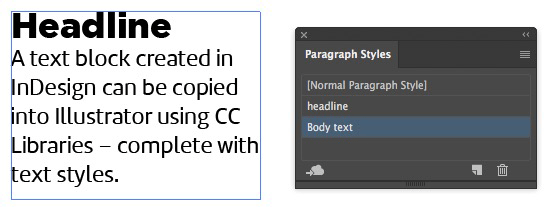
Figure 6. If you drag a block of text into a CC Library in InDesign, it will be available in Illustrator, complete with paragraph styles.
However, if you drag a text block containing more than one style into a library in InDesign, you may find that only the first style is picked up. To get the subsequent styles as well, click in the paragraph containing that style, and then add it to the library separately using the + icon at the bottom of the panel.
You can also drag text objects from InDesign into the library, and retrieve them in Illustrator. But note that some text elements are present only in InDesign, such as certain underline styles, footnotes, tables, and numbered and bulleted lists. Text in these formats will simply appear as plain text in Illustrator. Any text formatted in Illustrator, however, will appear in exactly the same way when you drag the object into InDesign.
Working with Colors
When you create a new document in Illustrator, you must choose whether to work in RGB or CMYK—unlike InDesign, Illustrator files are always one or the other. The standard rule is to use RGB color mode images for on-screen documents, such as web pages, and CMYK mode when working on documents that will be printed. If you’re creating a PDF that will primarily be used on-screen, such as software operating instructions, then you probably want to output it from InDesign in RGB mode so that the colors accurately reflect those seen in the app you’re documenting. But there are important exceptions to this rule!
It’s important to remember that, by default, CMYK files will not be color managed by InDesign, while RGB images will be. So when you’re creating an Illustrator document, you need to ask yourself: What is more important, color fidelity or CMYK values? For example, if you are creating a diagram in Illustrator and the background is 50% cyan, then you probably want it to be 50% in InDesign and in the final output. In that case, be sure the Illustrator file is set up in the CMYK mode.
However, if you are using Illustrator to create a photorealistic piece of art, with gradient meshes and rich colors, then you may want to use the RGB mode, even if the artwork is destined for print! That way, when you save as PDF or AI and place into InDesign, the image will be color managed, and you can get the best quality color, whatever your final destination output.
But again, for most graphics you’d make in Illustrator, such as a company logo or any other regular artwork, be sure to create it in Illustrator in CMYK rather than in RGB, to avoid InDesign having to perform a conversion later.
When it comes to sharing color swatches so that you can use the same colors in both Illustrator and InDesign, the best solution is—once again—the CC Library. It’s a good idea to keep all the house colors associated with a company or job in your CC library, so they can be retrieved with a single click. As with logos, though, you should distinguish between RGB and CMYK versions of those colors, to ensure that you use the RGB versions for web files and the CMYK versions for print. You can hover your cursor over a color in a CC library to see if it is CMYK or RGB, but the foolproof solution is to rename each swatch as you add it to the library, so you can always tell which is which (Figure 7).

Figure 7. In some cases it’s worth keeping separate RGB and CMYK versions of colors in your CC library. Hover your cursor over a color to see its mode and values.
Special Considerations
There are a few special kinds of objects and formatting that you should know about when moving files and objects between Illustrator and InDesign, including gradients, effects, graphs, and layers.
Gradients
While you can add an Illustrator object filled with a gradient to a library, the only library item you get is the entire selected object; you can’t add the gradient, or any attached strokes, shadows, and so on, as separate styles. But there is a useful solution here.
Illustrator ships with swatch libraries stuffed with fantastic gradients; InDesign doesn’t. And there’s no way to open your Illustrator gradient swatch libraries directly in InDesign. You also can’t add gradients to your CC libraries as swatches, only as objects. But if you make an object in Illustrator and apply your chosen gradient to it, you can then copy that object and paste it into InDesign, and the gradient will be added to your Swatches panel. You can then apply this gradient to any object in InDesign, including text. Note that this trick only works when the Illustrator file was created in CMYK mode.
Also note that while this works with simple gradients, more complex gradients won’t be added as swatches in InDesign (if the gradient contains transparency, for example). Instead, the pasted Illustrator object will be converted to individual solid color shapes (Figure 8).

Figure 8. Copying a gradient block from Illustrator is a good way to get new gradients into InDesign. But complex gradients are sometimes turned into blocky arrays of objects.
For more information, see Getting Cool Illustrator Gradients into InDesign and Moving Gradient Swatches Between Illustrator and InDesign.
Drop Shadows and Other Raster Effects
While Illustrator is primarily a tool for creating artwork with vectors, it does offer the ability to add some raster (bitmapped) effects—for instance, drop shadows. If you use these kinds of effects, you must pay attention to two critical concerns. First, these effects almost never end up looking good if you copy and paste them. For example, if you copy and paste an object with a drop shadow from Illustrator into InDesign, the shadow comes in as a separate object and is grouped with the vector path (Figure 9).

Figure 9. Objects with drop shadows placed into InDesign appear perfect (left). Objects copied from Illustrator via the clipboard place the shadow as a separate embedded raster object (right). In some cases, you would have to select this object and apply the Multiply blend mode to make its white background disappear. Or, better still, delete it and recreate it with InDesign’s drop shadow features.
I strongly recommend you select the bitmapped object and delete it—it’s better to apply effects like drop shadows to objects directly inside InDesign.
However, if you apply a drop shadow or bitmapped effect in Illustrator, and then save it to disk—or if you add an item with the effect to a CC Library—then when you place that file or library item in InDesign, the shadow will show up perfectly on your page background, just as you’d expect. Again, when it comes to special effects, that’s a safer workflow than the dodgy copy-and-paste method.
Graphs
If you create a graph in Illustrator, when you copy and paste it into InDesign you’ll find you’re able to edit it directly; you can change the height of bar graphs, for instance, by simply clicking on them and changing their height (Figure 10).

Figure 10. If you copy and paste a graph from Illustrator into InDesign, you’ll be able to adjust the size of each of the individual elements directly in the program.
This means that if you need a load of graphs with the same basic design, you can create one in Illustrator and then modify all the rest in InDesign.
Shared keyboard shortcuts
If you’re familiar with either Illustrator or InDesign, you’ll be pleased to know that most of the keyboard shortcuts are shared between the two apps. In both you can use M for the Rectangle tool, L for the Ellipse tool, P for the Pen tool, H for the Hand tool, for the Line tool (called the Line Segment tool in Illustrator), I for the Eyedropper tool, N for the Pencil tool, and T for the Type tool. You can also use S for the Scale tool and R for the Rotate tool in both apps.
There are a few differences, of course. In Illustrator you can select the Type tool and then click to start typing; in InDesign you have to use the tool to drag out a text frame first. In both apps, you can exit the Type tool after you’ve created your text using the Esc key (which frustrates Photoshop users, since in that app the Esc key is—more logically—used to cancel text creation).
If you’re primarily an Illustrator user, you’ll be pleased to hear that you can force InDesign to use even more Illustrator shortcuts by choosing Edit > Keyboard Shortcuts and then choosing Illustrator from the Sets popup menu (in CC 2018.1 and later).
Layers
When placing files (note this doesn’t work when placing from a CC Library), you also have the ability to hide and show specific layers within the file, and you can access this functionality at any time afterwards, using Object > Object Layer Options (Figure 11).

Figure 11. The ability to hide and show individual layers in placed Illustrator artwork means you can position your headlines inside an illustration, with the full artwork behind it and a version showing only upper layers in front.
This is a useful technique, as it allows you, for example, to place an InDesign headline between two layers in a placed Illustrator file. To do this, first place the object as normal, and then duplicate it. Use Object Layer Options in the duplicated version to hide all but the uppermost layers, and then place your headline between the two versions. This article by David Blatner shows the technique, but with a Photoshop document instead of Illustrator.
Another use of working with layers is when you want to save a group of logos—social media logos, for instance—in a single Illustrator file. Then, when you import that file into InDesign, you can choose which layer to display in each location.
Copying InDesign Artwork into Illustrator
So far we’ve looked exclusively at copying and placing artwork from Illustrator into InDesign. But there are times when you’d want to work the other way around, and place an InDesign page design into Illustrator: if, for example, you want to design a graphic to exactly fit a space in the layout.
There are two ways to move artwork in this direction. You can drag it into your CC Library in InDesign, which will make it available in Illustrator. But when you drag the item from the library into Illustrator, you won’t be able to edit it further. That’s because the assets are stored in the library as PDF files, rather than individual InDesign components, and as such won’t be individually editable.
Alternatively, you can simply copy the text and objects in InDesign, and then paste them into Illustrator. This way, the text and objects will remain individually editable. But you’ll find that Illustrator is unable to process InDesign’s text frames using this method; instead, each line of text will be a separate text object upon import. It will be editable, but the text won’t reflow as you edit it, so only use this approach if you’re sure you won’t want to change the text afterwards.
Super Friends
Every superhero needs a trusty sidekick to help save the day. Fortunately, Illustrator is always ready to lend a hand (or a vector), to bring a happy ending to your design projects.
Commenting is easier and faster when you're logged in!

Recommended for you

Work Week Projects: 5 Essential Illustrator Skills
Five quick exercises to do while you're at work to learn important skills in Ill...

Illustrator Downloadable: Fall Foliage Art and Frame Set
Reach for these assets when you want to pumpkin spice up your designs.

Printing Notes (With Some Help From InCopy)
by Aman Arora The Notes feature of InDesign can be used for adding comments, rem...