

Method #3: Get Hard-core with Hard Code
Upside
• Offers the most control; leverages existing markup
Downside
• Might be too geeky for some users; requires multiple steps; tables get very tricky
The method that gives you the most control over your HTML-to-InDesign conversion also requires a more hands-on approach to working with the source HTML. In this case, you’ll employ the power of GREP Find/Change to simultaneously use the HTML markup to apply styles and strip out that very same markup.
The best thing you can leverage from HTML is its structure and consistency—unless you’re working from very sloppy HTML that doesn’t comply to web standards, which we’ll assume is not the case here. Anything consistent and structured can be dealt with very effectively with some relatively simple GREP Find/Change operations.
First, you need to get to the source HTML. From most browsers, this is as simple as choosing File > Save As and choosing Page Source (or Source, or HTML, or other words to that effect). Once saved, the HTML file can be opened by any text editor (for example TextWrangler on the Mac, or Notepad on Windows). From there, you can select all of it (or just the portion you want), copy it to the clipboard, and paste it into InDesign.
Before moving on, you’ll want to take a look at the HTML to look for how many different types of markup tags you’ll need to deal with (and therefore styles you’ll need to create). For example, some markup is highly semantic, meaning that it’s simple and relatively free of class attributes. Some HTML will rely quite a bit on classes. That’s tricky, because you’ll need to create separate paragraph styles for each tag (H1, H2, P, LI, etc.), with and without classes, and a character style to correspond with each <strong> and <em> tag, plus any <span> tags. Initially, those styles don’t even need to be defined with anything other than a name. Attributes can be added later, but the styles themselves need to be present in the document before you can start practicing your GREP magic.
Once you’ve created the necessary styles, you can open the Find/Change dialog box, choose the GREP tab, and start searching for specific tags and the text that appears within them. For example, the regular expression <h1>(.+?)</h1> will find the level 1 heading, including its tags, and <p>(.+?)</p> will find all of the text in any single paragraph along with its surrounding tags. A search for <strong>(.+?)</strong> will find all text tagged to appear bold. These are just a few of several searches (Figure 8) you’ll need to run to find the different content and its tags.
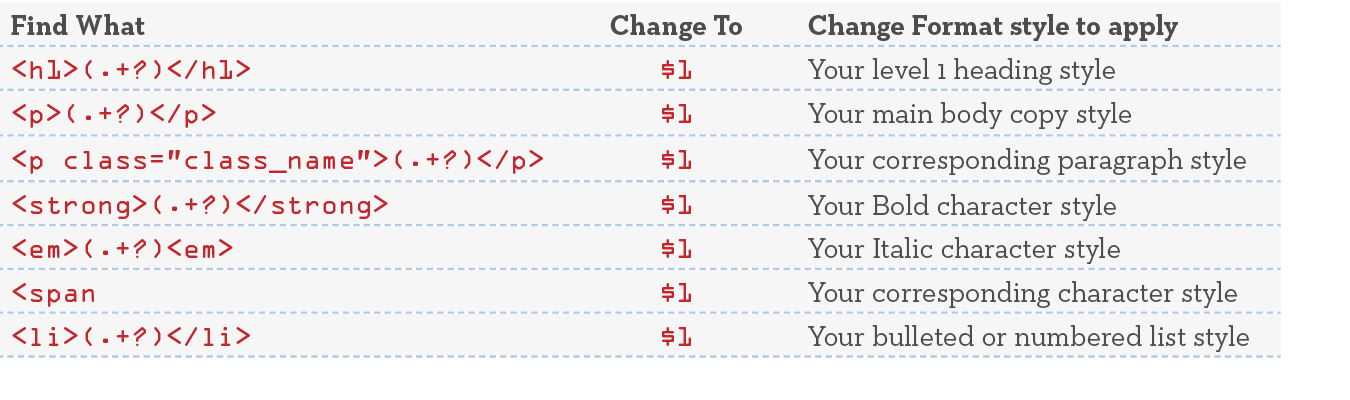
Figure 8
So what do you do with the text once you’ve found it? First, make sure your Find/Change dialog box is showing all of its options by clicking the More Options button (if you see a Fewer Options button, you’re already seeing everything). Next, enter the appropriate expression in the Find What field of the GREP area of the Find/Change dialog box. If you’re using expressions like the examples above, the (.+?) portion of the expression refers to the text you want to keep. Literally, it means “any one or more characters, but the shortest match.”
In the Change To field, just type $1, which will put back the text found within the HTML tags, but will discard the tags themselves. (Technically, it “puts back” the part that was inside the parentheses.) Then, click the small icon to the right of the Change Format area at the bottom of the Find/Change dialog box and, in the resulting window, select the paragraph style you want to apply to the found text. For example, if you’re searching for text within the <h1> and </h1> tags, you’d choose your level 1 heading style—whatever you’ve named it. When you click Find, then Change (and I strongly suggest testing this by changing one or two before committing to Change All), InDesign will put back the text within the opening and closing tags, apply the style you’ve specified, and delete the tags, leaving you with styled text without any surrounding tags.
Dealing with hyperlinks
In this method of processing pasted HTML, removing the markup for hyperlinks while preserving the link information requires a three-part process. First, choose Convert URLs to Hyperlinks from the Hyperlinks panel menu (or choose Type > Hyperlinks & Cross-references > Convert URLs to Hyperlinks), and then click Convert All in the resulting dialog box. InDesign will add all of the links it detects as Shared Hyperlink Destinations and will automatically apply them to the URLs within the link anchor tag. However, the text between the markup (the tags) won’t have the newly-created links applied. That task falls on you.
The fastest way to find all the text within the anchor tags is to run a GREP-based Find/Change for any text preceded by a closing angle bracket and followed by a closing anchor tag. That expression—(?<=>).+?(?=</a>)—will select the content of the link tag but not the tags around it. For each search result selected, choose the desired hyperlink from the pull-down menu in the Hyperlinks panel, and then click Find Next in the Find/Change dialog box to continue on to the next result. Repeat this step until you’ve processed all the links.
Finally, once all the desired text has hyperlinks applied, you’ll want to remove the original markup. Here again, it’s easily done using GREP. In the Find/Change dialog box, on the GREP tab, enter the expression </?a.*?> in the Find What field, leave the Change To field empty, and then click Change All. That removes every opening and closing anchor tag, leaving you with working InDesign hyperlinks on the remaining text.
This article was last modified on January 8, 2023
This article was first published on January 3, 2014
Commenting is easier and faster when you're logged in!
Loading comments...
This article was last modified on January 8, 2023
This article was first published on January 3, 2014
Commenting is easier and faster when you're logged in!

Recommended for you

Interview with Blatner Tools Creator… um… Me!
David caught up with David Blatner, the designer of the new Blatner Tools plug-i...

Tip of the Week: Tabs Panel Tips
This tip was sent to Tip of the Week email subscribers on February 5, 2015....
CreativePro Video: Always Paste to Center in Photoshop
See the simple trick for pasting large selections in Photoshop to the center of...