

One of the new Neural filters introduced in the Photoshop CC 2022 release is the Harmonization filter, which aims to match the tone and color of a layer to an underlying layer of your choice. Although still labeled as a ‘beta’ filter, which means it’s not fully finished yet, it’s still a quick and remarkably effective way to make images from different sources look as if they belong together. Here’s how it works.
1: The Starting Images
This photograph of a woman, taken in an indoor studio, is to be placed on a background showing seagulls on a rock at dusk. The first step is to remove the background from the woman, which is easily accomplished using Photoshop’s Select Subject feature.

2: The Background Removed
When the studio is removed from the woman layer, you can see how she looks completely out of place on that background: she’s too bright, and too green. It would be possible to recolor her using Curves or Levels, but the new Neural filter offers a quicker solution.
3: The Harmonization Filter
You can find the Harmonization filter by choosing Filter > Neural Filters. Then, when the dialog appears, choose Harmonization by clicking the slider next to its name. You won’t see any immediate difference, as the reference layer has yet to be selected.

4: Choosing the Reference Image
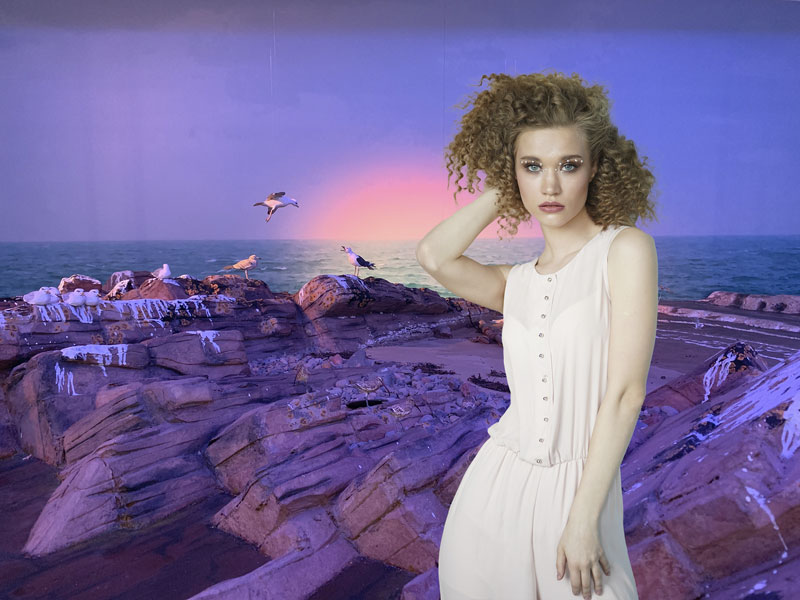
From the pop-up Select a Layer menu, choose the layer you want to set as a reference. This will typically be the Background layer. After a few seconds, the target layer will be recolored to match the background. Here, you can see how the colors have been tweaked to match the strong blue background; in addition, the layer has been darkened appropriately.

5: Adjusting the Settings
The default settings won’t necessarily be the best final choice. Fortunately, Photoshop gives you a good degree of control over the result. Here, I’ve reduced the overall Strength of the effect slightly. I’ve also lowered the Saturation a little, and increased the Brightness.

6: The Harmonized Result
Once you commit to the filter, the target layer will be duplicated so you can always revert to the original if you wish. The modified layer is now a much better match to the background, achieving in a few seconds what would have taken much longer using conventional techniques.

7: A More Complex Scenario
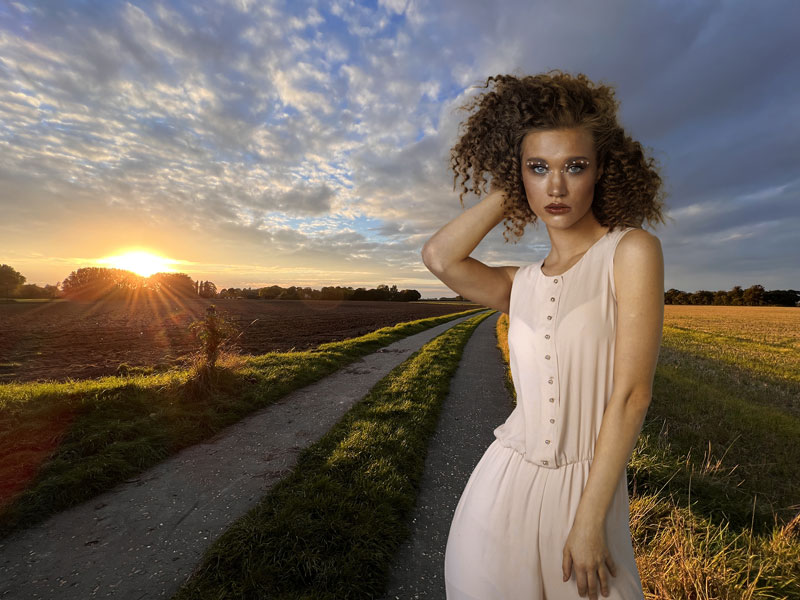
The Harmonization filter gets you a long way towards your goal, but it isn’t always a complete solution. In this example, the same cutout has been placed on a warm sunset background. Once again, the woman is a poor match for the scene: she’s far too pale and undersaturated to look like she belongs here.

8: The Initial Harmonization
This is the result of running the Harmonization filter, after having tweaked the settings slightly. The woman is now a better tonal match for the background, but she still doesn’t look as if she fits the space. Some more work is needed to complete the task.

9: Create a Curves Adjustment
Choose Layer > New Adjustment Layer > Curves, and check the button to make a Clipping Mask with the woman’s layer so that it doesn’t affect the background. Drag down on the RGB curve to darken the layer. The effect is too strong, but we’ll fix that next.

10: Mask the Adjustment Layer
Every Adjustment Layer comes with a built-in Layer Mask, and you can paint on here to hide the effect. Choose a soft-edged brush, with Black as the foreground color, and lower the opacity of your brush to around 30%. As you paint over the left edge of the layer, nearest the sunset, you’ll hide the Curves effect here, to make her look as if she is lit from the side. Build up the brightness selectively by painting over those regions several times.
11: Finishing off
As a final step, it helps to have a warm glow coming from the sun. Make a new layer, set to Hard Light mode, again using the woman’s layer as a Clipping Mask. Select a mid orange from the sun, and paint this over the hair and the left side of the body. Now it looks as if the sunlight is truly coloring the woman, placing her much more realistically in the scene.

Commenting is easier and faster when you're logged in!

Recommended for you

The Digital Art Studio: Patching Text without the Fonts
How do you fix a typo when you don’t have the correct font? After my beloved stu...
CreativePro Video: Adding Hair Effects in Photoshop
In this week’s CreativePro CreativePro video, Steve Caplin uses Photoshop to mak...

Creating a Color Burst Montage in Photoshop
Try this colorful collage idea the next time you want to convey imagination, vib...