
How to Shoot Raw Photos on Your iPhone (and Why You’d Want To)
You don’t need a DLSR camera to reap the benefits of the raw image format.
This article appears in Issue 5 of CreativePro Magazine.
When photographers want more editing latitude with their images, they shoot in raw format, which is the untouched data recorded from a camera’s image sensor. Raw is great for working with landscape photos or portraits that benefit from a larger range of colors and editing possibilities in each image file. Until recently, you needed a DSLR or midrange camera to shoot in raw, but now most smartphone cameras can also capture raw images, including the iPhone. So why shoot raw on an iPhone, and how do you do it?
Compressed Expectations
A raw file’s benefits can also be disadvantages. The greater amount of image data makes for larger file sizes, and because that data is unedited, post-processing is required to end up with even a decent basic image. That’s why nearly all digital cameras shoot in, and default to, the JPEG format. JPEG files are small. Typically, the results are good-looking photos, and widespread JPEG adoption also means virtually any software or device can read those images. On earlier cameras that were underpowered and offered limited storage space, this format was the perfect compromise. Since iOS 11, the iPhone’s default format is a successor to JPEG, HEIF (High Efficiency Image Format), with files that end in the HEIC extension. The downside to JPEG and HEIF is that they’re processed in the camera using algorithms that are optimized for how our eyes see colors, using lossy compression to create good-looking, small-sized image files. The camera captures the image data, the algorithms interpret how the data is turned into colored pixels, and then a lot of the data is thrown away permanently to compress the file into a smaller size. When it comes to editing those files, you end up with less image information to work with—and therefore less ability
to pull out details or tones compared to raw files.
Raw Formats on Phones
In addition to containing more image data and thus being larger, raw files can also be more confusing to work with. One of the more annoying things about shooting raw on traditional cameras is that each model has its own raw format version. When a new camera is released, there’s usually a lag of weeks or months before software is able to open and process its raw files. As a response, Adobe created the DNG (Digital Negative) format, which is intended to be universally compatible. For phones that support raw capture, DNG is the raw format of choice. On the iPhone, there’s a third option. In 2020 Apple introduced the Apple ProRAW format, but it’s available only on the iPhone 12 Pro or iPhone 13 Pro (or their Max-sized siblings). ProRAW is a hybrid that combines the dynamic range of raw and the computational photography technologies (like Smart HDR and Deep Fusion) that Apple uses to blend exposures and combine them into a single high-quality photo. Even so, the file is saved as a DNG, with extra data specific to the ProRAW format. However, caveats abound when capturing raw images on the iPhone, whether that’s DNG or ProRAW, so keep reading for the details.
How to Shoot Raw on an iPhone
Since iOS 10, Apple has supported raw images at the system level, but with the exception of the iPhone 12 Pro and iPhone 13 Pro models, you still can’t use the built-in Camera app to capture raw images. I suspect Apple’s reasoning is twofold. Because most iPhone owners don’t know or care about raw photos, they could be confused about a raw shooting option. And I think there’s a dash of marketing thrown in, too; Apple’s central messaging is that the iPhone takes perfectly magical photos as it is, so why should most people worry about raw? But plenty of folks do want to capture raw images. For them, third-party apps take advantage of the system-level support for capturing images as raw files in DNG format. Several apps offer a raw or DNG mode, including Halide Mark II, Adobe Lightroom, Manual, Camera+, and others. (Apple compiled an App Store List.) In most apps, shooting in raw is an option in settings or a button on the main interface. Enabling it doesn’t change how to capture an image, however. All the fundamentals of exposure, focus, and composition still apply, with varying controls over how many settings are handled automatically by the app. You can shoot almost entirely manually for the most control. (The exception is aperture, which can’t be adjusted because the iPhone cameras all have fixed aperture values.) In the iPhone models that support ProRAW, shooting in raw is just a matter of tapping the RAW button in Apple’s Camera app, after you enable the Apple ProRAW format in Settings > Camera > Formats. An alert will inform you that ProRAW files are much larger than JPGs; expect file sizes around 25 MB per photo (Figure 1).
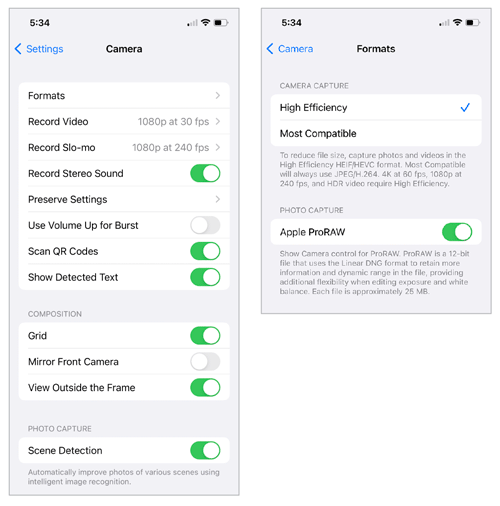
Figure 1. If you have an iPhone 12 or 13, you can enable the ProRAW format in Settings > Camera > Formats.
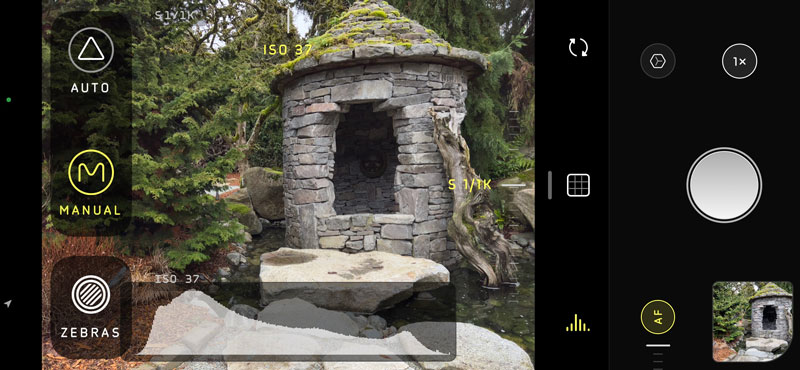
Figure 2. Shooting raw in the Halide Mark II app

Figure 3. Shooting raw in the Lightroom app
Editing Raw Photos
In addition to having more data available to work with, raw formats support enhanced control over some image characteristics, such as noise reduction and sharpening. If you’re already in Adobe’s Lightroom ecosystem, Lightroom on iOS provides most of the same editing features as Lightroom on the desktop, with raw-specific controls for highlights, detail, clarity, and other attributes. On the iPhone or iPad, access to those features depends on the tool you’re using. Apple’s Photos app offers the same controls for raw files as it does for JPEG or HEIF images, which are good, but not extensive. A raw-specific alternative is to edit in RAW Power, which digs deep into raw controls such as compensating for luminance and color noise, raw sharpening and contrast, and more. Changes are saved to the Photos library, and you can always revert to the original if you don’t like how the adjustments turned out. Editing ProRAW images can introduce an interesting wrinkle because of how they’re created. Other raw image formats include just the sensor data; before an app can edit the file, it needs to demosaic it, a process that turns that data into colored pixels we can see and manipulate. A large part of why raw images are so advantageous is because there are many ways to demosaic them. With ProRAW, however, the image is already demosaiced. When the photo is captured, Apple’s image processing pipeline records multiple shots of the scene and blends them together. That data is stored as a collection of local tone-mapping information, gathering huge amounts of details in the shot from a range of settings. In fact, Apple worked with Adobe to add this data to the DNG specification. So, by definition, there isn’t a single “raw” version of the photo you see. There is, however, a raw file at the core of the image, which is what is displayed in editors that don’t recognize the local tone mapping data. It’s usually quite different from the processed version you see in the Photos app. That’s still editable, but you lose the advantage of the ProRAW format. Editing apps that do recognize the format handle ProRAW images differently. In the Apple Photos app, the blended version is used as the baseline and then edits are made on top of that. In RAW Power, a separate Local Tone Map slider controls how much of the effect is applied (Figure 4). 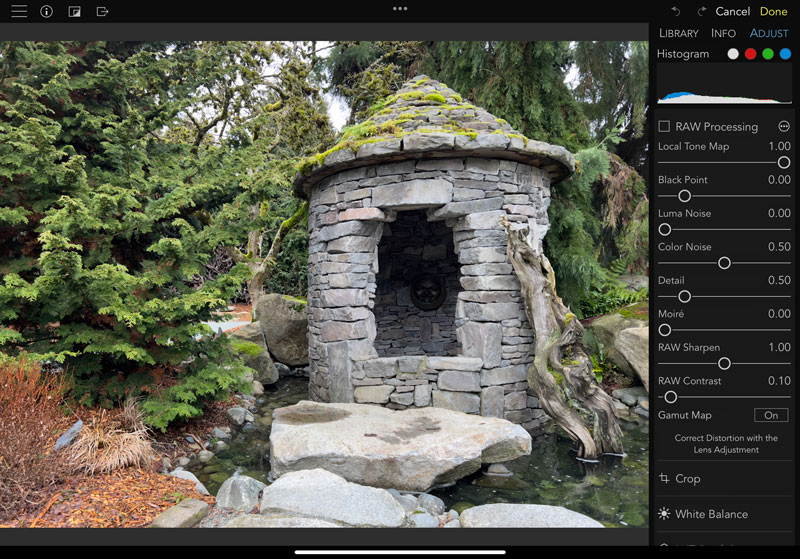
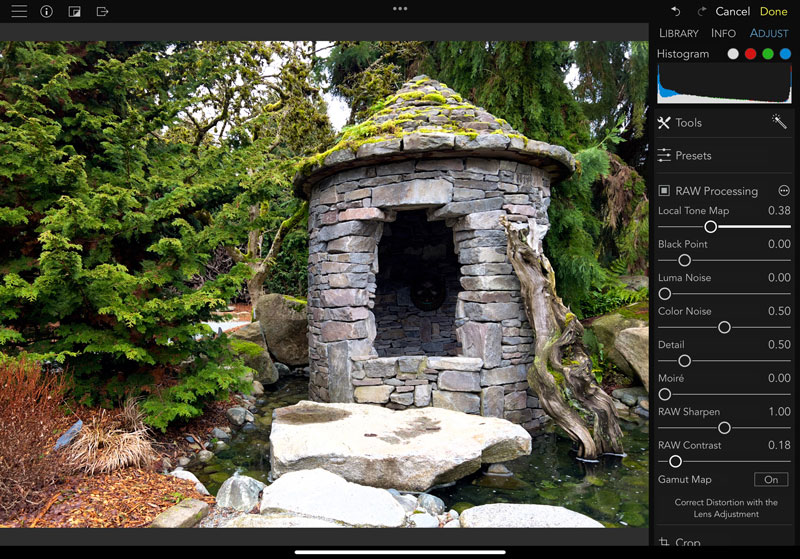
Figure 4. The Local Tone Map control in RAW Power can help when you want to return some contrast and dark tones to a ProRAW image (before: top, after: bottom)—an alternative to Apple’s default processing, which sometimes tries to illuminate too much.
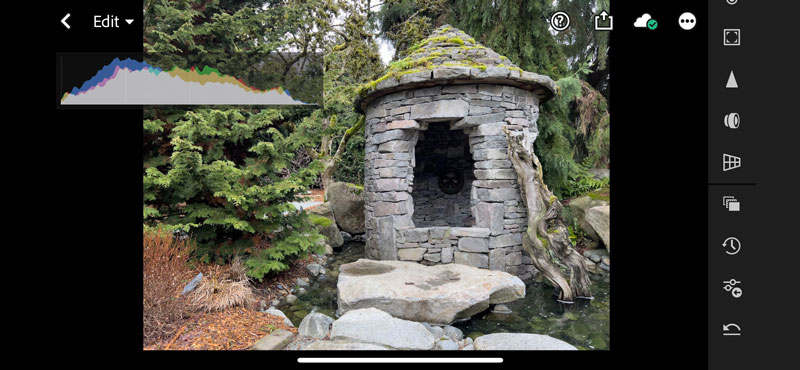
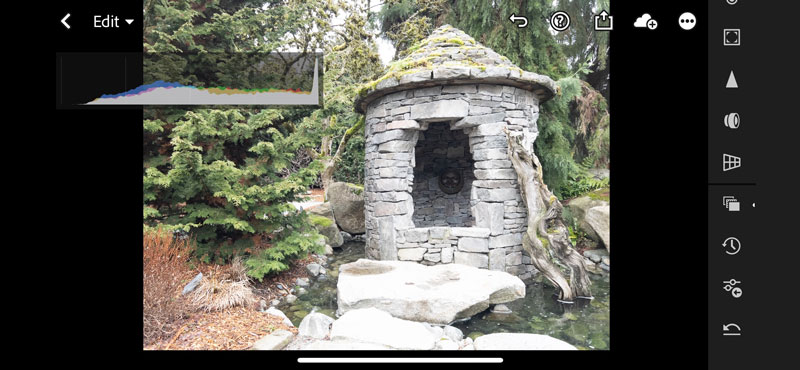
Figure 5. Lightroom applies an Apple ProRAW profile to incorporate Apple’s processing during editing (top). With the default Adobe Color profile applied, the unedited base raw image appears overexposed (bottom).
A Raw Deal
Shooting in raw formats on iOS does take a little extra work, since it’s not an option provided in the built-in Camera app on most iPhones, but for some situations, that effort is rewarded by greater latitude in editing. It’s also easy to experiment, because the capability is built into all modern iOS devices. You just need an app that will unlock it.
Commenting is easier and faster when you're logged in!

Recommended for you

Photoshop How-To: Distorting Text
This story is taken from “Photoshop Studio Skills: For Photoshop 7 and Pho...

iStock.com Changing Pricing Structure
iStock is often credited as the birthplace of the microstock industry: widely-so...

Animating Images With Plotagraph Pro
Plotagraph Pro is an innovative app that allows you to selectively animate still...