
How to Share Photos to Social Media Sites from Lightroom

The old-fashioned part of me wants to say that social media is a distraction, and that chasing likes and followers is folly that shouldn’t be undertaken by serious photographers.
The modern, realist part of me tells that other fuddy-duddy to shut up, because to be a photographer or designer in this day and age means having some sort of online presence.
Surprisingly, our software hasn’t entirely gotten the message. Sharing photos from Adobe Lightroom or Lightroom Classic to services like Instagram, Facebook, or Twitter still involves several steps, especially on the desktop versions of the software.
If you use Lightroom, let’s look at how make the process easier to share your creations with the world.
Lightroom CC on the desktop
Right away, we’re presented with a couple of challenges. Ideally, we’d be able to share photos directly to services from within either Lightroom or Lightroom Classic, but those options don’t exist. Part of the reason is external; Facebook used to allow apps to upload directly to its service, but ended that option last year, forcing developers to yank the sharing features they’d included.
So, the first task is getting photos out of Lightroom or Lightroom Classic, which is fairly straightforward. The second task is related to image size: although you can upload an image of any size to these services, some of them recommend specific sizes for the best display.
For our purposes here, I’m going to focus on saving files for Facebook, Instagram, and Twitter, the three most popular services for quickly sharing images. Uploading to Flickr, SmugMug, Google Photos, or other sites involves similar steps. I’m also talking just about the built-in export features; if you use Lightroom Classic, it’s worth checking out Jeffrey Friedl’s plug-ins, which add the ability to export directly to some of the services.
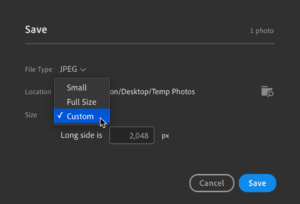
In Lightroom CC, exporting photos is pretty bare-bones:
- Select one or more images and click the Share button or choose File > Save To.
- Choose JPEG as the format.
- Pick a destination from the Location option.
- For Size, choose Small, Full, or Custom.
- Click Save to save the file(s).
That size option depends on where you’re posting the image. If I’m uploading to a site such as Flickr, I export a full-resolution image. However, photos on Facebook tend to look best at 2048 pixels on the long side; you can certainly upload full-size images there, but in my experience they turn out soft due to Facebook’s often clumsy resizing algorithms. Instagram, on the other hand, tends to be sharpest at just 1080 pixels on the long side, since Instagram is still optimized for viewing on phones.
Lightroom Classic
Lightroom Classic presents far more options, namely the ability to create user presets:
- Select one or more images and choose File > Export.
- Pick an export location.
- Optionally rename the file. Since the social files are different resolutions, I append the size to the filename, such as “IMG_1234_2048px.jpg”. That makes it easier for me to upload the correct file for the correct service.
- Under File Settings, choose JPEG and decide a quality level; the lower the level, the more image compression is applied.
- Under Image Sizing, select the Resize to Fit button, choose Long Edge from the pop-up menu, and specify the pixel value below.
- Click Export to create the file(s).

Instead of going through those steps every time, create a preset for the services you want. Under the Preset column, click Add and give it a descriptive name such as “Facebook 2048px”. Click Create.
Now, the next time you’re exporting photos, all you have to do is choose File > Export with Preset > [the preset you created], bypassing the Export dialog altogether.
Uploading
Facebook and Twitter have web interfaces in which you can add your image files to new posts. Instagram is more tricky, since the service still believes we do everything on phones, not computers or tablets.
I get around this in a couple of ways.
In Safari on the Mac, choose Safari > Preferences, click the Advanced category, and enable “Show Develop menu in menu bar.” Next, with Instagram.com loaded, choose Develop > User Agent > Safari — iOS 12.2.3 — iPhone (or whatever the latest version of iOS is displayed). That simulates the site loaded on an iPhone, complete with the [+] button to add a new image.
The other option I use is to put the images into iCloud drive and use the Files app on the iPhone to send the image to the Instagram app. You could also use Dropbox, Google Drive, or other cloud services that have apps on mobile devices, both for iOS and Android.
Honestly, this is all more of a hassle than it needs to be, but at least these options make it a bit easier to share from Lightroom to the social media sites where most people can view your photos.
This article was last modified on April 21, 2019
This article was first published on April 21, 2019
Commenting is easier and faster when you're logged in!

Recommended for you

Photoshop for Beginners
Becoming a Photoshop expert is probably on a lot of folks’ bucket lists. W...

Public Domain Assets at Your Fingertips
At the risk of stating the obvious, the internet is a big place. And that fact o...

10 Essential Tips for InDesign
These tips originally appeared in InDesign Magazine. To have new InDesign tips d...