
How to Make a Table in Illustrator
Three methods for getting tables into Adobe Illustrator


This article appears in Issue 33 of CreativePro Magazine.
Unlike in Adobe InDesign (see more on this below), there isn’t currently a native way for you to generate a table within Illustrator. Rest assured, you can still fake a table using the Grid Tool and the Grid Tool Options. Or, you bring in a table created in another program. Let’s look at both options.
Option 1: Fake a Table in Illustrator with the Rectangular Grid Tool
To start, select the Rectangular Grid Tool. You should find it grouped with the Line Segment Tool. If it’s not there, it might be because you’re using the Basic toolbar. In that case, choose Window > Toolbars > Advanced.
With the Rectangular Grid Tool, drag across your artboard to create a base grid for your table. Alternatively, you can click on your artboard and use the Grid Tool Options to set the table width and height precisely.
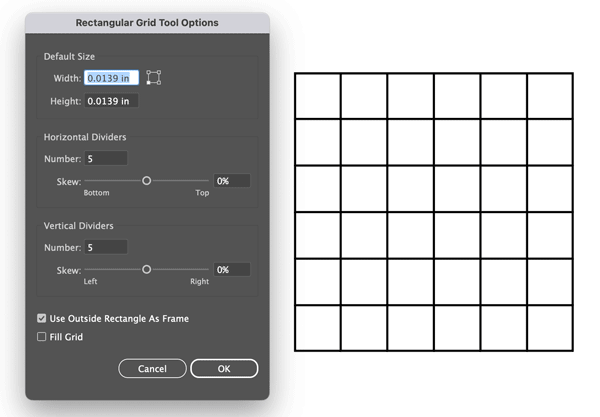
In the Rectangular Grid Tool Options dialog box, you’ll see a few options to customize your grid including:
- Width and Height: The default measurement units will match what you have selected in Units preferences. But you can use any units by adding the abbreviation after the number, (in, px, p, mm, and so on).
- Horizontal Dividers: Enter the number of rows you would like in your table. Optionally, you can use the Skew slider to adjust the spacing between each divider.
- Vertical Dividers: Enter the number of how many columns you would like in your table. Optionally, you can use the Skew slider to adjust the spacing between each divider.
- Use Outside Rectangle as Frame: When this is turned off the table border will be composed of four separate lines. When it’s on the border will be a rectangle.
- Fill Grid: Turn this on if you want to apply the current Fill and Stroke colors to your table.
Editing the Table
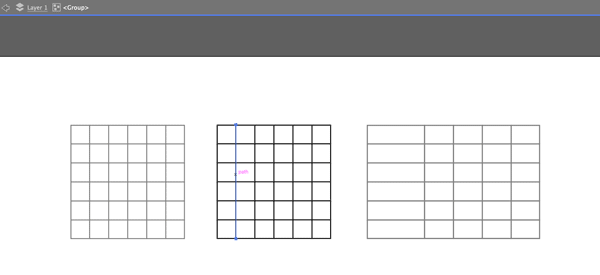
If you want to edit your grid into a more traditional table, take the Selection tool and double-click on your grid to enter Isolation Mode. Once in Isolation Mode, click on the dividers to delete them or adjust their spacing by dragging them. To adjust the overall dimensions and proportions of your table, take the Selection tool, and drag on one of the edges of your table.
Adding Text to the Table
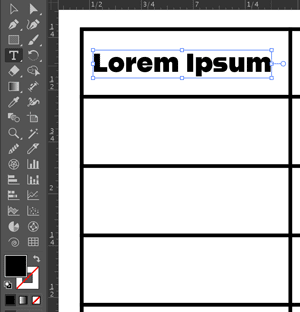
To create your text for your table. Take the Type Tool and drag within each cell.
And there you go! You’ve created a table in Illustrator!
Option 2: Paste a Table Created in InDesign or Excel
Admittedly, the grid method can be labor intensive and slow, especially for complex tables. If you already have a table in another application, such as Adobe InDesign or Microsoft Excel, you can copy and paste it into Illustrator. But there is a trick! First, check out How to Paste Tables from Microsoft Word or Excel into InDesign by Mike Rankin, or the InDesign Tables Superguide Volume 1 to learn how to do just about everything with tables in InDesign.
Once your table has been created in InDesign, select it and at least one other object. Copy them both and paste into Illustrator. Then, delete the extra object. It’s necessary to bring this “helper” object along for the ride because if you just copy the table, only the text will be pasted in Illustrator. It’s not necessary to use a helper object when copying and pasting from Excel.
Tip: Make sure to use a font that is available in all your apps to avoid getting unexpected results when pasting into Illustrator.
Option 3: Use CC Libraries
I saved the best for last. By creating a table in InDesign and saving it to a Creative Cloud library, you not only get the efficiency and flexibility of InDesign’s table features. You also get a live link when you place the table into Illustrator. So, if/when the data changes it can be automatically updated in Illustrator.
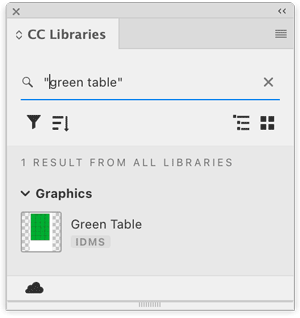
In InDesign, create and format your table as desired. Then, select the table, go to the CC Libraries panel, click the plus (+) button, and choose Graphic. Switch to Illustrator and locate the item in the same library. Either drag from the library onto the artboard or right-click the table in the library and choose Place Linked. Either method will give you a loaded cursor. Then, click to place the table at full size or drag to resize it.
To edit the table, double-click it in the library. It will open as a separate file in InDesign. As soon as you save and close that file, the table will update in Illustrator.
Note: you can also right-click on the table in the library and add a description, which can make it easier to find the exact item you want faster when you’re working with a large library (or a collection of many libraries). Use the Search field at the top of the Libraries panel to locate the table you want.
Fantabulous!
Commenting is easier and faster when you're logged in!

Recommended for you

Creating Indented Cell Strokes
I was recently designing a few tables in InDesign and wanted to give certain cel...

The Truth About Cell Styles
Is there a way to combine the attributes of multiple cell styles in a table? And...
Cool Use for InDesign’s New Graphic Table Cells Feature
One of the great new features of InDesign CC 2015 is a new type of table cell ca...