How to Draw a 3D Ribbon in Adobe Illustrator, part 2

Make sure you check out Part 1 of this tutorial before reading on.
When last we saw our Illustrator project, we had created a customized ribbon or lanyard effect from a simple rectangle, by adding text, texture (via the Scribble effect), and twists (using Envelope Mesh). So it looked something like this:

Next, we’ll see how to reuse meshes and how to add highlights and shadows to finish the effect.
Releasing, Reusing, and Editing Meshes
So you’ve done all of this neat twisting and distorting with your mesh. What if you want to make a second object with the same distortion effects (which we do)? Must you try to recreate each and every push and pull? Nope.
1. Duplicate one of your current layers (either the front or back strips of the lanyard), locking the original.
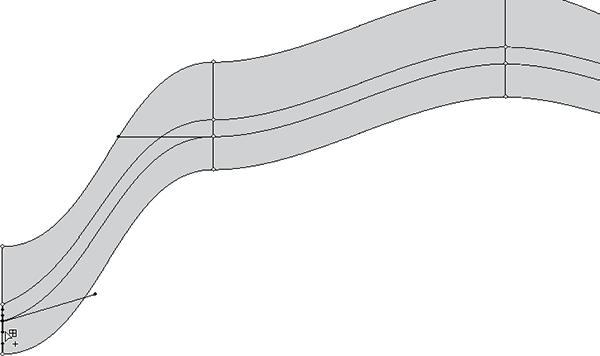
2. With the black arrow Selection tool, click on your new object, copy, and choose Object > Envelope Distort > Release. You should have your original, uninteresting scribbled box and text group, as well as the mesh, now a distinctly separate object (see Figure 12).

Figure 12: After releasing the envelope distort you’ll have the original object group and the mesh object.
3. To mirror the distortion of the lanyard ribbon with another object, you would select the target object and the now independent mesh, and use Object > Envelope Distort > Make with Top Object—which we are not going to do now. Instead, delete the undistorted scribble group, leaving the mesh itself.
4. Zoom in on the left edge of the mesh and grab the Mesh tool from the Tools panel (if you can’t find it, press U on your keyboard to select the Mesh tool).
Until your mouse is over the mesh (or an object that can be converted to a mesh) it will display a no-mesh cursor. Position the cursor roughly at the midpoint of the left edge of the mesh, however, and you will see the Add Mesh Point tool. Click here. Notice that you have now split the entire length of the mesh into two rows where previously it was one (see Figure 13).

Figure 13: Adding a row to the mesh.
If you clicked on a different area of a vertical mesh patch border you would add additional rows; click on a horizontal border to add columns, and click somewhere inside a mesh patch to add both a column and row simultaneously.
The more mesh patches (columns and rows) you create, the greater your command over distortion or (as you will see in the next step) color. The drawback, of course, is that you have more mesh patches and mesh points to wrangle when you want to make large changes—so don’t go nuts with the Mesh tool.
This article was last modified on January 18, 2023
This article was first published on June 17, 2013
Commenting is easier and faster when you're logged in!
Recommended for you

Adobe Releases Lightroom 6 and Lightroom CC
This week (April 21, 2015) Adobe Released Lightroom 6 and Lightroom CC 2015, pro...

The One-Hour Ad Deadline
The phone call and the email arrived together. “We’ve reserved a full page ad in...

Creating an Out of Bounds Effect in Photoshop
Images where animals or people bust out of their background are very popular, an...


