How to Draw a 3D Ribbon in Adobe Illustrator, part 1

Attendees of conventions, tradeshows, and similar events are typically issued badges for entry into the show floor, panel discussions, parties, and various other functions. In most cases, those badges are suspended from lanyards, and lanyards make good promotional items. After the convention, some attendees even continue to use their lanyards to hold their office security badges around their necks—thus spreading the message further and wider.
Consider a lanyard printed with repetitions of your client’s tagline and website address. How would you draw it in Illustrator? Just a long rectangle with type set atop it?
Well, you could do that, I suppose. But a drawing like that certainly won’t give the client the sense of seeing the physical item; it won’t make the client excited about the project. Let’s go the extra mile for our client and give him something he can almost reach out and touch. It will pay off with the satisfaction of hearing the client’s fingernails clink on the monitor.
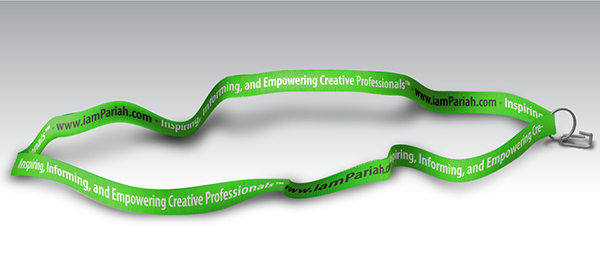
This is the project we’ll create.

For this tutorial you can use almost any version of Adobe Illustrator. It will work in versions CC, CS6, CS5, CS4, CS3, and CS2, and probably even earlier versions—I don’t recall if the required features were in CS1 and earlier. You should also have at least a basic working knowledge of using Adobe Illustrator, particularly the Selection, Direct Selection, and Type tools as well as experience working with paths, fills, strokes, and layers.
Step 1: Doing the Basics
It all begins with a basic shape—a rectangle with text.
1. Begin a new landscape-orientation document in RGB. Theoretically any size will do, but 11×8.5-inches is a good start. Name the document “Lanyard”.
2. Draw a long, narrow rectangle just a little short of the full width of the document and not very tall. For example, if your document is 11×8.5-inches, make the rectangle approximately 10.5 inches wide by 0.375 inches tall (see Figure 1).
![]()
Figure 1: My starting rectangle
3. Fill the rectangle with a solid color. Give it a stroke of none.
4. Set your type over the box, in approximately the same shape and size. Enter the text that will appear. In my case I’ve used my tagline and Website address.
5. Style the type as you see fit. I used Myriad Pro Semibold Condensed, 18 pt, with the tagline in white, the URL in black, and the bullet separating them a green slightly darker than the rectangle’s fill (see Figure 2).
![]()
Figure 2: My text set as desired
6. Once you’re happy with the text, copy it and paste it repeatedly until it completely fills the text box.
This article was last modified on December 13, 2022
This article was first published on June 10, 2013
Commenting is easier and faster when you're logged in!
Recommended for you

Use the History Log to Make Photoshop Take Notes For You
Have you ever finished a complex sequence of steps in Photoshop, and later wishe...

CreativePro Tip of the Week: Making Dotted Lines in Illustrator
This CreativePro Tip of the Week on Making Dotted Lines in Illustrator was sent...

Convert Fonts to Graphics with Font Pestle
We’ve had stories about amazing scripts that can build custom fonts from a...


