
As a long-time InDesign user, I’ll admit that I’ve often envied Adobe Illustrator’s Layers panel. While InDesign users could only create and manage top-level layers, Illustrator users could really go to town in its Layers panel?viewing object stacking order and changing it, showing and hiding the groups or objects, and locking and unlocking.
In InDesign CS5, you can let go of your envy. When you create an InDesign document, you can not only create top-level layers which appear on all the pages of your document. But also, if you click the disclosure triangle beside each document layer, you can also view all objects and their stacking order on the currently active spread. Groups, buttons and the new object states have their own disclosure triangles that can be expanded to see their contained objects. (Note that this is different than the way Illustrator does it. In Illustrator CS4 and CS5, if you’ve created multiple artboards, the objects for all artboards are viewed on the Layers panel at the same time.)

Layers Panel Collapsed

Layers Panel Expanded
InDesign reminds you that you’re only viewing the objects on the current spread because it shows you the page numbers it is currently displaying at the bottom of the panel. Objects like paths, circles and rectangles are, by default, called <path>, <circle>, or <rectangle>. Text is named the first few characters within that text frame. Placed images or multimedia is given the name of the placed file. However, these can be renamed (see below). Layer colors are now indicated by a colored bar to the left of all the objects in the layer, as they are in Illustrator.
As in Illustrator, you now have two ways to select objects. You can, as you did before in InDesign, select one or more objects in the layout, and the colored squares on the Layers panel indicate which objects (and the enclosing layer) are selected. But you can also click (or Shift-click) objects in the Layers panel, and they will then be selected in the layout as well. This can be a fabulous way to select artwork in a complex layout, especially when you have objects stacked on top of other objects! In the illustration below, clicking on the square beside <beach.psd> in the Layers panel selects the indicated image in the layout.
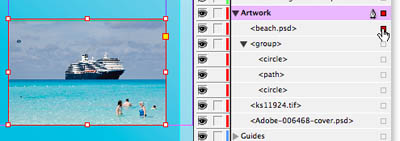
Select by Clicking Colored Square
Similarly, you can show and hide individual objects by clicking the “eyeball” icon to the left of the object name (the equivalent of choosing Object > Hide).
You can lock an object or a group by clicking in the second column to the left of the object or group name. The padlock icon indicates locked, and when you click again to clear it, the object is unlocked. In InDesign CS5, if you have a locked object, it now matches the behavior of Illustrator: A locked object cannot be edited. If you have Frame Edges showing in Normal mode, you’ll see a padlock icon on the edge of the frame (see below). You can also unlock by clicking on the frame padlock. (In previous versions of InDesign, locking a frame only locked its position on the page; you were still able to select the object and edit its contents.)

Lock from the Layers Panel
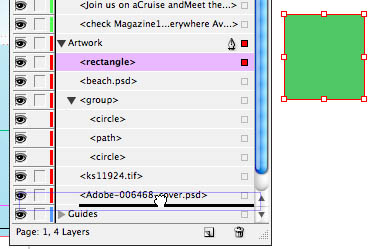
Creating a new object works the same as in previous versions of InDesign. When you create, paste, or place a new object, it appears on the target layer, the layer indicated by the pen icon on the Layers panel. By default, it appears at the top of the stacking order. In the illustration below, I’ve created a rectangle when the Artwork layer was targeted. By default, it is named <rectangle>.

Newly Created Object
To rename an object, click once on its name in the Layers panel, then pause, then click a second time. Then you’ll be able to edit the name. This is especially handy when you have several objects of the same kind, and you don’t want them all named <rectangle>.

Renaming an Object
Finally, it’s now much easier to change the stacking order in a complicated layout. Simply select the name or the colored square representing a particular object, and drag it up and down in the stacking order. (In the illustration below, I’m dragging the rectangle to the bottom of the stack in the Artwork layer.) You can even drag and drop items in and out of groups, buttons and object states!
Change Stacking Order
So, when you upgrade to InDesign CS5, be sure to try out these new more efficient ways of working on your layouts.
This article was last modified on December 20, 2021
This article was first published on September 28, 2010
Commenting is easier and faster when you're logged in!

Recommended for you

Taking Another Look at the Content Grabber
Not everyone is a fan of the content grabber, but it does have a hidden feature...

InDesign Magazine Covers Your Version, Too
I’ve been the Editor in Chief of InDesign Magazine for 26 issues (that...

CS5 bug with anchored objects on spreads
Beware of this bug that can make anchored objects fail to print or output to PDF...