


Objects in a spotlight or a setting sun throw long shadows. When you want that three-dimensional look but the available images don’t fit the bill, you can make one yourself in Photoshop.
1. Open your image and, if necessary, remove it from the background (Figure 1). To follow along using the gear image in this tutorial, download the PSD file and open it in Photoshop.

Figure 1. Remove the background, if there is one.
2. Duplicate the layer the image is on by dragging it to the new layer icon in the Layers palette (Figure 2).

Figure 2. Duplicate the layer.
3. Make sure the foreground color is set to black. Now fill the new layer by pressing Cmd+Shift+Delete. Using the shift key tells Photoshop to fill only where there are pixels; e.g., to preserve transparency.
Go to Filter > Blur > Gaussian Blur and enter 3.1 pixels in the Radius box (Figure 3).

Figure 3. Blurring the shadow will make it look more realistic.
4. Now to distort the shadow’s shape. (Note that if try this technique with text, you must render the type first.)
Press Ctrl/Cmd+T to bring up the free transform tool. Right-click on the selected object (Cmd-click if you have a one-button mouse). Select Distort from the pop-up menu.
You will see a bounding box with 8 little squares (called handles). Click and drag the top-left and top-right handles until the shadow looks similar to Figure 4. Press Enter/Return to apply the transformation.

Figure 4. My imaginary light source is coming from the right, but you can change the way the shadow falls simply by dragging the shadow’s handles.
5. Duplicate the shadow layer by dragging it to the new layer icon in the Layers palette. Apply the Gaussian Blur to the copy, this time with a larger pixel radius setting of 5.1 (Figure 5).
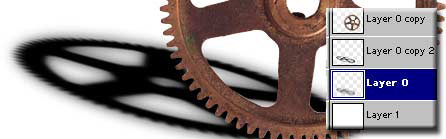
Figure 5. The shadow gets even softer.
6. You now want to make the shadow softer as it gets further away.
Go back to the top shadow layer and add a layer mask. Using the gradient tool, drag it from right to left to blend the 2 shadow layers (Figure 6).

Figure 6. Blend the shadows.
You can get more details on this part of the technique here.
7. Finally, set the shadow to Multiply mode and set the opacity of the top shadow layer to about 50% and the bottom shadow to about 30% (Figure 7).
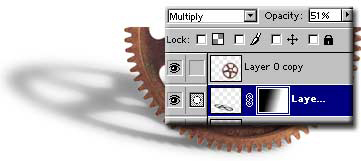
Figure 7. Now that’s a shadow to be proud of.
This article was last modified on January 3, 2023
This article was first published on March 31, 2006
Commenting is easier and faster when you're logged in!

Recommended for you

Photoshop CC 2015.5 New Features
Adobe has promised subscribers to its Creative Cloud plan that it will release m...

Creative Blöks: The Perfection Fairy
Each step you take on a creative path—whether you’re designing, drawing, or deve...

How to Open Doors in Photoshop
Opening closed doors is a useful Photoshop technique, and you can use it to open...