


Importing Files from Your Scanner
While EPS files used the Open menu to initiate the import, bringing files in from external sources requires using other menu items. In the case of scanners, a special technology known as TWAIN is used. Almost every scanner comes with a TWAIN-compliant driver for Photoshop. A TWAIN driver allows the scanner and Photoshop to speak the same language, and also puts the control over how the scanner performs in your hands.
TWAIN driver user interfaces vary between manufacturers, but you’ll always find them on the same menu. Open the File menu and choose Import. If you’re using Photoshop 6 and have scanner software installed, it will be listed here by manufacturer and model name. If you’re using Photoshop 5 or 5.5, you can access your scanner software by choosing File > Import > Twain Acquire. In figure B, the last two entries in the menu are TWAIN drivers loaded on our hard drive as they appear in Photoshop 6. You might have more than one scanner listed if you have multiple scanners installed on your system.
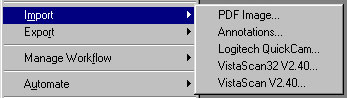
Figure B
Once launched, each scanner has different options and methods for scanning your image. Our scanner software, shown in figure C, loads within Photoshop. It gives us the ability to set the resolution and size of the scan, as well as make image adjustments before our image is imported. Most scanner software allows you to designate the area of the scanner glass you’d like scanned. It’s a good idea to only scan what you need or you’ll be waiting longer than you have to for your scan to complete.
Once you’ve made your choices, you can click Scan to import the image. Once the image is loaded into Photoshop, as with EPS files before, you can save the image to any file format you choose.
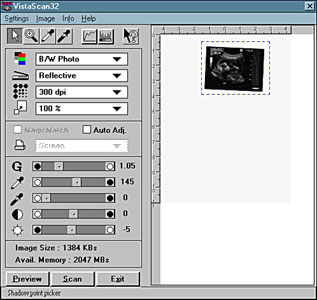
Figure C
Importing Files from a Digital Camera
Importing pictures from a digital camera isn’t much different than importing from a scanner. Digital cameras store images in their internal memory or on removable storage devices such as compact flash cards. You can import these images in two ways: with the use of an external reader or by using plug-ins to bring the infor-mation directly into Photoshop.
Using Card Readers for Importing Digital Images
Since many digital cameras use removable storage media, having a reader that can quickly transfer your images to a computer is a must-have for many digital camera enthusiasts. While fast USB and Firewire connections have made the transfer of images directly from the camera much quicker, storage capacity on many memory cards has also increased. Card readers work just like a disk drive-you simply choose Open from the File menu in Photoshop, locate your card reader and select the image or images you’d like to open. Importing your images into Photoshop using a card reader is fast and relatively foolproof.
Using Plug-ins for Importing Digital Images
Many camera manufacturers also include a plug-in that allows direct access to the digital camera using some sort of connection. This connection ranges from USB, serial, Firewire and even Infrared. A plug-in is a third-party application that’s compliant with Photoshop (or whatever program it was created to work with). These two applications run together to achieve a goal, usually to create special effects or increase productivity. In our example, the plug-in allows us to communicate with a digital camera and import files directly into Photoshop.
Plug-ins for digital cameras, similar to scan-ner TWAIN drivers, are accessed using the Import menu. In our example, we’re using a Web cam to snap some quick images. The camera is connected to the computer with a USB cable, so we could use the standalone version of the software to snap the image, save it to our hard drive, and then open it in Photoshop. However, using the plug-in offers a much more streamlined approach.
When using our Web cam plug-in, we first choose Import from the File menu and locate our camera from the dropdown list. Once launched, the camera software opens. This plug-in was made to work in Photoshop. As shown in figure D, we get a live preview from our camera, an image size picker and a snapshot button that initiates the import of the image. It couldn’t be simpler!
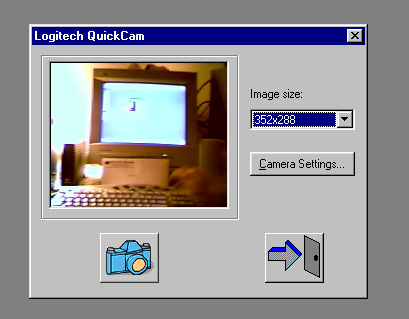
Figure D
While we don’t get all the image control options we normally get in the full-blown application, it’s no big deal; we can adjust our image in Photoshop. Plug-ins aren’t meant to replace functionality in Photoshop, but to enhance and add to the possibilities.
You may have a still digital camera that works in a similar way. Many cameras have features that allow you to control your camera from your computer and transfer the images immediately to Photoshop. This is another good example of how using plug-ins to import images can extend the functionality of this image-editing application.
Import Wrap Up
Photoshop can open almost any image file format. Those that it can’t open can usually be imported using several different methods. Whether you’re bringing in a file from your hard drive or importing images from a camera or scanner, understanding how to import images to Photoshop gives you many options for using the application to its fullest.

Creativepro.com readers can subscribe to Element K Journals at a discount. Click here to learn more.
This article was last modified on January 3, 2023
This article was first published on May 24, 2003
Commenting is easier and faster when you're logged in!

Recommended for you

Inside the Publishing Revolution: How the LaserWriter and Photoshop Changed the World
Excerpted from “Inside the Publishing Revolution: The Adobe Story” (...

Simultaneous Contrast: How Your Environment Affects Color Perception
This article originally appeared on chromaqueen.com. Republished with permission...

Managing Problems With Rotated Images in InDesign
Does anyone else have problems with poor previews of placed graphics in InDesign...