


Part 1: Selecting a photo printer.
Part 2: Color management, soft proofing, making your first print.
Part 3: Rendering intents, out-of-gamut colors, best viewing conditions.
Part 4: Driver-controlled color, custom paper profiling, third-party RIPs
So far in this series, I’ve looked at how to select a printer, how to profile a monitor and generate a soft proof, and how to correctly use Photoshop’s Print with Preview and Print dialogs. If you have the right kind of printer and are following my tips, you should be getting very good results that are a fairly close match to what you see on your screen. But if you want to squeeze every last bit of quality out of your system, there are a few more steps you can take.
Driver-controlled Color
In the printing scheme I discussed in parts 2 and 3, Photoshop calculated the color values that were sent to the printer. In the Print with Preview dialog box, I told you to choose Let Photoshop Determine Colors in the Options panel, then turn off Printer Color Management in the printer’s driver dialog box. This left Photoshop in charge of all color calculations (Figure 1).
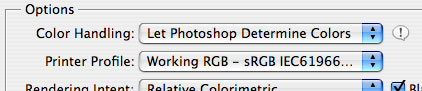
Figure 1. In previous examples, I said to configure Photoshop’s print dialog so that Photoshop controlled the color information sent to the printer.
Now I’m going to tell you about another way to print: Choose Let Printer Handle Colors from the Color Handling menu of the Print with Preview dialog box. Leave Color Management turned on in your printer’s driver dialog and all color calculations will be performed by your printer. It’s helpful to try this alternate method because you may find that for some images, your printer’s included driver yields better results than Photoshop-managed color.
If I had suggested such a notion a few years ago, angry mobs of color geeks and printing nerds would have pelted me with empty ink cartridges. But nowadays, many printer vendors are engineering very good drivers that can outperform Photoshop’s built-in color handling.
This is especially true for black and white output on some printers. Epson printers that use the K3 ink system, for example, yield substantially better black and white output if you use the driver’s built-in Advanced Black and White mode, rather than letting Photoshop determine colors.
With color images, when you let the printer driver control color, you might notice improvements in everything from overall cast, highlight or shadow detail, certain color ranges, and even continuous tone.
Now the bad news: These changes may not be consistent from image to image. In other words, you might find that some images print better with Photoshop-controlled color, while others print better with printer driver-controlled color.
So does this mean you need to use even more ink and paper by printing every image using both methods? Probably not. You’ll need to experiment a little, but what you’ll likely find is that the differences between Photoshop and printer generated color are very slight, and that you can easily alter one to look like the other. With a little initial trial and error, you might also come to understand which types of images work better with one method than another.
One downside to printer-controlled color is that your soft proofs may not be as accurate. Also, the success of the method depends on the printer you have. Some printers still ship with lousy drivers that can’t hold a candle to Photoshop’s color. If you’re working with a higher end photo printer, though, the printer driver is probably high-quality.
Custom Paper Profiling
In part 3, I discussed how soft proofing and overall output quality (when using Photoshop-managed color) relies on high-quality profiles. If you don’t have an accurate monitor profile, your soft proofs won’t be accurate. Similarly, if you don’t have good paper profiles, your soft proofing will not only be inaccurate, but your printer might output wildly incorrect colors.
When you installed your printer software, a collection of profiles should have been installed for each paper type your printer company sells. There may even be several profiles for each paper: Some profiles are for specific viewing conditions (daylight, tungsten, etc.) or printer settings.
Unfortunately, not all vendor-supplied printer profiles are reliable. One reason is that some printers are easier to control with profiles. For example, some higher end printers include sensors that carefully monitor ink flow through the print head to better determine exactly how much ink is being delivered to the paper. Some printers are carefully calibrated as soon as they leave the assembly line. On the flip side, less-expensive printers often vary significantly from one unit to the next, meaning a generic, vendor-supplied profile may be of little use.
When you use a paper sold by someone other than the company that makes your printer, you’ll need to make or find a profile for it. Many third-party vendors provide free profiles for download. Crane has an extensive profile collection, as does Hahnemühle. Bill Atkinson’s high-quality profiles are also available as free downloads.
If you’re not getting good output with vendor-supplied profiles, or if you’re using a paper you can’t find a profile for, it’s time for a custom job. Several services, such as Inkjetart.com, make custom profiles for around $25. Simply download the supplied profile target, print it out on your printer, and mail it back. The company then sends you a standard color profile. When printing the target, be sure to set your printer settings to the ones you typically use, and turn off the printer’s built-in correction.
While $25 is cheap, you may find that as you change ink cartridges, your profile becomes less accurate. Continually re-generating a profile can become expensive. If you regularly create paper profiles, you may want to invest in your own profiling hardware.
Making Your Own Profiles
A paper-profiling system consists of a hardware/software combination that measures a sample output by your printer and generates a profile. To create a profile, you first print test target images, which are color swatches that come with the paper profiling system. Then you measure these targets with the included hardware.
I profiled several printers with the X-Rite Pulse ColorElite system.The Pulse system has many nice features, such as a plastic guide that keeps the system’s scanner from scratching and smearing test targets.
The Pulse system can scan in either direction, and the guide makes it easy to move the scanner at a consistent speed, ensuring successful scans. One of the Pulse system’s best features is that the scanning device is portable: Charge it off of your computer’s USB port and use it anywhere (Figure 2). The device stores its data for later downloading to the computer.
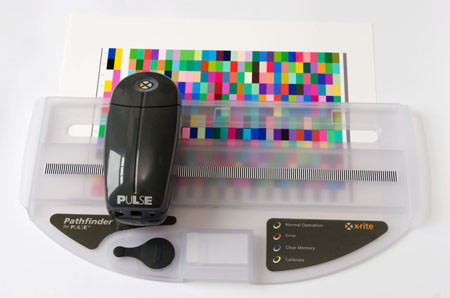
Figure 2. The X-Rite Pulse ColorElite system uses a battery-operated scanning device, which lets you scan profiles without being tethered to your computer.
Once you’ve measured your target output, creating a profile is a simple matter of plugging in the device and letting the included software generate and install a standard profile. The ColorElite produces very nice profiles very quickly — total time from scanning to installation is usually under five minutes.
When I profiled an Epson R2400 printer with the X-Rite system, I saw slight improvements in color, but not a huge change in contrast. This is because the R2400 printer profiles on Epson’s Web site are very good.
Profiling an Epson RX700 yielded far more dramatic results. Color and detail were better, and grayscale output was much improved over the green color cast I saw with the printer’s included profile.
While not accurate in terms of absolute color, the scans in Figure 3 demonstrate the relative improvement produced by a custom profile.
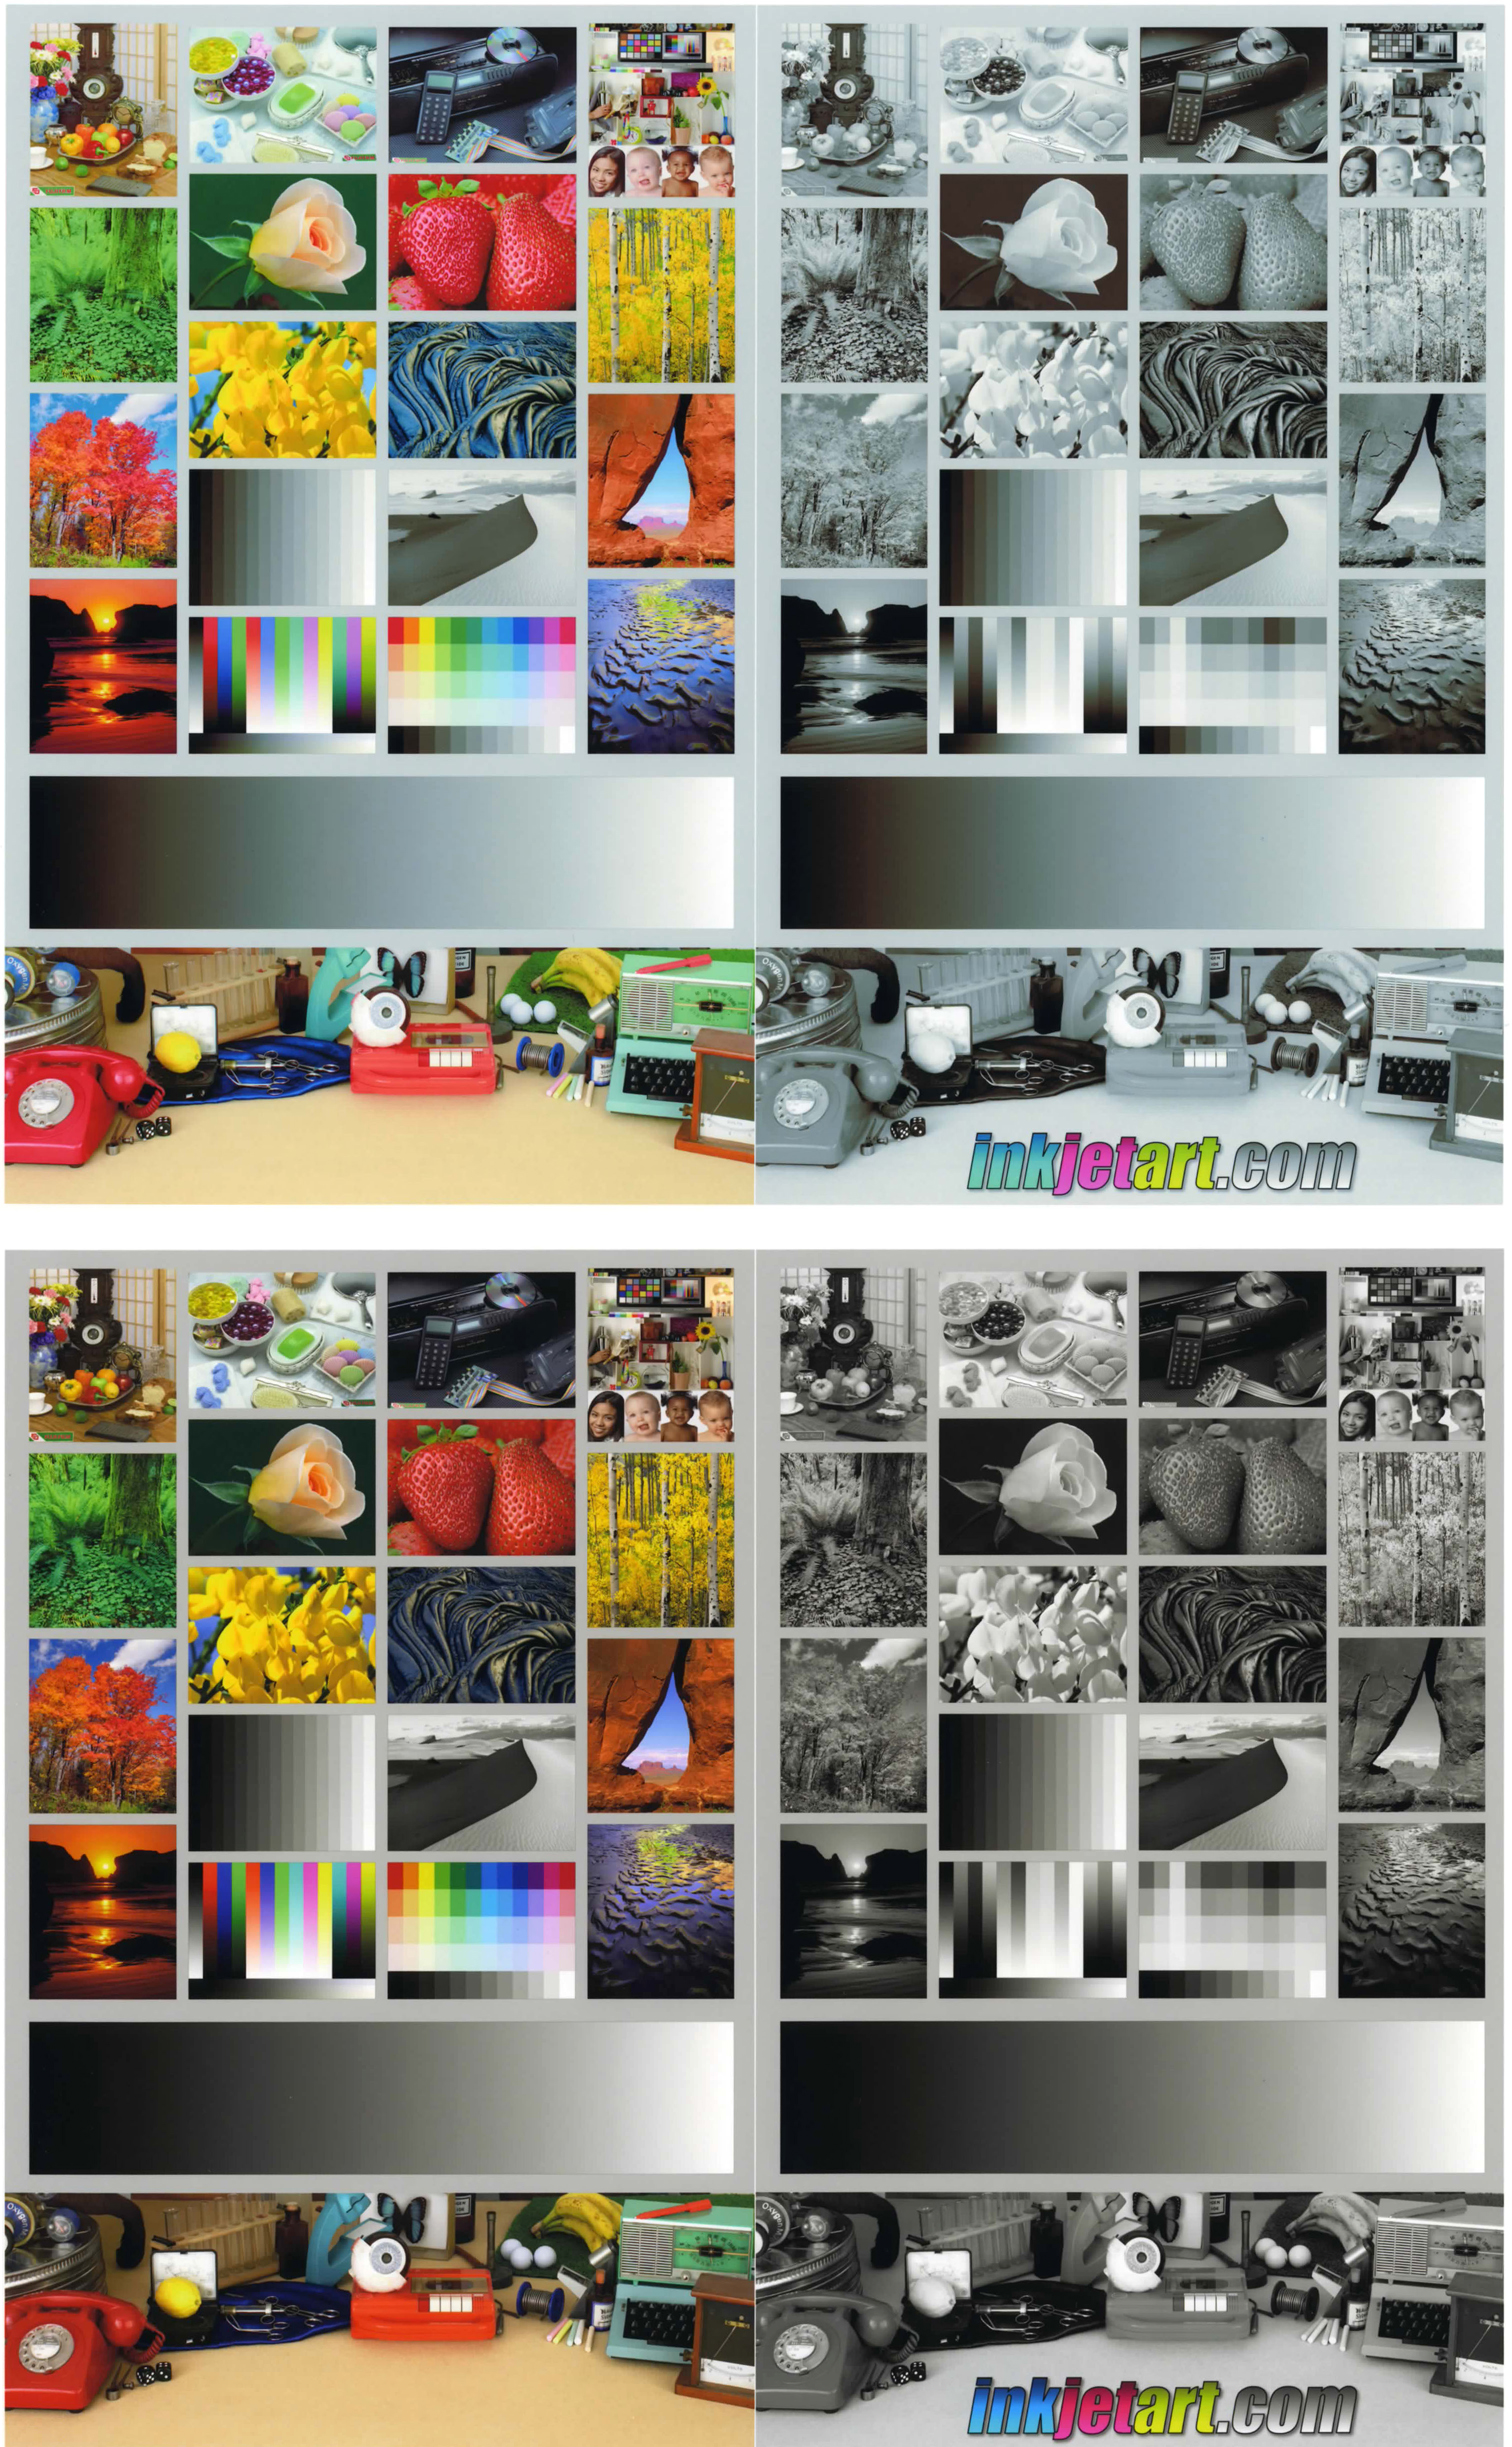
Figure 3. Compare a sample of output from an Epson RX700 using Epson’s included profile (top) to the same file output on the same printer using a profile made by the X-Rite Pulse ColorElite (bottom). Click image to see full-size versions
Paper profilers are not cheap. The Pulse ColorElite system starts at $1,095 and goes up from there, depending on hardware and software options. Obviously, spending $1,000 to build a profile for a $500 printer doesn’t make sense, unless you have a lot of those $500 printers. If you regularly use papers for which you don’t have a profile, or if you find that your printer’s output changes a lot when you change ink cartridges or print heads, then a profiler will be worth the money, and more cost effective in the long run than mail-order profiles.
What’s more, systems like the ColorElite include software that let you customize profiles, and average multiple scans to produce more accurate profiles. If you understand how to work with these systems, you can get better results than what you’ll get from a mail-order profile.
Third-Party RIPs
There are different ways to mix primary ink colors together to produce an image. That’s why there can be output differences between Photoshop and your printer driver. There’s a third option: use a third-party RIP, or raster image processor, to determine which colors are sent to the printer.
ColorByte Software’s ImagePrint RIP has a solid reputation for producing photo output that’s superior to native printer drivers or Photoshop. ImagePrint ships in separate versions for different printers, and pricing varies greatly depending on the printer model you’re using. The cheapest version of ImagePrint (which is only for the Epson 2100/2200/2400 and the HP 30 and 90) is $495. The full version (which allows printing from within another app) is $895. Pricing for other printers goes up from there, with large format Epsons and Rolands being the most expensive, at $2,495. I tested the $495 version with an Epson R2400 printer.
Using the program is straightforward: Drop your images onto ImagePrint’s page layout window, arrange them as desired, configure the print controls, and print. ImagePrint completely replaces your native printer driver, so you’ll never see the standard print dialog or page-setup boxes. Rudimentary layout controls center and align images, letting you easily gang print, something that’s more difficult in Photoshop.
One of the most impressive things about ImagePrint is its huge array of custom profiles. For the 2400, I got profiles for all of Epson’s papers, with separate profiles for different viewing conditions, and separate profiles for grayscale printing. There were also profiles for a range of the most popular third-party papers.
ImagePrint is more than just a collection of good profiles. The RIP software itself mixes colors very differently than Photoshop or your printer driver. Because of this, the output from some printers shows less metamerism (color shifts that occur when you view the print under different types of light) and may even last longer.
The ultimate measure of the program, though, is its output. To test ImagePrint’s results, I printed a series of images — color charts, test patterns, and color and grayscale photos — using ImagePrint, Photoshop-generated color, and driver-generated color. I then showed these images to a jury of professional photographers, photography teachers, and imaging experts and asked them to pick the best prints. The jury did not know which methods I used to produce any of the prints.
There was little agreement among the jury members, and the final results didn’t reveal any overall preference for one print method. All judges agreed that the differences in image quality between the three methods were so small that if they weren’t seeing the images side-by-side, they probably wouldn’t notice a difference. The judges also agreed that you could probably achieve the same results with all three methods after a little tweaking.
The one trait that ImagePrint consistently showed was darker blacks and, therefore, slightly higher contrast than the other methods. At times, this worked in ImagePrint’s favor, but at other times it made ImagePrint-produced images the weakest of the bunch. ImagePrint usually yielded better grayscale results than did Photoshop, but consistently lost out to the Advanced Black and White mode built-in to Epson’s K3 driver.
ImagePrint did not produce bad prints by any stretch of the imagination, but they certainly weren’t noticeably better than any other printing method I tested. Other drawbacks: Printing from ImagePrint requires a more complex workflow, and the program’s copy-protection dongle uses up a USB port.
Perhaps the software yields significantly improved results on other printers, especially those like the Epson 2200, which has bad metamerism problems. ImagePrint has a reputation for excellent grayscale results, and this advantage might be more pronounced on a printer without the Epson 2400’s multiple black inks and a high-quality black and white driver. I do know that if you’re printing from an Epson K3-series printer, you won’t see a tremendous improvement with ImagePrint.
Practice, Practice, Practice
If all of this is confusing, bear in mind that as you work with your printer, you’ll become more accustomed to its quirks and capabilities. More experience with your printer will make you a more capable printer operator. Over time, you can more easily get high-quality, predictable results from your output device.
This article was last modified on December 14, 2022
This article was first published on September 1, 2006
Commenting is easier and faster when you're logged in!

Recommended for you

Using Photoshop Templates
Do you suffer from Blank Page Syndrome like I do? Instead of staring at the void...

Bringing Out Shape and Detail in the Darkest of Colors
Light Hogs “Is there detail in the blacks?” If you ever asked this question when...

Illustrator CC 2018 New Features
Adobe Illustrator CC 2018 brings several exciting enhancements, including Variab...