


Remember the early days of desktop publishing, when graphic design novices suddenly found themselves (either by choice or assignment) taking on layout and design jobs? Digital technology is having a similar effect on photography.
Because of the low cost and extreme convenience of digital photography, many people are being cast in the role of photographer when it comes time to update the company Web site or newsletter, or take some simple product shots. Granted, in an ideal world, these jobs should be going to a professional photographer. But in many cases it’s not a question of “Should we have a professional photographer shoot this? Or Bob in marketing?” It’s a question of “Should we have Bob in marketing take a picture of this? Or just go without?” With digital photography so convenient and inexpensive, many people are choosing to use photos where they wouldn’t have before.
Outside the workplace, people with no previous photography experience are picking up digital cameras and finding them very compelling. Browse through any of the popular photoblogging sites on the Net, and you’ll find lots of entries from people who comment “I’d never really taken any pictures before I got my digital camera,” and now they’re posting photos– in some cases, extremely good photos.
Because of the automatic features and ease-of-use of the modern digital camera (and point-and-shoot film camera) it’s easy to pick up a digital camera and take decent pictures without having to learn some of the important, basic concepts that older technology forced beginning photographers to learn. I answer a lot of questions about digital photography, and I’m frequently surprised to find that people who are taking very good digital photos often have some very conspicuous gaps in their basic photographic knowledge. Similarly, I also encounter a lot of people who are being asked to assume a photographic mantle at work, even though they have little more than snapshot experience.
Over the next two installments of this column, we’re going to look at some of the basic photographic concepts and principles that experienced film photographers take for granted, but that the digital photographer, might never have learned. These principles should help you get better results from your camera, and perhaps help you better understand the creative possibilities at your disposal.
Choosing a Focal Length
These days, almost all digital cameras come with zoom lenses. We’re talking about actual optical zoom lenses, not digital zoom features. The great thing about a zoom lens is that, for small cameras with fixed lenses, a zoom gives you a choice of focal lengths, while for cameras with interchangeable lenses, they enable you to carry less gear.
Inexperienced photographers, though, don’t necessarily know that a zoom lens is not just a way to get closer to a distant subject. (Even experienced photographers can become lazy and choose to zoom when they should move themselves instead.) In addition to allowing you to gain a telephoto view of a distant object, your zoom lens provides you with a rather profound control of the sense of space in your scene. Zooming can also — intentionally or not — create some rather weird distortions of your subject.
The basics: Shorter focal lengths yield a wider field of view (see Figure 1) while longer focal lengths (“telephoto”) yield a narrower field of view (see Figure 2).
 Figure 1: Focal length: 22mm
Figure 2: Focal length: 400mm
Your eye sees roughly a 55-60-degree field of view, so lenses that are shorter than 50mm are considered wide-angle, while lenses that are longer than 50mm are considered telephoto. (These lengths are in 35mm equivalency. If you’re not clear on this concept, see part three of my opus on buying a digital camera.)
But when you zoom, there’s a lot more going on than just a change of field of view and magnification.
As focal length increases, so does depth compression. In other words, longer lenses compress the sense of depth in your image, causing the apparent distance between your foreground and background to shrink.
Consider the pair of images in Figure 3. Both of these images were framed the same way. In Figure 3a, we zoomed out to a wide angle (short focal length) and stood close to our subject. For Figure 3b, we moved further away, but zoomed in (long focal length).
 Figure 3a
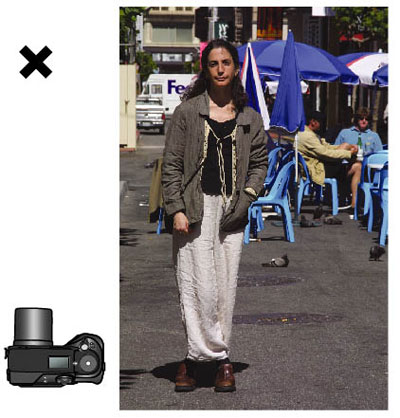
Figure 3b
In both cases, our subject is framed identically, but the backgrounds of the images are very different. In the wide-angle shot, the café tables appear to be much farther away than in the telephoto shot, and our subject is actually obscuring some background details, such as the FedEx truck on the next block. In the telephoto image, the tables seem closer, and the entire block appears shorter and more intimate.
As this example demonstrates, your choice of focal length can have a profound impact on the sense of space in your scene. So, though it may be more convenient to say “I want to take a picture of that thing over there, I’ll just zoom in to it” you might want to consider whether a very telephoto focal length will yield an atmosphere that’s appropriate to the venue or to the feeling you’re trying to evoke.
Obviously, if a telephoto lens compresses depth, a wider-angle lens stretches depth. When we speak of changes in depth, we mean all depth, not just big foreground/background changes. This is important to remember when shooting portraits.
Figure 4 shows another two images that are framed the same, but shot with different focal lengths.
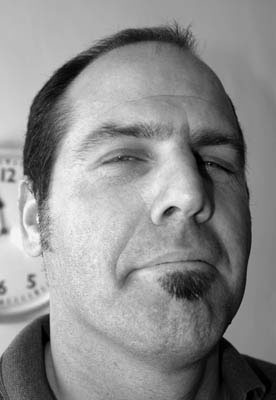 Figure 4a
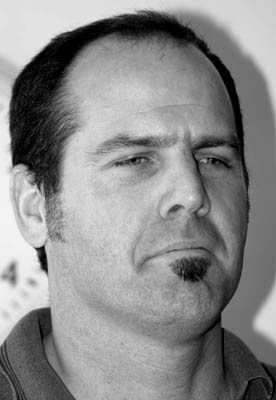
Figure 4b
If you’ve ever seen a picture of yourself and thought “that really doesn’t look like me” one reason might be that the photographer used a lens that was too short. In Figure 4b, notice that, just as in our street scene, the sense of depth is greatly reduced, while in Figure 4a, the sense of depth has been stretched so that the man’s ears appear much farther back, his nose seems longer, his eyes spaced different. (In addition, in Figure 4b, notice that the telephoto scene has brought the clock much closer.)
Portrait photographers typically use a slightly telephoto lens, so to achieve the same sort of effect, you’ll want to stand a little farther away from your subject and zoom in.
Of course, there are times when you might want to use this distortion to your advantage. For example, the wide-angle shot in Figure 3 might be more evocative of the subject’s true character than the telephoto shot.
Or, maybe you’re shooting an image that is supposed to be slightly whimsical. Next time you watch a comedy at the movies, pay attention to how often wide angle lenses are used. Similarly, note that people in whimsical print ads are usually distorted in the wide-angle way shown above.
To sum up: Your zoom lens is not just a convenience to help you take pictures of things that are far away. The ability to zoom in does not come “for free.” As you zoom in and out, the composition of your image changes drastically, so you need to think about camera position and focal length very carefully when setting up your shot.
Striving for Adequacy
Most people assume that the automatic light meter in their camera calculates the best possible exposure for a scene, and in most cases this is true. However, there are times when your light meter will merely do an adequate job. Understanding some light meter fundamentals will help.
The goal of a light meter is to calculate a shutter speed and aperture value (and, in some digital cameras, an ISO speed) that will yield a good image. Light meters vary in their approach to solving this problem. Simple systems take basic luminance measurements, while high-end meters measure brightness from many parts of the image, and compare this information to a database of correctly exposed images to come up with a proper exposure.
In general, though, you should remember the following two things about your light meter: It knows nothing about color, and it assumes that you’re pointing it at a scene that is 18% gray.
If that last item seems a little arbitrary, you’re just going to have to take it on faith. The fact is: Most scenes reflect about 18% of the light that strikes them, meaning that if the camera assumes it’s looking at a scene that’s 18% gray, and calculates an exposure accordingly, then that exposure is probably going to be valid for your particular scene.
Since most scenes truly are 18% gray, then your meter’s assumption is usually valid. However, if you’re standing in a field of snow, taking a picture of an albino in a white parka who’s listening to an iPod, then your light meter’s fundamental assumption is going to be wrong. The result will be an image of an ashen figure wearing a dirty parka while listening to an unidentifiable MP3 player, because the light meter will have correctly calculated a reading that renders the scene as gray.
Similarly, if you’re shooting a Johnny Cash impersonator standing on a lava flow holding a bowling ball, then following your light meter’s suggestion is going to result in the tones in your image being rendered as gray rather than black.
For these instances, you’ll need to out-think your light meter and over- or under-expose to render tones correctly. Over-expose to render white objects white, under-expose to darken black objects (see Figure 5). The easiest way to do this is with your camera’s exposure compensation controls, though you can also use any manual exposure modes that your camera might have.


Figure 5: Though our meter’s recommendation yielded a good result (top), by under-exposing, we can return the statue to its truer, blacker tone (bottom).
Colors also have a luminance value. A deep red color, for example, might have a luminance value that is darker than 18% gray and so will be rendered more accurately and more richly with an underexposure.
One of the great advantages of digital over film is expense (or lack thereof). If you’re not sure whether you need to over- or under-expose, then bracket your shots. Shoot one at the meter’s recommendation, then some additional frames over- and under. Many cameras offer auto-bracketing features that , when combined with the camera’s burst or drive mode, will automatically shoot a series of bracketed shots. Later, you can examine the images to decide which yields the most accurate exposure for your subject.
Nothing New
The concerns presented here are nothing that photographers haven’t always faced. However, with a digital camera, it’s easy to shoot pictures without learning these concepts ahead of time. Hopefully, understanding these concerns a little better will help you to shoot better pictures.
This article was last modified on December 14, 2022
This article was first published on October 26, 2004
Commenting is easier and faster when you're logged in!

Recommended for you

DesignMentor Training Teaches Creatives to Shoot, Color Correct and Edit with Camera RAW through Digital Photography Portfolio-B
DesignMentor Training offers Creative Professionals the means to add advanced di...

Panasonic Lumix G7 First Impressions
There are many competitive options in the marketplace when it comes to buying a...

Photography Camera Aperture Explained
Aperture is part of what photographers refer to as the Exposure Triangle, along...