
Frame Fitting Options
Learn how to speed up your workflow by framing images like a pro in InDesign.


This article appears in Issue 118 of InDesign Magazine.
It’s a rare image that arrives on your InDesign page at exactly the right size. Instead, the vast majority of images require scaling. So manipulating the way images fit within their frames is a crucial skill for even the simplest of InDesign projects. Here, we’ll take a look at the wide array of frame-fitting options that can streamline your workflow and help you get the perfect fit every time.
Basic Fitting Presets
When we talk about fitting an image in InDesign, we’re referring to how we choose to size and position it within a frame. Because InDesign treats each image and its corresponding frame as two separate and unique items, we have an incredible amount of flexibility to achieve our desired fit.
By default, when you place an image into a premade InDesign frame, InDesign imports it at 100%—which means a typical, unedited image from any modern camera will likely be astronomically huge compared to its frame (Figure 1). If you place an image by dragging the Place cursor, InDesign automatically creates a new frame and scales the image inside it. However, if you resize the frame, the image inside becomes cropped, and often requires further repositioning or resizing.

Figure 1. InDesign places an unformatted, high-resolution image at 100% of its size by default. Here, in a frame that fills an 8.5″ × 11″ page, the image appears unrecognizable and its bounding box is so large, the document has to be viewed at 13% just to see it.
Even preformatted images will likely require some adjustment, which, although easy to do, quickly becomes a tedious chore. To speed up the process, you can change InDesign’s default scaling settings, or use image-fitting “presets.” We’ll
learn how to change fitting defaults later in this article, so for right now, let’s explore the different quick-fix fitting presets that InDesign offers.
To use InDesign’s six fitting presets (Figure 2), make sure either the frame or content is selected (using the Selection tool (V) or Direct Selection tool (A), respectively).

Figure 2. InDesign’s fitting presets can be found, among other places, in the Properties panel.
Then look to the Frame Fitting section of the Control panel or the Properties panel (Window > Properties). You can also find these features on the Object > Fitting menu. With the item still selected, click the desired preset to apply it. Here’s a rundown of what each preset does:
Fill Frame Proportionally: Fills the frame without distorting image proportions. If the frame and the content have different proportions, any parts of the image beyond the bounding box will essentially be cropped (masked) (Figure 3). This is probably the most commonly used fitting preset.

Figure 3
Fit Content Proportionally: Proportionally resizes the image to fit entirely within the frame. If the frame and the content have different proportions, any unused area within the frame will appear empty (Figure 4).

Figure 4
Fit Content to Frame: Resizes the image to fit the frame—without maintaining proportions. If the frame and image have different proportions, the image will appear distorted (Figure 5). It’s pretty rare that you’d want to use this.

Figure 5
Fit Frame to Content: This one doesn’t change the image size or position at all. Instead, it adjusts the frame to fit the image (Figure 6).
Figure 6
Center Content: Centers content within the frame without resizing either (Figure 7).

Figure 7
Content-Aware Fit (new in CC 2019): Intelligently applies “Adobe Sensei” AI technology to scale and position the image inside the frame for the best composition (Figure 8; also see “The Content-Aware Monkey”).
The Content-Aware Monkey
 I like to think of InDesign’s relatively new Content-Aware Fit feature as a “monkey” because it can clearly make image-fitting decisions better than the other “robotic” presets, but it’s certainly not as good as a human. With some kinds of images (especially those that include people and animals), it can fit them inside a frame with surprising accuracy. At other times, the results are surprisingly odd. That said, as long as you accept that you’re probably going to do a little extra tweaking, it’s often helpful to start with Content-Aware Fit. Note that the Content-Aware Fit function is not currently available on Windows 32-bit.

Figure 8
Customizing and Fine Tuning
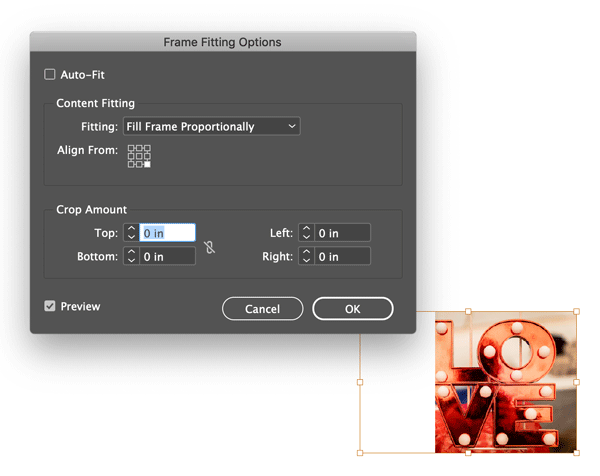
Preset fitting options are great, but they’re even better when you can customize how they operate. You’ll find three options for fine-tuning your frame fitting in the Frame Fitting Options dialog box (accessible by clicking the Options button in the Properties panel or by choosing Object > Fitting > Frame Fitting Options). Here’s a rundown of how they work.
Auto-Fit
Normally, when you resize a frame, the image doesn’t follow suit. You can make both the frame and the image scale together by holding Command/Ctrl+Shift while you drag the frame’s corner or side handle, but this has two problems: first, you have to remember the modifier keys; and second, you’re limited to scaling both (the frame and the image) proportionally. Proportional scaling is great, but there are times when you may want to change the proportions of the frame without having to manually readjust the image within it.
That’s where Auto-Fit comes in. With Auto-Fit enabled, you can change the size or proportions of the frame, and the content will magically adjust, maintaining (or closely approximating) any cropping or scaling you’ve already applied (Figure 9).

Figure 9. The Auto-Fit feature allows you to change the size and shape of the frame while maintaining previously applied fit settings. It saves you from having to reapply fit settings yourself, but depending on your situation, you may need to adjust the final composition slightly.
Essentially, it’s continuously reapplying your previously established fitting options, without your having to hold down any special modifier keys. If at some point you want to change the position or scale of the image within the frame, you can easily work around Auto-Fit by using the Direct Selection tool (A).
In addition to appearing in the Frame Fitting Options dialog box, the Auto-Fit feature provides a checkbox in the Control panel along the top of your screen, making it easy to tick on and off as desired.
Setting a Reference Point
When sizing and positioning images within a frame, you may appreciate the ability to set a reference point for controlling from where the image is aligned. By default, InDesign aligns the center of the image with the center of the frame. And while aligning to the center may be common and quite handy (even if only as a starting point), InDesign provides a number of alternatives for those particular instances where you prefer a different option.
Like Auto-Fit, reference points are also found in the Frame Fitting Options dialog box. There you’ll find a small 3 × 3 grid, representing nine available reference points for the image to align from. For example, selecting the top left point tells InDesign to align the top left of the image with the top left of the frame, whereas selecting the bottom right point will align the image’s bottom right corner with the bottom right corner of the frame (Figures 10A and 10B).

Figures 10A and 10B. The reference point tells InDesign from where to align the image. Here you can see the difference between a top left and a bottom right reference point.
Crop Amount
It’s not hard to manually crop images—you just change the frame size separately from the image; or you can select the image inside a frame (with the Direct Selection tool or by double-clicking the image with the Selection tool) and move it. But there are instances where it’d be helpful to quantify and automate the process of cropping, like when you place large numbers of images with white borders around them, or if you’re working with vast numbers of scanned images, printed with the date stamped on the front. The Crop Amount fields, found within the Frame Fitting Options dialog box, make consistent cropping painless.
A positive Crop Amount value will enlarge the image beyond the frame (Figure 11), while a negative value will shrink it, resulting in empty space.

Figure 11. A 5 × 5 image placed in a 5 × 5 frame with a .25-inch crop setting applied on all sides and the Fill Frame Proportionally option selected. The crop value is applied to the image’s actual size—not the size of the frame.
Note that these values relate to the inherent image size, not to the size it appears within InDesign. (That is, they refer to the image as though it were placed at 100% scale. This means it’s often difficult to predict the cropping precisely, as it’s based on the image resolution and scaling.)
To avoid distorting your image, make sure Fit Content Proportionally or Fill Frame Proportionally is selected in the Content Fitting drop-down menu. The one you choose will depend on the proportions of your image vs. the frame and the desired crop you’re after, so when in doubt, make sure the Preview option is turned on so you can see the effect of your settings.
Make Your Life Easier
Presets and frame fitting options make fitting images in InDesign quick and easy. But as soon as you start working with multiple images, repetitively adjusting each one becomes a headache—fast. Here are a couple ways to automate the process and save yourself a ton of time.
Setting Defaults
As we’ve seen, InDesign defaults to placing images at 100% of their size, which often requires additional adjustment. Thankfully, you can select your own default settings to avoid having to make repetitive changes every time you place an image.
When changing settings, don’t forget that doing so with no documents open affects all new documents. Changing settings with a document open, but no objects selected on your page, affects that particular document only. And making changes with an object selected affects that object only.
To change frame fitting defaults, choose Object > Fitting > Fitting Options, and select your desired settings. Before Content-Aware Fit was available, my personal go-to fitting default was always Fill Frame Proportionally. These days, you may want to choose Content-Aware Fit as your default, but you won’t find it here. Instead, go to InDesign’s General Preferences (Command/Ctrl+K) and click to put a check next to Make Content-Aware Fit The Default Fitting Option (Figure 12).

Figure 12. Contrary to what you might think, the option for making Content-Aware Fit the default fit setting isn’t found alongside the rest of the fitting options. It’s in InDesign’s General Preferences panel.
Object Styles
One of the best ways to save time and have InDesign do the heavy lifting is to make use of object styles. Object styles give you the ability to create different sets of fit options that can be applied effortlessly to multiple images and globally edited by changing the settings only once. And as you might expect, you can create as many object styles as you want to suit different needs.
To edit the existing default object style for graphic frames, make sure nothing in your document is selected (or no documents are open if you want to affect the style for all future documents too) and open the Object Styles panel (Window > Styles > Object Styles). Double-click the Basic Graphics Frame style (the default style applied to all graphics frames), and then in the Object Style Options dialog box, click to put a check next to Frame Fitting Options (found within the list of Basic Attributes on the left). Choose your desired settings, and click OK.
In some cases, you may want to leave the existing Basic Graphics Frame style alone and instead create a separate style to serve as your preferred default. You can designate any style you create as the default graphic style by dragging the frame icon to the desired style (Figure 13).

Figure 13. To change the default style applied to graphics frames, click and drag the frame icon from the Basic Graphics Frame style to your preferred default.
Default object styles are especially useful when creating template documents to make the end user’s life easier, ensuring specified fit settings for any new graphics frames added to the document.
Speaking of graphics frames, it’s important to note that although object styles can be manually applied to any image frame, only frames created with tools like the Rectangle tool (M), Ellipse tool (L), Polygon tool, or Pen tool (P) (frames without an X through them) can have a style applied by default. Thus, to apply the default style automatically, be sure to create the frames using one of the shape tools rather than one of the frame tools.
Frame Fitting Made Easy
One of the reasons that InDesign is at the top of the heap, design-wise, is its attention to the details of how designers really work, and what challenges they face every day (when the job isn’t as glamorous as it looks in the advertisements). The wide and flexible variety of options for easily and efficiently achieving foolproof framing for all your graphics needs clearly reflects that ethic.
Commenting is easier and faster when you're logged in!

Recommended for you

New Contest! The Case of the Jaggy Image
Solve this InDesign mystery for a chance at winning a great prize.
Tip of the Week: Pasting Photoshop Vector Paths into InDesign
There are three new Links panel icons in InDesign CC that you'll see when workin...
Tip of the Week: Customizing the Links Panel
How to apply colors via the keyboard by navigating swatches in InDesign.