Formatting in InDesign Index Entries
How do you style a particular kind of index entry, like making plant species italic when the other entries are non-italic

[This article was written and contributed by Patricia Neyman, based on a book she created for the Nevada Native Plant Society. She wrote, “InDesign Secrets articles and discussions have been an invaluable resource for me!” and she tells us that she wants to “give back” to the community by providing this answer to a puzzle that had eluded her, hoping that her solution might help someone else in the future. –DB]
Different paragraph styles can be applied to different levels of an Index, but (as of this writing) there is no provision for formatting within a level. For example, my document lists many plant species:

I need to index these species both by common name and latin name, and the latin names need to be listed in italic in the index.
One option is to manually apply formatting after you generate the index, but if you ever have to re-generate the index, the formatting will have to be done all over again. The option I describe below is a workaround, accomplished by marking the index entries manually (in this case, with periods before and after the entry) and then adding two GREP styles within the Style set up for the Index (one to make the text italic, and one to make those periods disappear).
To see a clear demonstration of just how to add a GREP style to a Style, I recommend this video by Anne-Marie Concepcion and David Blatner (although it does not deal with an index but rather a paragraph style applied to text). One very useful feature of this video is it that it demonstrates a method to preview the effects of your GREP expressions as you build them. You can do this with an index, too, by setting up a dummy text and index, and using this procedure (that’s what I’ve done in the images below). Then you can import the final style back into your working document.
In the video they employ and talk about GREP codes which may seem daunting, but they instantly seem a lot simpler if you read Michael Murphy’s PDF called GREP in InDesign 3 (which is still applicable to users of any version). He does a super job of explaining the different types of symbols and what they do, complete with formulas in multicolors with simple yet detailed explanation of just what each element in the formula does; a well as how to think about text so that you can come up with a formula that will accommodate variation.
However, ultimately, I could not find any reference on the internet describing exact procedure nor the exact code I needed get italics into the index.
So here is a step by step description of how to get italics into an index. Although it looks complex at first, it really isn’t that difficult to do. What is difficult and time-consuming is to find all this info in one place. I hope this can help others avoid the considerable time it cost me to get to this point.
Assume that a style called Index Level 1 has been set up for the Index. (If you’re working with a book that you are synchronizing, be sure these changes and additions for the Index go into the Master document, not just the one where the index is located. I had trouble with styles I made reverting to old versions when I synchronized.)
- Create two new character styles (use the regular InDesign Character Style panel):
- A character style named Index L1 Italics: will be the same as your Index Level 1 Style except set for italics. (For purposes of testing I often set character color to red, because it’s easy to spot on the page.)
- A character style named Index L1 Hide Periods, which has a character color of none, and a size of 0.1 points.
- Now you will nest these two character styles under the Index Level 1 Style as GREP styles. To start, right-click in the Paragraph Styles panel on Index Level 1 Style and choose Edit Index Level 1.
- Select GREP Style from the list at left, and click New GREP Style button near bottom of window.
- Select Index L1 Italics from the Apply Style pop-up menu.
- Click to the right of where it says ‘To Text’. Type or paste in this formula:
(?<=\.)(.+)(.+)(?=\.) - Click New GREP Style again, and in Apply Style, select Index L1 Hide Periods
- In the To Text area, enter this formula
\.+

- Since these nested styles are now part of the Index Level 1 Style the marked text will be automatically changed whenever the index is generated. Now we just need to set up the proper marking for the index entries:
- Before starting, note if you have already marked (as index topics) the items you want to be italicized in the index, you will have to remove them as topics (using the Index Panel menu) before you follow these directions. Otherwise you will end up with duplicate entries. Also, when you perform the steps below be sure you have Reference selected at the top of the Index Panel, not Topic.
- Select an item you want indexed (in this case, a plant species).
- Press Cmd/Ctrl-7, which bringing up the New Page Reference dialogue box. The text you have highlighted appears on left at top of the Topic Levels column.
- Copy that text in the Topic Levels column and paste it on the right in the Sort By column (otherwise the initial period you are about to put in will mess up the sorting order).
- Go back to the Topic Levels column and manually insert a period before and after the entry.
- Press Enter to record the new index entry. You should now see the item and periods in the Index panel.
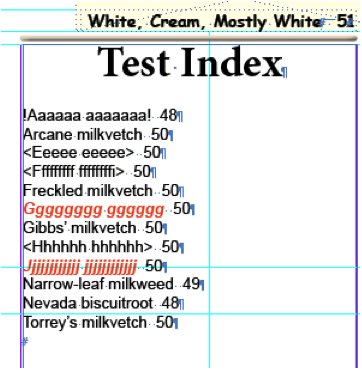
- Generate index. The items you just marked with periods should now be italicized in the newly generated Index. The periods should not appear because of the “hidden” character style that is being applied to them.

Making All-Caps Revert to Normal Text in the Index
Though all-caps is looked down on by many people, it does have its uses. We used it for the common names of plants in our publication (see above) in order to avoid the controversy over whether common names should be capitalized, and if so should all the words be capitalized, etc.
In my index-formatting adventures I discovered first that the appearance of an Index is determined only partly by the Styles you have set up for the different levels of the Index. It can be affected by how you have typed the items in your text. The all-caps look in the above text was first achieved by typing all the names in capitals using the caps-lock.
When it came to doing the index we discovered that capitals which have been typed using the Caps lock will persist in the Index regardless of your Index Styles. If you have typed any words in all Caps this way you will have to retype them, and then change the character or paragraph style applied to them to make All Caps part of it. You will then see all-caps in the text but not in the index. The capitals you leave (made with the Caps key) will continue to show up in the Index. (see also this article on the subject).
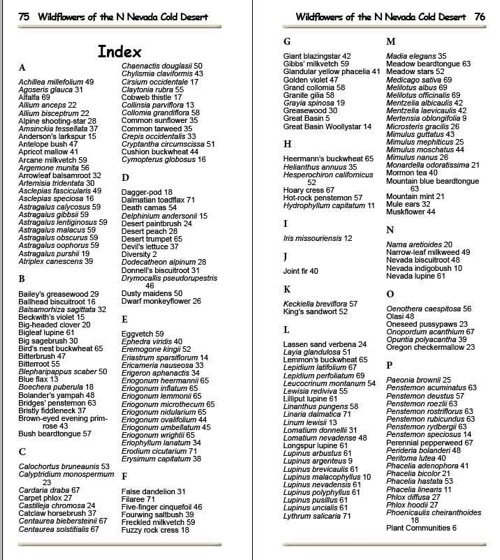
Here is my final index:

This article was last modified on December 21, 2021
This article was first published on May 8, 2012
Commenting is easier and faster when you're logged in!
Recommended for you

Turning Off Hanging Punctuation for Quotes in Middle of a Paragraph
The art director said "only hang quotes at the beginning of a paragraph"! This l...

IndexMatic<sup>3</sup> Review
The most powerful indexing solution for InDesign just got even better.

Styling Code Snippets with GREP Styles
I received an urgent plea for help from a designer in Romania who’d tracked me d...


