Force Color Images to CMYK with a 240% Ink Limit

So your printer our output provider (such as Lightning Source) says you have a 240% ink limit, eh? First of all, what does that mean? How can you have more than 100% ink? Well, if you place 100% cyan and 100% yellow in the same place, that green color is called 200% total ink. (It is also often called “total area coverage” or TAC.)
So a 240% TAC means there shouldn’t be any place on your page that has more than 240% total ink—which can happen pretty quickly in dark shadows where there is a lot of black ink.
Fortunately, it’s easy to test for this in InDesign, and it’s even pretty easy to avoid if you use the correct CMYK conversion methods.
Separations Preview and Ink Limits
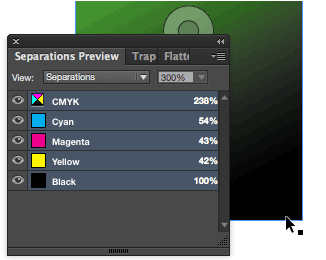
Claudia McCue wrote a terrific piece about InDesign’s Separations Preview panel in Issue 67 of InDesign Magazine, where she showed how you can use this panel both to view your color separations on screen and also find your total ink limit anywhere on the page. In a nutshell, if you open the panel (from the Window > Output menu), then set View to Separations, and then hover your cursor over a color on the page, you can see the total ink coverage really easily:

In this case, the cursor is over a black section of an image, and the total ink (look next to “CMYK”) is 238%.
This is great because it gives you real-time, accurate feedback about what CMYK colors are going to come out of InDesign, even if you place RGB images into InDesign. That is, if you have placed CMYK images, it’ll show you the real CMYK values; or, if you place RGB images, the panel will show you what values you’ll get if you convert to CMYK as part of the printing or pdf-exporting process. (More on that in a moment.)
Alternatively, you can set the View pop-up menu in the panel to Ink Limit, then set the total ink limit in the field in the upper-right corner of the panel. Here, I’ve set it to 240%, and all the areas that are under 240% show up in gray, and all the areas that are more than 240% total ink show up in red:

Now, if you’re paying attention, you’ll wonder why there is so much red in the second image, when the dark black I measured in the image above was clearly under 240%! In both cases, the image is an RGB image that I’ve placed into InDesign. But in the first screen shot, I told InDesign how I was planning on converting it to CMYK, and in the second screen shot I left it set to the default conversion.
That is, in the second image, InDesign assumed I was just going to use the default U.S. Web Coated SWOP v2 profile, which has a built-in max ink limit of 300%.
Making the Panel Use the Right CMYK
When you’re converting colors from RGB to CMYK with InDesign (or Photoshop, or anything else), you need to pick the right CMYK. If you just go with the defaults, you’ll get middle-of-the-road mediocre color most of the time. Or, your printer will yell at you because you didn’t convert correctly. So, back to the original question: How can you tell InDesign to use a 240% max ink limit in the conversion?
First, you need a profile with that limit. Here’s a simple one I created quickly with Photoshop. You can likely get better results by downloading one from color.org or VIGC or colormanagement.org. The best option would be you getting one from your printer! (Ask them for “an ICC color profile for your press.”)
After you get the profile you need to install it in the right place:
- Mac: Drag into [HD]/Library/ColorSync/Profiles/
- Windows: Right-click on profile and choose “Install Profile”
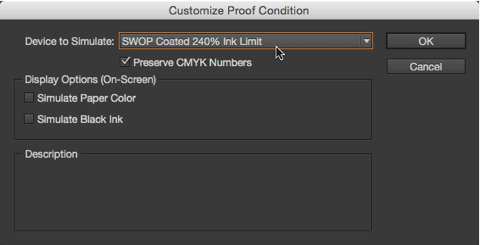
Okay, so now you have a profile that will limit all RGB-to-CMYK conversions to less than 240% ink. To tell InDesign’s Separations Panel to use that profile, choose View > Proof Setup > Custom, and then choose your new profile from the CMYK pop-up menu:

When you click OK, InDesign automatically turns on the View > Proof Colors feature. (But you can toggle that on and off manually, too.) When Proof Colors is on, InDesign is displaying your whole document as though you were in CMYK. You’ll often see bright RGB colors get muted or shift slightly (which should be expected in CMYK). Also, View > Overprint Preview will turn on automatically, and the current color view will be listed in the document title bar:

So now, when Proof Colors is turned on, the Separations Preview panel shows you real CMYK values — that is, the CMYK values you’ll get when you use that profile to convert your RGB images to CMYK. (See “How to Convert to CMYK When Exporting a PDF” in this article.)
Next time someone says to you, “I have to use Photoshop so that I can see my CMYK values,” you can explain that InDesign does it just as well. You just need to know where to look.
This article was last modified on July 8, 2021
This article was first published on December 17, 2014
Commenting is easier and faster when you're logged in!
Recommended for you

Creating a Flatplan in InDesign
How to use InDesign's Print function to create a file that you can then turn int...

Tip of the Week: Use RGB PDFs to Avoid Packaging Errors
This InDesign tip on using RGB PDFs to avoid packaging errors was sent to Tip of...

CreativePro Conversations: Centralizing the Proofing Process with PageProof
Learn how PageProof centralizes the proofing process—creating a more cohesive pr...


