
Five Lightroom 2 How-Tos

Photoshop Lightroom is an amazing application for anyone who needs to organize and tweak photos. If you haven’t yet tried Lightroom 2 (or even if you have upgraded), you may not be aware of all of its cool new features. Here are five of my favorites.
Apply a Graduated Filter
In traditional film photography, a graduated filter is a piece of glass that’s often gray on one end and fades to clear on the other end. The filter equalizes the brightness of the ground and sky in landscape shots. For years, Photoshop users have been duplicating the effect by layering an adjusted version of an image over the original, and then using a gradient layer mask to combine the two.
Lightroom 2’s new Graduated Filter tool does the same thing, but it applies non-destructive Camera Raw adjustments instead. Here’s how to do it:
1. Select a photo in the Filmstrip or Grid Layout and click Develop in the upper-right corner to go to the Develop module.
2. Select the Graduated Filter tool (“M” is the keyboard shortcut) and change the Camera Raw properties you wish to adjust using the controls just below the Histogram panel. There are seven properties you can adjust:
* Exposure
* Brightness
* Contrast
* Saturation
* Clarity
* Sharpness
* Color
The settings panel has a simple mode, which lets you adjust only one property, and an advanced panel that lets you adjust multiple properties and also save your adjustments as a preset. The toggle switch to change modes is beside the Effect drop-down menu.
3. Once you’ve set up your property adjustments, click with the Graduated Filter tool where you want the adjustments to begin, drag to the point where you want them to end and release. Hold the Shift key to drag horizontally or vertically.
Figure 1. I applied a graduated filter that darkens and colors the sky—see the controls in the tool panel at right. Click the image for a larger view.

4. A pin on the photo indicates where you applied the graduated filter. You can select this pin and make further adjustments with the settings panel, or hover near the pin while it’s selected to rotate the graduated filter. You can also click and drag the edges of the graduated filter to extend its length. Note that Lightroom always keeps the pin equidistant to the filter edges, so dragging an edge also moves the pin.
Make Advanced Adjustment Brush Presets
The single most exciting new feature in Lightroom 2 is the Adjustment Brush. The ability to apply Camera Raw adjustments with a brush radically expands Lightroom’s abilities. And because the Adjustment Brush auto-detects what to adjust with the Auto Mask feature, it’s easy to use.
Here’s how to create your own Adjustment Brush presets:
1. Select a photo in the Filmstrip or Grid Layout and click Develop in the upper-right corner to go to the Develop module.
2. Select the Adjustment Brush tool (“K” is the keyboard shortcut) and click the Effect drop-down menu. You’ll see the seven Camera Raw properties (Exposure, Brightness, Contrast, Saturation, Clarity, Sharpness, and Color) and Soften Skin, the only preset that ships with Lightroom 2. The Soften Skin preset modifies both clarity and sharpness. You can modify multiple properties only in the panel’s advanced mode; click the toggle switch to access the advanced controls.
Figure 2. The Effect drop-down menu. Note that I’ve saved the Blue Sky adjustments from the Graduated Filter how-to above.

3. Select a property in the Effect drop-down menu and/or change an adjustment with the plus or minus buttons, then select Save Current Settings as New Preset… in the Effect drop-down menu.
4. To rename or delete a preset, select it in the Effect drop-down menu and then open the Effect drop-down menu again and these options will appear.
These presets are also available when you’re using the Graduated Filter tool.
Build Your Own Picture Package
Do you remember being a kid and getting an envelope with your annual school portrait? The photos were in several sizes and were tiled on two or three full sheets of paper. They’re called “picture packages,” and they’re useful for printing batches of portraits at various sizes.
Photoshop has had a picture package feature for years, with a variety of templates and a simple interface for creating your own. Lightroom 1’s Print module focused on contact sheets and grid layouts that didn’t allow for the multiple sizes needed for traditional picture packages. Lightroom 2 addresses this need with a new Picture Package layout engine that lets you design and print your own picture packages. The application ships with three standard templates, but you can create your own.
1. Select a photo or photos in the Filmstrip or Grid Layout. Click Print in the upper-right corner to go to the Print module.
2. In the new Layout Engine panel, click on Picture Package. The page layout will appear with grid lines and a standard template layout.
Figure 3. The Picture Package engine interface. The panels at right help you create and customize your layouts. Click on the image for a larger view.
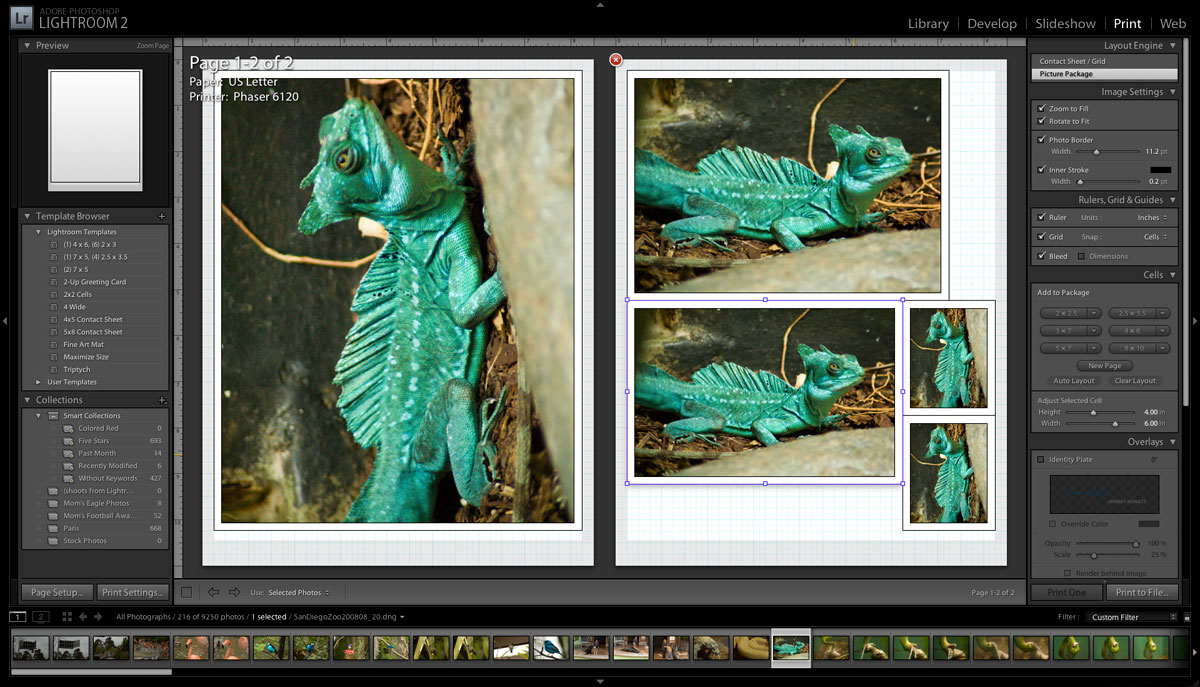
Many panel settings in the Picture Package layout engine differ from those in the Contact Sheet/Grid layout engine:
* You can’t select whether pictures will repeat on each page. Picture packages don’t allow including different photos on a single page.
* Stroke Border has been replaced with Photo Border, which is the white space between trimlines and the photo, and Inner Stroke, which is comparable to the stroke border.
* The Layout panel is replaced by the Cells panel and Rulers, Grid & Guides panel.
* You have the option to print cut guides, either as lines or as crop marks.
3. The new Cells panel is where all the customization happens. Here you can add standard-size photo cells to your layout, create your own cell sizes, add pages, optimize your layout space, clear the cells from your layout and adjust cell sizes already on the page. If photos are already on the layout, click Clear Layout in the Cells panel to remove them.
4. Click the buttons below Add to Package to add the cells to your layout. Lightroom will create a new page if it can’t fit a cell onto the current page.
5. You can also click the drop-down menu next to any button to add a different cell to the page or select Edit… to make your own cell size. As you add cells, notice that the cells behave like elements in other Adobe applications: Anchor points allow you to resize cells, and you can Option-drag cells to duplicate them. Right-click a cell to rotate or delete it. You can also adjust a cell’s height and width from the Cells panel. You can’t select multiple cells.
6. Try overlapping cells. It may not seem useful, but clicking the Auto Layout button and Lightroom will organize all the cells to optimize space. This includes removing whole pages if possible.
7. Want to delete a page? Hover over any page in the layout and a small “X” in a red circle appears momentarily on its upper-left corner. Click that X to delete the page.
8. Once you’ve perfected your picture package layout, click the plus sign in the Template Browser panel to save it to your user templates.
Create Collections for Slideshow, Prints, and Web Galleries
Lightroom has let you group images into Collections since its inception. In version 2, Collections can be manually created or can be Smart Collections that dynamically store photos based on user settings. Lightroom 2 can also create collections tied to the Slideshow, Print or Web modules. The collections aren’t even called “collections”: they’re Slideshows, Prints, or Web Galleries.
Here’s how you create them:
1. Select a photo or photos in the Filmstrip or Grid Layout and click Slideshow, Print, or Web in the upper-right corner to go to the selected module.
It doesn’t matter how many photos are selected at this point, or what settings you’ve used in the module—you can change them later, which is what makes this technique versatile.
2. Click the plus sign in the Collections panel to access the drop-down menu. You can select “Create Collection Set…” to create a standard collection but depending on the module you selected you’ll also have the option to “Create Print…”, “Create Slideshow…” or “Create Web Gallery.” A dialog box will appear to let you name the collection and place it in a collection set. If you selected photos before this step, you’ll also have the option to keep your images with this collection and create virtual copies.
Figure 4. When in the Slideshow module, you’ll have the option to create a Slideshow in the Collections panel.

These collections sport different icons than standard collections so they’re easy to spot. You can add or remove images to a slideshow, print, or web gallery collection but it will retain its slideshow, print, or web gallery layout and settings. You can also revise the layout or settings as needed.
Figure 5. Note the unique icons for slideshows, prints, and web galleries.

Go to page 2 for the final how-to, “Convert a Photo to a Watercolor.”
This article was last modified on January 5, 2023
This article was first published on November 13, 2008
Commenting is easier and faster when you're logged in!

Recommended for you
Meet the Neo SmartPen: A New Way to Draw
As an artist who specializes in combining traditional and digital tools, I’m alw...
Make a Grungy Logo in Photoshop
If you’re a seasoned Photoshop user, this little tutorial might not be for...

How to Create Seamless Textures in Photoshop
Learn the simple solution for making any texture seamless.