

It’s long been a feature request for InDesign that you be able to create grayscale output from the application. That desire has now been fulfilled in InDesign CS6. You can now export PDF in grayscale from InDesign?provided you can find the feature.
Before InDesign CS6, you have had to export a PDF file, then use Acrobat 9 Pro or Acrobat X Pro to do the conversion to grayscale. For example, Keith Gilbert described how to do that in a blog post.
Here’s where to find this somewhat hidden feature in InDesign CS6:
1. Choose File > Export > Adobe PDF (Print).
2. Select the correct the correct PDF preset. All of them will work except PDF/X-1a, but PDF/X-3 and PDF/X-4 will display the grayscale profile you’re using in Acrobat’s Output Preview, as we describe below.
3. Select the Output panel, then choose Convert to Destination from the Color Conversion menu.
4. In the Destination menu, scroll all the way to the bottom. Choose one of these grayscale profiles (they don’t say grayscale, you have to know that!) Then click Export to create a PDF file.

Gray Profiles
TIP: Choose Dot Gain 15% (I’ll tell you why below).
5. Open the PDF you created in Acrobat. You’ve got a grayscale copy of your document.
6. (Optional) Open the Output Preview panel. In Acrobat X Pro, choose Tools > Print Production > Output Preview. In Acrobat 9 Pro, choose Advanced > Print Production > Output Preview to view the document. If you’ve chosen PDF/X-3 or PDF/X-4, Acrobat recognizes the output intent (the grayscale profile) you’ve chosen and it will display this at the top. (PDF/X-1a only supports CMYK output profiles.)
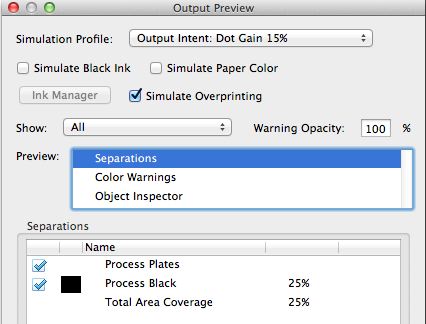
Acrobat’s Output Preview
If you select another PDF preset like High Quality Print or Press Quality, there is no information in the PDF to indicate the output intent so it will appear that there are CMYK separations. Never fear! All of the information is only on the Process Black plate, which you can observe if you move your cursor around the PDF.
Why did I suggest choosing Dot Gain 15%? That’s because that is the same setting which Acrobat uses by default when converting your RGB, CMYK or spot colors into grayscale using the method that Keith Gilbert described in his blog.
Additional Tip: You can preview your document in grayscale in InDesign. Choose View > Proof Setup > Custom. In the Customize Proof Condition, from the Device to Simulate menu, select the same grayscale profile.
Caveat: If you have tints or photographs which are already in grayscale, their color values will change somewhat. How much and in what direction depends on the profile you choose. You can create a set of grayscale tints to test this. However, this is how Acrobat converts to grayscale as well, and I haven’t really heard many complaints.
UPDATE: After doing some more research, I found out that if you place Photoshop images which have a grayscale profile (e.g., Gray Gamma 2.2, Dot Gain 20%, etc.), gray values are preserved when placed into InDesign and when exported to grayscale. I also found out that Acrobat using Preflight or Convert Colors does the same thing.
This article was last modified on September 17, 2022
This article was first published on May 17, 2012
Commenting is easier and faster when you're logged in!

Recommended for you

InDesign Poll Results: Which tool(s) should be removed from the toolbar?
Hey folks, it’s time to review the results of our latest InDesign pol...

Extensis Awarded Patent for Innovative Font Identification Technology
Extensis, a brand of Celartem, Inc., today announced that it has been awarded a...
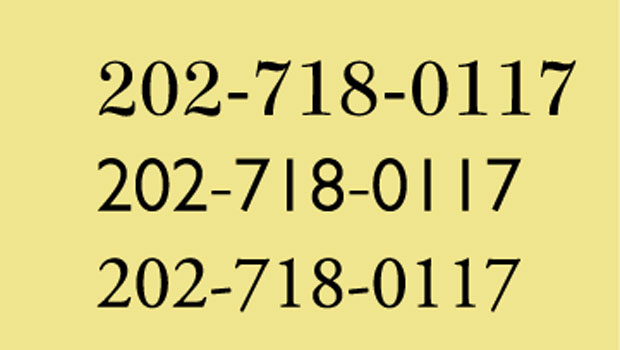
TypeTalk: Setting Phone Numbers
TypeTalk is a regular blog on typography. Post your questions and comments by cl...